
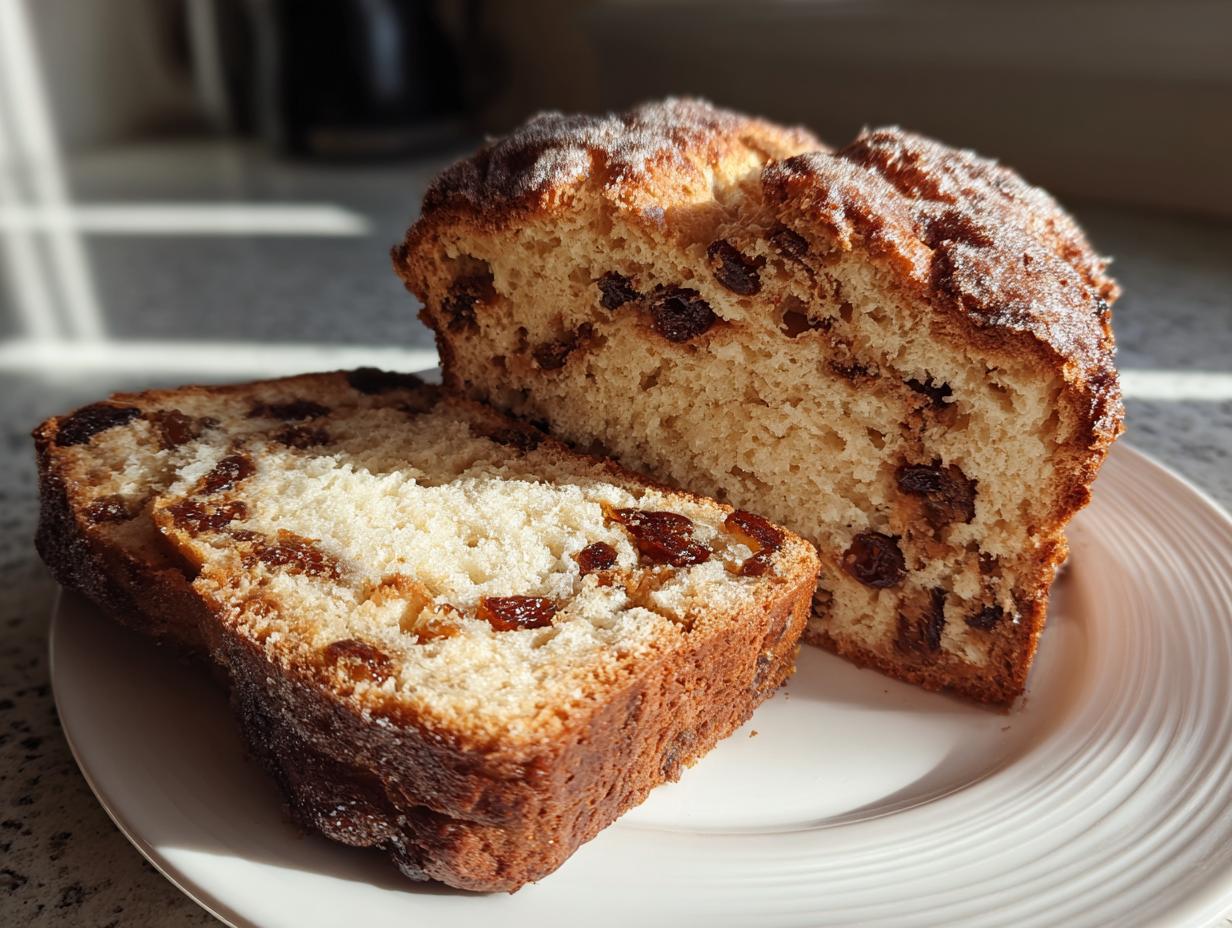
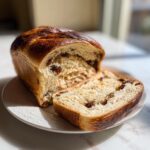
If you want to know the real language of comfort, just wait until you slide this loaf out of the oven. That initial wave of warm, sweet, yeasty aroma hitting you? That’s the sound of victory in the kitchen. I’m not handing you some fussy, intimidating recipe here. This soft homemade **raisin bread**—the kind with that gorgeous, clean cinnamon swirl—is my way of translating exactly how the pros get that unbelievably tender crumb right on your home counter. Forget the guesswork; we’re making amazing **raisin bread** from scratch, and you’re going to feel like a pro doing it. If you ever feel like tackling the dough without the kneading hassle, check out my guide on how to bake easy yeast bread later! Stop buying the plastic-wrapped stuff!
- Why This Homemade Raisin Bread Recipe Works (The Kitchen Slang Translation)
- Ingredients for the Best Cinnamon Raisin Bread
- How to Prepare Your Fluffy Raisin Bread
- Ingredient Notes and Tips for Perfect Raisin Bread
- Storage and Reheating Instructions for Homemade Raisin Bread Recipe
- Troubleshooting Common Issues When Making Raisin Bread
- Frequently Asked Questions About Soft Sweet Bread Recipes
- Estimated Nutritional Data for This Breakfast Loaf Recipe
- Share Your Warm Comforting Baked Goods Experience
Why This Homemade Raisin Bread Recipe Works (The Kitchen Slang Translation)
Look, anyone can dump ingredients in a bowl, but to get that bakery-quality result? You need to know the ‘why.’ That’s my job here—translating the line cook moves into kitchen confidence for you. This isn’t just about following directions; it’s about understanding why this specific **raisin bread** sings. You want to see how easy yeast dough can be? If you want to skip the kneading entirely on a different recipe, check out my tips on easy homemade pita bread.
We aren’t aiming for airy slices; we want that satisfying, sliceable, tender hug of a loaf. Trust me, learning these small chef secrets is what makes the difference between good bread and bread people ask you to bring to every single gathering.
Achieving the Tender Crumb in Your Raisin Bread
Want that unbelievably soft interior? It comes down to temperature control. We use melted butter, which coats the flour differently than softened butter, resulting in a richer, less structured dough. Plus, make sure your egg is room temperature! Cold eggs cause the melted butter and milk to seize up a little, inhibiting that silky smooth texture we want. It’s this attention to detail that delivers that legendary tender crumb bread every time.
Mastering the Cinnamon Swirl Bread Technique
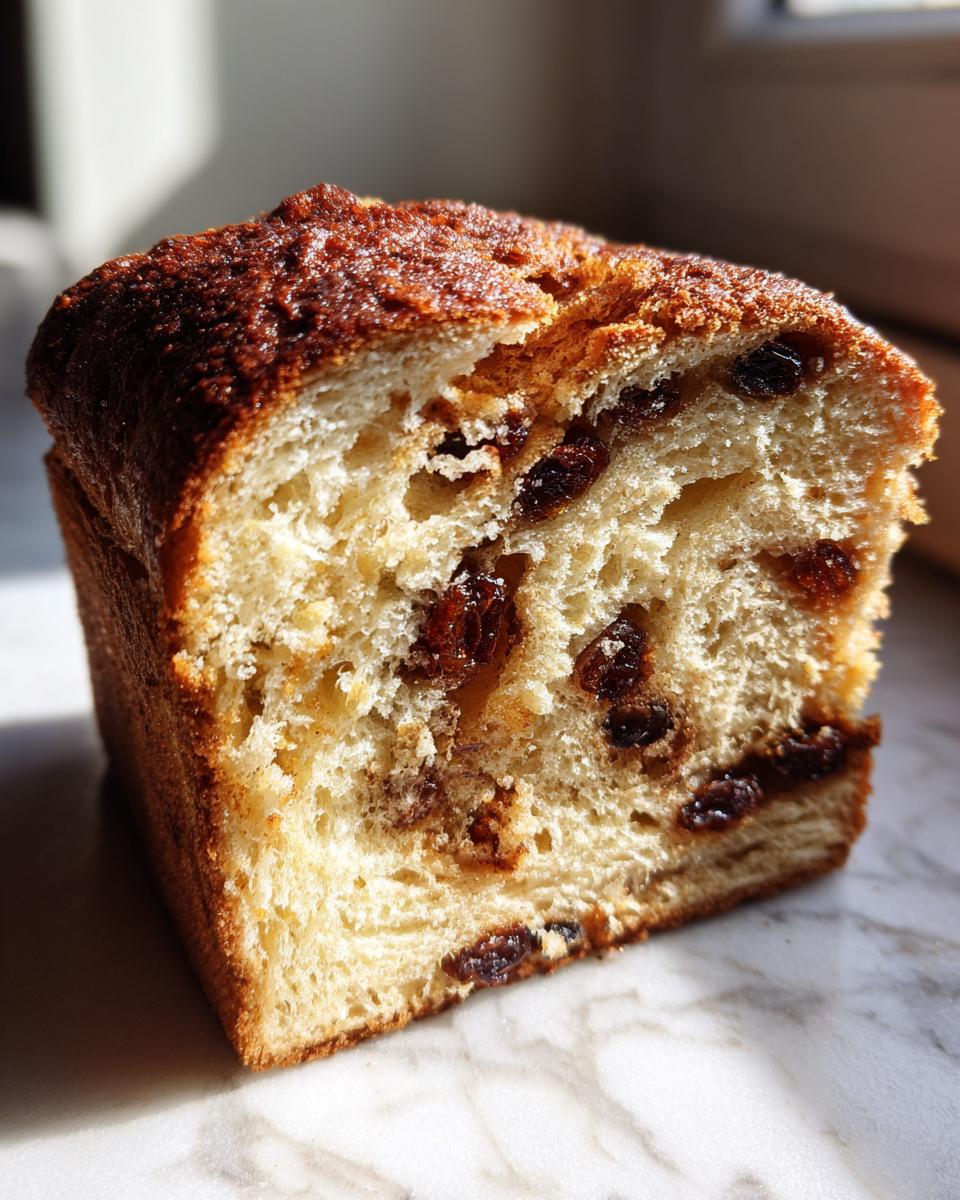
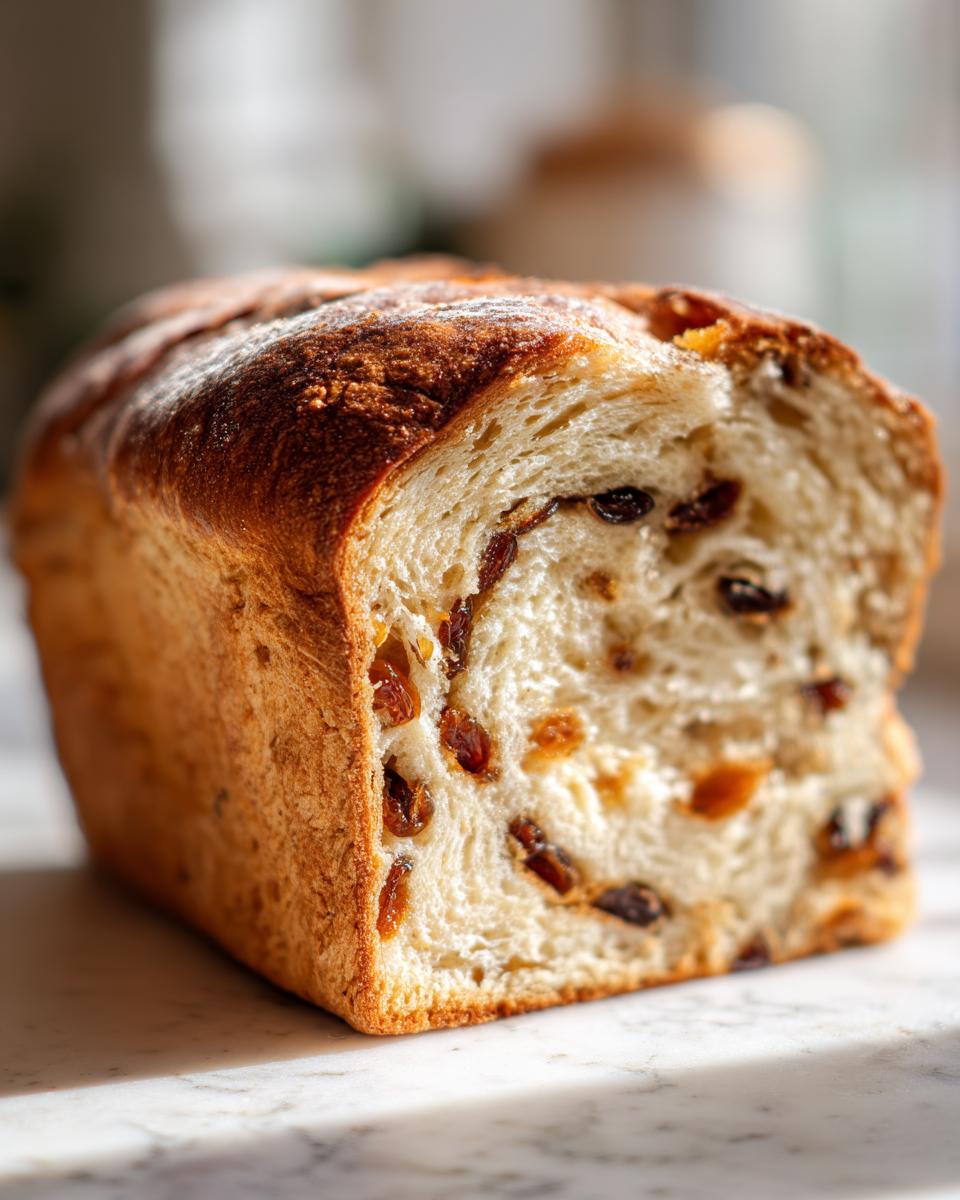
The swirl is everything! If you just sprinkle your cinnamon sugar mix onto bare dough, it often falls out the seam or just mixes into the dough overall. The trick? We brush on a thin layer of softened butter first. That butter acts like glue, holding the cinnamon-sugar mixture tight against the dough while you roll it up. This ensures you get those beautiful, visible rings of spice when you slice into your cinnamon swirl bread. It’s a non-negotiable step for maximum visual impact and flavor pockets!
Ingredients for the Best Cinnamon Raisin Bread
Okay, let’s talk gear. The ingredient list for this **raisin bread** looks simple, but paying attention to the temperature and consistency of what you’re pulling off the counter is key. Seriously, don’t skip checking the temperature on that milk, or your yeast will sulk! If you’re ever looking for an even easier, slightly different sweet bake, I have an amazing cinnamon roll casserole that uses a slightly different base, but the same enthusiasm!
Here is exactly what you need to pull off this loaf:
- 1 cup warm milk (And I mean warm, around 110°F. Too hot and you kill the yeast, too cold and they just take a nap!)
- 2 1/4 teaspoons active dry yeast
- 1/4 cup granulated sugar
- 1 large egg, make sure this is room temperature!
- 1/4 cup unsalted butter, melted (but not hot!)
- 1 teaspoon salt
- 3 1/2 cups all-purpose flour, plus more for dusting when you get messy—and you will get messy.
And for the star of the show, the filling:
- 1 cup raisins (Remember, we’re soaking these first!)
- 1/2 cup packed light brown sugar (This gives that deep molasses flavor that white sugar just can’t touch.)
- 2 tablespoons ground cinnamon (Use the good stuff—the stuff that makes your whole kitchen smell like a bakery.)
- 2 tablespoons softened unsalted butter (This must be soft enough to spread easily, but not oily.)
How to Prepare Your Fluffy Raisin Bread
Alright, this is where the magic happens, and I promise you, it’s less work than you think. We’re going to walk through this bread shaping like we’re doing it side-by-side. Forget stiff, complicated baking jargon; we’re making a beautifully soft, swirl-filled loaf of **raisin bread** today.
Activating Yeast and Mixing the Raisin Bread Dough
First thing’s first: waking up those little yeast guys! You need your milk warm—think bathwater temperature, not hot tub. Mix the yeast in and wait five minutes. If it gets foamy on top? That’s the cue we chefs look for—it means your yeast is alive and ready to party. Once you confirm the foam, stir in the sugar, egg, melted butter, and salt. Then, start incorporating that flour slowly. You’ll mix just until it looks shaggy and sticky—don’t try to make it perfect in the bowl, or you’ll overwork it later.
Kneading and the First Rise for Your Sweet Yeasted Bread
Now we engage the muscles! Turn that shaggy mess out onto a lightly floured surface. You’re going to knead this dough for a solid 6 to 8 minutes. You’re looking for elasticity—it should spring back lightly when you poke it. Once it feels smooth, pop it into an oiled bowl, cover it up, and stick it somewhere warm. This first rise is crucial for structure; it needs to double in size, which usually takes about an hour to an hour and a half. Patience is key for this sweet yeasted bread!
Shaping for Maximum Cinnamon Swirl in Your Raisin Bread
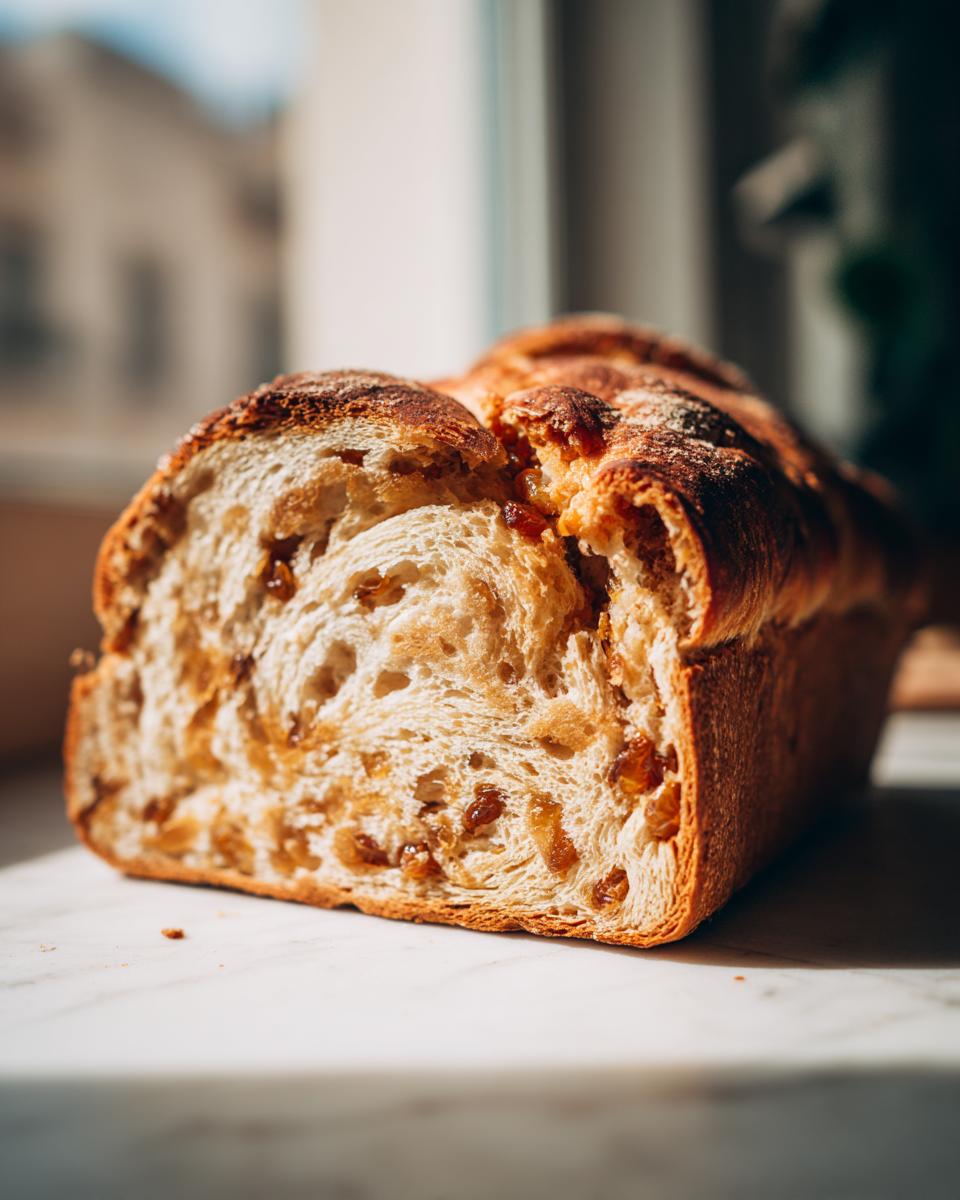
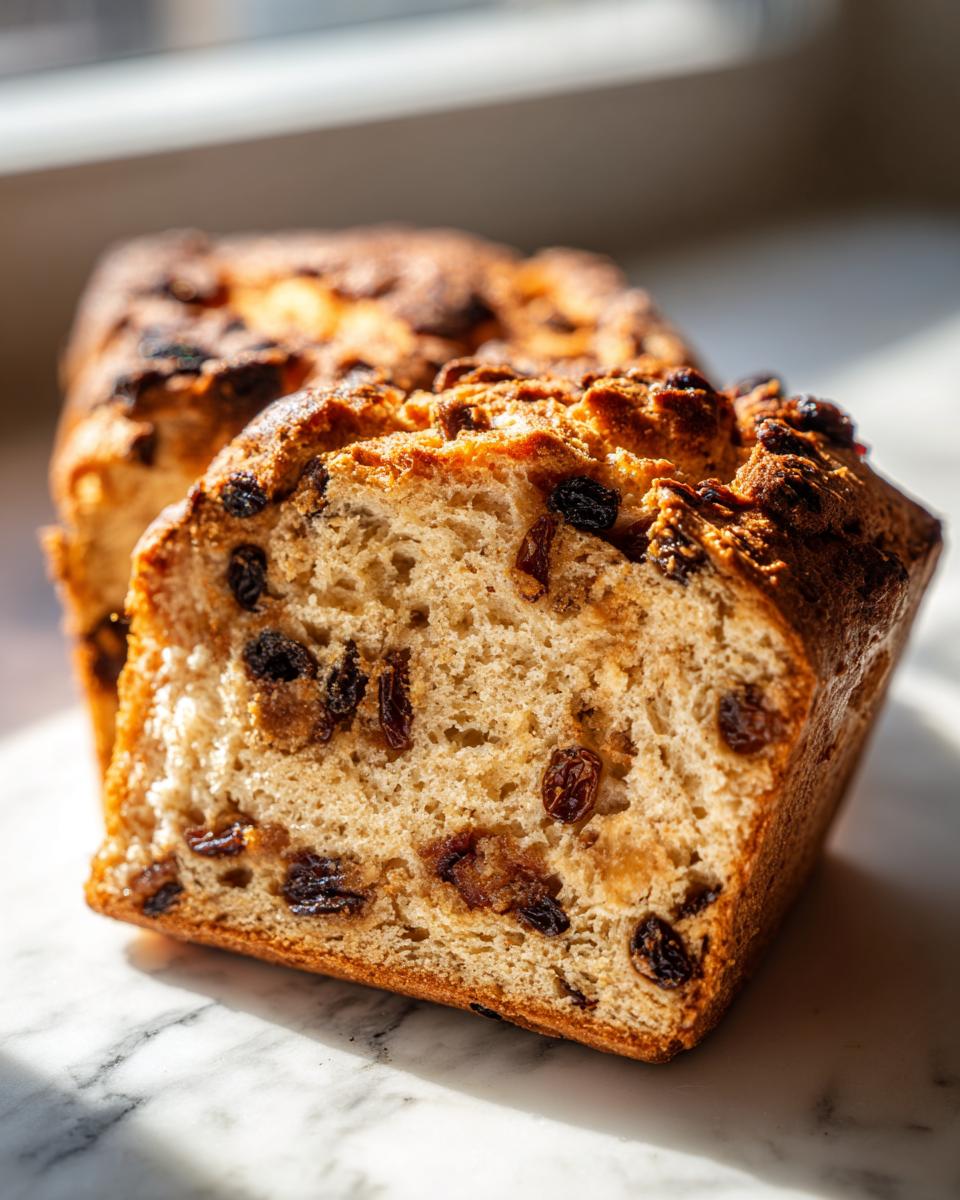
Once it’s doubled, punch it down gently—oof, that satisfying sound! Roll that dough out into a big rectangle, roughly 18 by 12 inches. Now, grab that softened butter we reserved and brush every single inch of that surface. Seriously, don’t miss the edges! Then, evenly sprinkle your cinnamon and brown sugar mix over the butter. Starting from the long side, roll it up TIGHTLY into a log, making sure you pinch that final seam closed like your life depends on it. That tight rolling is what gives you that gorgeous definition in your artisan raisin bread.
Second Rise and Baking the Aromatic Homemade Bread
Place that log, seam-side down, into your greased 9×5 loaf pan. Here’s the second test of patience: let it rest again for 30 to 45 minutes until it crowns about an inch over the rim. Don’t let it rise too long, or it might collapse in the oven! Preheat your oven to 375°F (190°C). Bake for 30 to 35 minutes. You want it deeply golden brown. As soon as it’s done, get it out of the pan and onto a rack so the bottom doesn’t get soggy. That glorious smell means you’ve made incredible aromatic homemade bread!
Ingredient Notes and Tips for Perfect Raisin Bread
I always tell people that baking bread isn’t magic; it’s just knowing the right sequence of events. If you ignore the prep work on the ingredients, you mess up the final structure of your **raisin bread**. That’s the insider knowledge I want to pass on. Before we even get to the mixing bowl, we need to talk seriously about those little dried gems. If you’re looking for other easy side recipes, I’ve got a great one for easy dumpling sauce if you ever need a savory fix!
Plumping Raisins: A Simple Trick for Baking with Raisins
Don’t just toss those shriveled raisins straight into the batter—that’s amateur hour! They need to be plumped first. I soak mine just until they start looking full again, maybe 10 minutes in some really hot water. Here’s the secret step the pros always enforce: You absolutely MUST drain them thoroughly and then pat them completely dry with a paper towel before they even think about touching the dough. Why? If they are wet when you add them, they leach that moisture into your dough while it rises, which messes up the structure and can lead to a gummy pocket right where the sweetness should be exploding. It’s all about controlled moisture when successfully baking with raisins.
Variations on Your Breakfast Loaf Recipe
This recipe is foundational, meaning you can totally riff on it! The milk and yeast base supports just about anything you want to throw into the swirl layer. If you love nuts—and who doesn’t?—tossing in a half cup of roughly chopped walnuts or pecans along with the cinnamon sugar makes this an absolutely killer loaf. Walnuts pair so beautifully with that warm spice. Another easy tweak that changes the flavor profile entirely is swapping the raisins out for dried cranberries. It gives the loaf a slightly more tart edge, turning it into a fantastic year-round treat, not just a holiday bake for your raisin bread.
Storage and Reheating Instructions for Homemade Raisin Bread Recipe
It’s tempting, I know. The moment this loaf comes off the rack, you want to attack it with a serrated knife, but hold your horses! I have to translate this crucial chef secret: never slice yeast bread when it’s piping hot. Seriously, don’t do it! When you cut into it fresh out of the oven, all that lovely steam escapes instantly, and you’re left with a gummy, slightly sticky interior no matter how perfectly you baked it. Let it cool completely on a wire rack—at least an hour, maybe two. This resting period lets the starches set properly, guaranteeing that wonderful, fluffy texture and a clean slice for your homemade raisin bread recipe.
Now, how to store that gorgeous creation? If you plan on eating the entire loaf within two days (which, honestly, is usually my goal), just wrap it tightly in plastic wrap or aluminum foil once it’s fully cool. Store it on the counter. That moisture barrier keeps it soft for at least 48 hours.
If you made two loaves (because you’re smart like that), freezing is your best friend. Wrap individual slices tightly—use plastic wrap first, then maybe a layer of foil—and pop them in the freezer. They last great for up to three months!
When you’re ready for a taste of home, reheating is simple but makes a huge difference. If you’re just warming up a slice, a quick 30 seconds in the microwave works wonders to bring back the softness. But for the absolute best experience, I recommend toasting those slices up! That slight crispness on the exterior paired with warm, soft bread inside? Pure heaven. For other easy, moist bakery favorites, check out my guide on the easy moist apple bread recipe!
Troubleshooting Common Issues When Making Raisin Bread
Every time I teach this loaf, someone inevitably sends me a frantic message: ‘My dough won’t double!’ or ‘My beautiful swirl sunk!’ Don’t worry about it for one second. This is where my time working the line comes in handy. When something looks wrong in bread making, there’s almost always a simple temperature or timing error. It’s not that you’re a bad baker; it’s that the recipe didn’t translate the visual cues clearly enough! We’re going to decode the most common issues so you can proceed with total confidence.
If you’re looking for a simpler bake next time that avoids all yeast drama, you absolutely have to try my little easy breakfast cookie recipe—it’s almost foolproof!
Here are the main things that trip people up when making this delicious **raisin bread**:
My Dough Isn’t Rising: The Yeast Temperature Check
If your dough is stubbornly flat after an hour and a half, the culprit is usually the milk temperature when you killed the yeast. Remember I said warm, around 110°F? If that milk was closer to 130°F, you essentially brewed yourself a cup of dead yeast. They simply won’t activate or produce the gas needed for the rise. If your dough hasn’t even started bubbling after 10 minutes in the first proofing stage, you need to start that step over with freshly warmed milk. Don’t try to throw the dough in a warmer spot and wait forever; time won’t fix dead yeast!
The Loaf Collapsed During Baking or After Cooling
This is usually one of two things: either you overworked the dough (which stresses out the gluten structure) or, much more commonly, you over-proofed it during the second rise. Over-proofing means the dough got too inflated before it hit the heat. When that happens, the structure can’t hold up in the oven, and it collapses in the middle. When the dough crowns above the pan, it’s ready to bake *now*. Don’t wander off to check email! Also, if your oven wasn’t hot enough when you baked it—way under 350°F—it won’t set the crust fast enough, leading to a pancake effect.
The Cinnamon Layer Leaked Out the Ends
Did you see that tight seam I demanded you pinch shut? That’s your insurance policy against leakage! But sometimes, even with a tight seam, the filling escapes if you didn’t butter the dough surface properly before adding the cinnamon sugar. If the cinnamon dry mix touches the bare dough, it absorbs moisture from the dough, slides around, and pushes its way out the weakest point—usually the ends—during the final rise or baking. Make sure that butter layer is thin but complete from edge-to-edge! This guarantees a beautiful, contained swirl when you slice that lovely **raisin bread** later.
Frequently Asked Questions About Soft Sweet Bread Recipes
I get so many messages asking for variations or how to troubleshoot little hiccups. I love it! It means you’re out there baking, and that’s what Kitchen Slang is all about—turning confusion into confidence. We’re diving into the details now. If you’re looking for other cozy ideas, my coffee cake muffins are another easy way to get that comforting, sweet vibe without fuss!
Can I make this a no knead raisin bread?
Absolutely, you can! That’s one of the best parts about working with enriched doughs like this. If you want to skip the 6-to-8-minute knead, you just need to substitute in time. After you mix everything until it’s shaggy (Step 2), skip the kneading step and just let it sit, covered, for a much longer first rise—think 3 to 4 hours instead of 90 minutes, or even overnight in the fridge! You might need to add just a tiny splash of extra milk, maybe a tablespoon, because you aren’t mechanically developing the gluten. You are relying totally on enzyme activity. Keep that yeast happy, and you’ll get a soft, fluffy loaf, making this a fantastic no knead raisin bread!
What is the best way to use leftover raisin bread for toast?
Leftover? I’m not sure I know that concept when it comes to this bread! But assuming you have some slices remaining, toasting is mandatory. Store-bought slices can get dry when toasted, but because this is one of my favorite soft sweet bread recipes, it toasts up beautifully. Here’s the pro move instead of just throwing it in the toaster: Slice it thick, brush both sides lightly with softened butter, and then toast it in a skillet over medium heat until golden brown on both sides. It reheats the interior just enough to make the raisins soft again while giving you that perfect crisp exterior. That’s the ultimate way to enjoy your raisin bread for toast.
Estimated Nutritional Data for This Breakfast Loaf Recipe
Look, I’m a baker, not a nutritionist! I can tell you exactly how to get the best swirl and the softest crumb, but when it comes to exact macros, we have to translate that information too. This data below is an estimate based on my standard ingredient breakdown for this **raisin bread**. These numbers can shift depending on the exact brand of flour or how much butter soaks into the pan during baking. So take this as a guideline for your easy chili recipe planning, not a strict scientific measurement, okay? Eat the bread, enjoy the comfort!
Data is based on one slice of the full loaf:
- Serving Size: 1 slice
- Calories: 220
- Sugar: 10g
- Sodium: 250mg
- Fat: 5g
- Saturated Fat: 3g
- Trans Fat: 0g
- Carbohydrates: 40g
- Fiber: 2g
- Protein: 5g
- Cholesterol: 25mg
Share Your Warm Comforting Baked Goods Experience
So, that’s the whole translation—the science and the intuition behind the best soft homemade loaf you’ll ever pull out of your own oven. I really, truly hope you get that perfect cinnamon swirl! Showing up for yourself in the kitchen like this is what it’s all about, right? It’s about creating those tangible moments of joy.
Now that you’ve baked this loaf, I desperately want to know how it went! Did you nail the second rise? Are your slices the envy of the neighborhood? Head down to the comments section below and tell me everything. Rate this recipe, tell me your favorite way to eat it—slathered in butter, toasted for breakfast, or snatched cold right off the rack.
And if you shared this experience on social media, tag me! There’s nothing better than seeing your beautiful results and those stunning rings of spice in your kitchen. Let’s flood the internet with delicious, homemade **warm comforting baked goods**! Seriously, don’t forget to leave a rating; it helps other home cooks find this translation, too. If you’re feeling ambitious after conquering this bread, you should absolutely check out my guide on making easy garlic naan bread next week!
PrintSoft Homemade Cinnamon Raisin Bread
Bake a soft, sliceable loaf of homemade cinnamon raisin bread with a clear cinnamon-sugar swirl. This recipe translates professional shaping techniques into simple steps for a tender crumb.
- Prep Time: 30 min
- Cook Time: 35 min
- Total Time: 2 hr 40 min
- Yield: 1 loaf 1x
- Category: Breakfast
- Method: Baking
- Cuisine: American
- Diet: Vegetarian
Ingredients
- 1 cup warm milk (about 110°F)
- 2 1/4 teaspoons active dry yeast
- 1/4 cup granulated sugar
- 1 large egg, room temperature
- 1/4 cup unsalted butter, melted
- 1 teaspoon salt
- 3 1/2 cups all-purpose flour, plus more for dusting
- 1 cup raisins, plumped
- 1/2 cup packed light brown sugar
- 2 tablespoons ground cinnamon
- 2 tablespoons softened unsalted butter
Instructions
- Activate the yeast: In a large bowl, combine the warm milk and yeast. Let it sit for 5 minutes until foamy.
- Mix the dough: Add the granulated sugar, egg, melted butter, and salt to the yeast mixture. Stir to combine. Gradually add the flour, mixing until a shaggy dough forms.
- Knead the dough: Turn the dough out onto a lightly floured surface. Knead for 6 to 8 minutes until the dough is smooth and elastic. If using a stand mixer, use the dough hook for 5 minutes.
- First rise: Place the dough in a lightly oiled bowl, turning to coat. Cover the bowl with plastic wrap and let it rise in a warm place for 1 to 1.5 hours, or until doubled in size.
- Prepare the filling: While the dough rises, mix the brown sugar and cinnamon in a small bowl. Set aside.
- Shape the loaf: Gently punch down the risen dough. Turn it out onto a lightly floured surface and roll it into a large rectangle, about 18 by 12 inches.
- Create the swirl: Brush the surface of the dough evenly with the 2 tablespoons of softened butter. Sprinkle the cinnamon-sugar mixture evenly over the buttered surface.
- Roll and seal: Starting from the long edge, tightly roll the dough into a log. Pinch the seam closed firmly.
- Second rise: Place the log seam-side down into a greased 9×5 inch loaf pan. Cover loosely and let it rise again in a warm spot for 30 to 45 minutes, or until the dough has crowned about 1 inch over the edge of the pan.
- Preheat and bake: Preheat your oven to 375°F (190°C). Bake for 30 to 35 minutes, or until the top is golden brown and the internal temperature reaches 200°F (93°C).
- Cool: Remove the bread from the pan immediately and let it cool completely on a wire rack before slicing for the best texture.
Notes
- To plump the raisins, soak them in hot water for 10 minutes, then drain and pat them completely dry before adding them to the dough.
- For a bakery-style crust, brush the top of the loaf with a little melted butter immediately after it comes out of the oven.
- This bread is excellent toasted with butter for breakfast or as a snack.
Nutrition
- Serving Size: 1 slice
- Calories: 220
- Sugar: 10
- Sodium: 250
- Fat: 5
- Saturated Fat: 3
- Unsaturated Fat: 2
- Trans Fat: 0
- Carbohydrates: 40
- Fiber: 2
- Protein: 5
- Cholesterol: 25