
Look, I get it. You want that shatteringly crisp crust and that chewy, open interior—the kind of loaf you’d fight someone for at the farmer’s market. But you don’t want the fussy kneading, the complicated folding schedules, or ingredients you need a culinary degree to pronounce. You want real, spectacular, artisan bread without the commitment. That’s exactly what I’m here to translate for you. My time working in those chaotic bistro kitchens taught me that the best results often come from techniques that look like cheating but are actually pure science. I’m Zoe, and I take those professional secrets—the shortcuts that build incredible flavor and structure with almost zero effort—and I turn them into language you can use right on your own countertop. This Dutch Oven No Knead recipe, boosted with savory Parmesan and herbs, is the ultimate proof that bakery-style bread is finally yours for the keeping.
- Why This Dutch Oven No Knead Artisan Bread Recipe Works for Beginners
- Gathering Simple Ingredients for Your Savory Artisan Bread
- Mastering the No Knead Artisan Bread Techniques
- Tips for Achieving a Bakery Style Loaf Every Time
- Serving Suggestions for Your Homemade Loaf
- Storage and Reheating Instructions for Artisan Bread
- Frequently Asked Questions About Artisan Bread Recipe
- Estimated Nutritional Data for This Artisan Bread
- Share Your Bakery Style Loaf Experience
Why This Dutch Oven No Knead Artisan Bread Recipe Works for Beginners
If you’ve ever felt intimidated by rustic bread making, this is your redemption story. Seriously. The primary reason this method delivers such a phenomenal bakery style loaf is because we skip the hard part: the kneading! When you mix the flour, water, and yeast, you’re actually just hydrating the dough. The magic happens while you—and your sink—do nothing. That long, slow rest time, often 12 to 18 hours, develops all the complex flavor and structure you’d normally bust your biceps achieving through kneading. Trust me, watching that shaggy mess turn into a bubbly mound of possibility is the best part of this whole process.
This particular No Knead Bread is fantastic because it leans on physics, not skill. We use the cast iron Dutch oven as a personal steam generator. That trapped heat and moisture is the secret weapon for that hard, shatteringly crisp crust we all crave. It’s the easiest form of easy artisan baking you’ll ever try. You can see how we approach yeast breads a little differently over here in this other easy loaf recipe, but this savory version takes the cake!
Remember, when it comes to building that incredible crust, preheating that heavy pot is non-negotiable. It’s the foundation for a perfect bake, and sites like Paisley Recipes agree that this technique is a game-changer for crusty homemade bread.
Gathering Simple Ingredients for Your Savory Artisan Bread
Okay, here’s the beautiful part about this artisan bread recipe: it really only relies on the essentials, which keeps it firmly in the realm of simple ingredients bread. When you break it down, it’s flour, water, salt, and yeast. But we’re adding some superstars to turn this into the ultimate savory artisan bread.
You’ll need:
- 3 cups all-purpose flour
- 1 1/2 teaspoons salt
- 1/4 teaspoon instant yeast
- 1 1/2 cups cool water
- 1/2 cup grated Parmesan cheese
- 2 cloves garlic, minced
- 1 tablespoon fresh rosemary, chopped
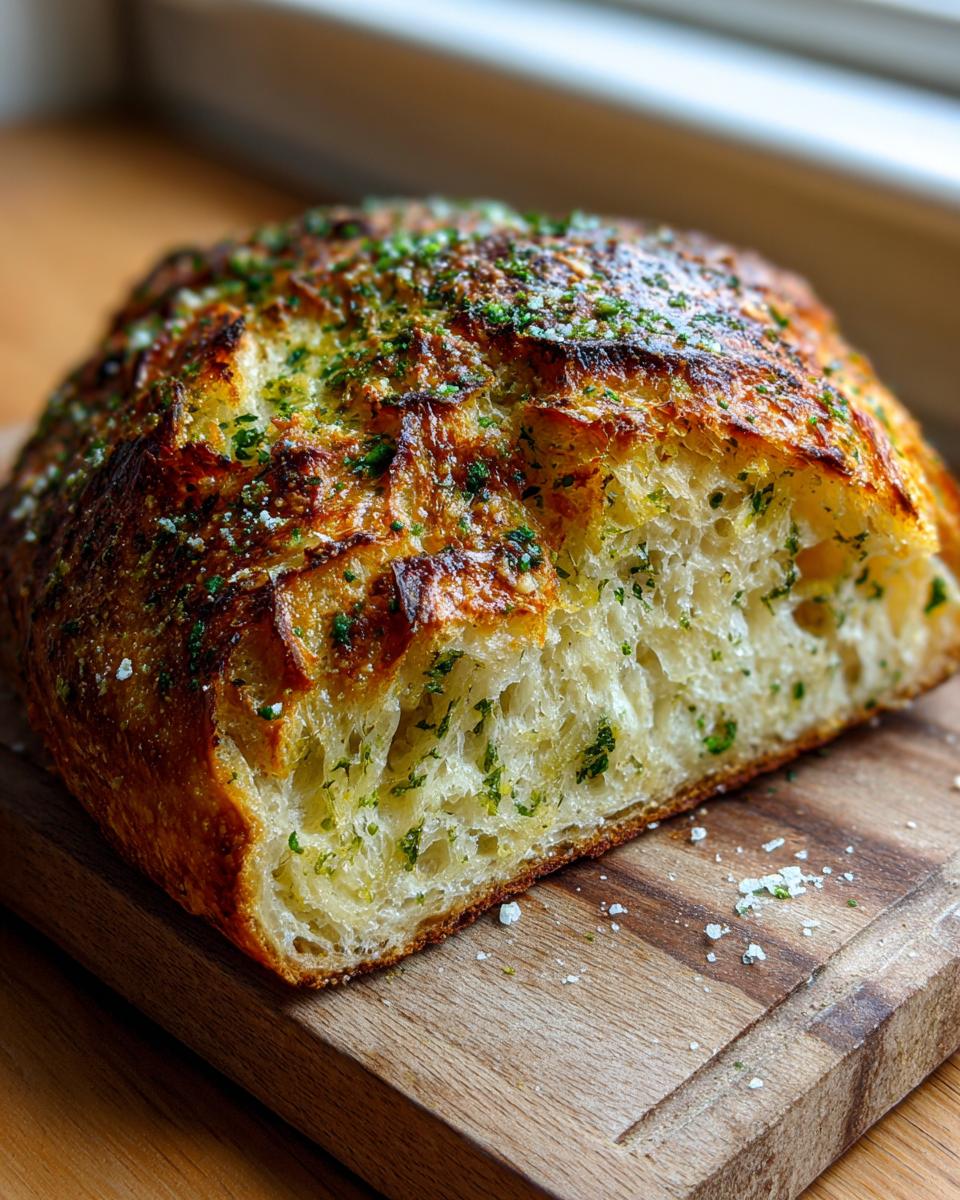
That Parmesan, garlic, and rosemary aren’t just tossed in for fun; they infuse the dough during that long rest period. It gives you that incredible aroma when it bakes—like walking into a little Italian storefront bakery!
Ingredient Notes and Substitutions for Artisan Bread
Since we aren’t kneading this dough, we need to be precise with how we handle the flavor boosters. We rely on the long fermentation to tenderize the crumb, which is why you must use instant yeast here. It works slowly and consistently over many hours, which is what builds that amazing structure for a truly chewy artisan bread.
If you look at the recipe notes, you’ll see I mentioned rosemary. If you don’t have fresh rosemary, you can totally swap it out. Just use about 1 teaspoon of dried rosemary instead. Dried herbs are more potent, so you need less. Don’t worry if you’re missing the Parmesan for some reason; it just adds a layer of saltiness and complexity, but you can skip it if necessary and just add an extra pinch of salt to the dry mix. But honestly? Don’t skip the garlic! The texture of this homemade loaf is surprisingly forgiving.
Mastering the No Knead Artisan Bread Techniques
Alright, this is where we move from ingredients to pure kitchen magic. Look, I’ve seen people mess this up by trying to *help* the dough too much, so listen closely! The whole point of this technique is setting it and forgetting it. When I first tried this method years ago, I kept checking the dough after four hours, thinking, “This can’t possibly work, it looks like sludge.” I felt like I was abandoning a child! But those 12 to 18 hours are the secret sauce. That long, slow fermentation time—that’s the flavor builder. It’s what gives you that beautiful, complex taste and the perfect structure for a chewy artisan bread without you lifting a finger.
Mixing and the Long Rest for Perfect Artisan Bread
We start simple. Grab a big bowl—and I mean big, because this dough expands! Whisk together your flour, salt, and that tiny bit of instant yeast. When you add the cool water, mix it with a wooden spoon. You stop mixing the absolute second everything is incorporated. I mean it! You want a shaggy, sticky mess. If you see streaks of dry flour, that’s fine. This is not meant to be smooth. Then, fold in your Parmesan, garlic, and rosemary until it’s mostly distributed. Don’t overdo it trying to make it look perfect.
Cover that bowl tight with plastic wrap—you want zero air getting in or out for the rest period. You’re going to let this gang out on the counter for 12 to 18 hours. Set a reminder, go to a movie, whatever you need to do, but do not knead it! The slow rest does all the structure work for you, creating those amazing air pockets that define great artisan bread. If you want to dive deeper into naturally leavened loaves, always check out my thoughts on sourdough bread recipe crusty artisan loaf, but for right now, focus on this simple mix.
Preheating and Baking Your Dutch Oven Bread
When you’re ready to bake (usually the next morning), this is when we bring the heat! About 30 minutes before you plan to bake, put your Dutch oven—lid and all—right into the oven while it preheats to 450 degrees Fahrenheit. Seriously, your pot needs to be molten hot. This is the biggest step for getting that crackly, shatter-ready crust.
Next, take extreme care here because that pot is screaming hot! Use oven mitts designed for high heat. Carefully remove the Dutch oven from the oven. Quickly scrape your sticky dough right onto a piece of parchment paper. That parchment paper is your best friend; it acts like a sling to lower the dough safely!
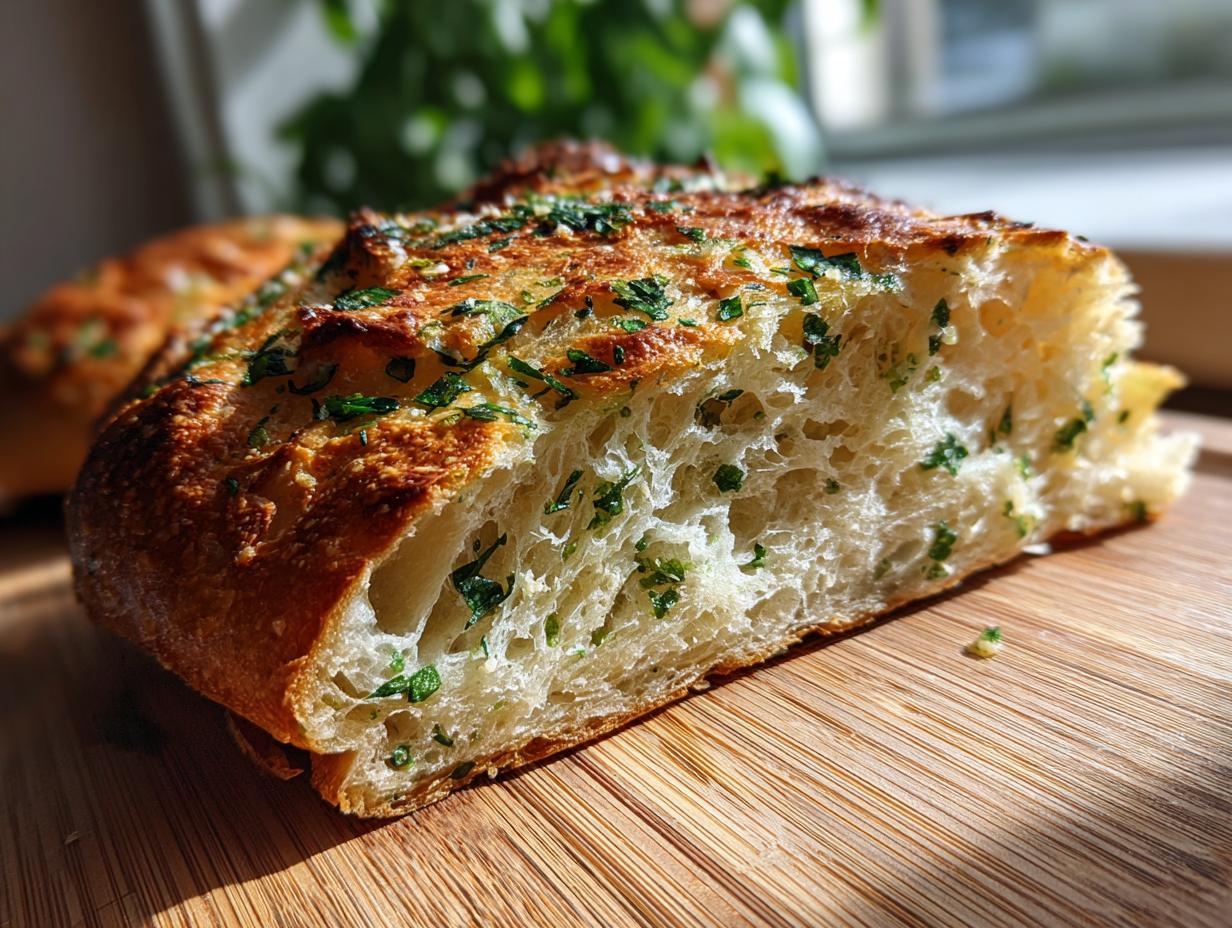
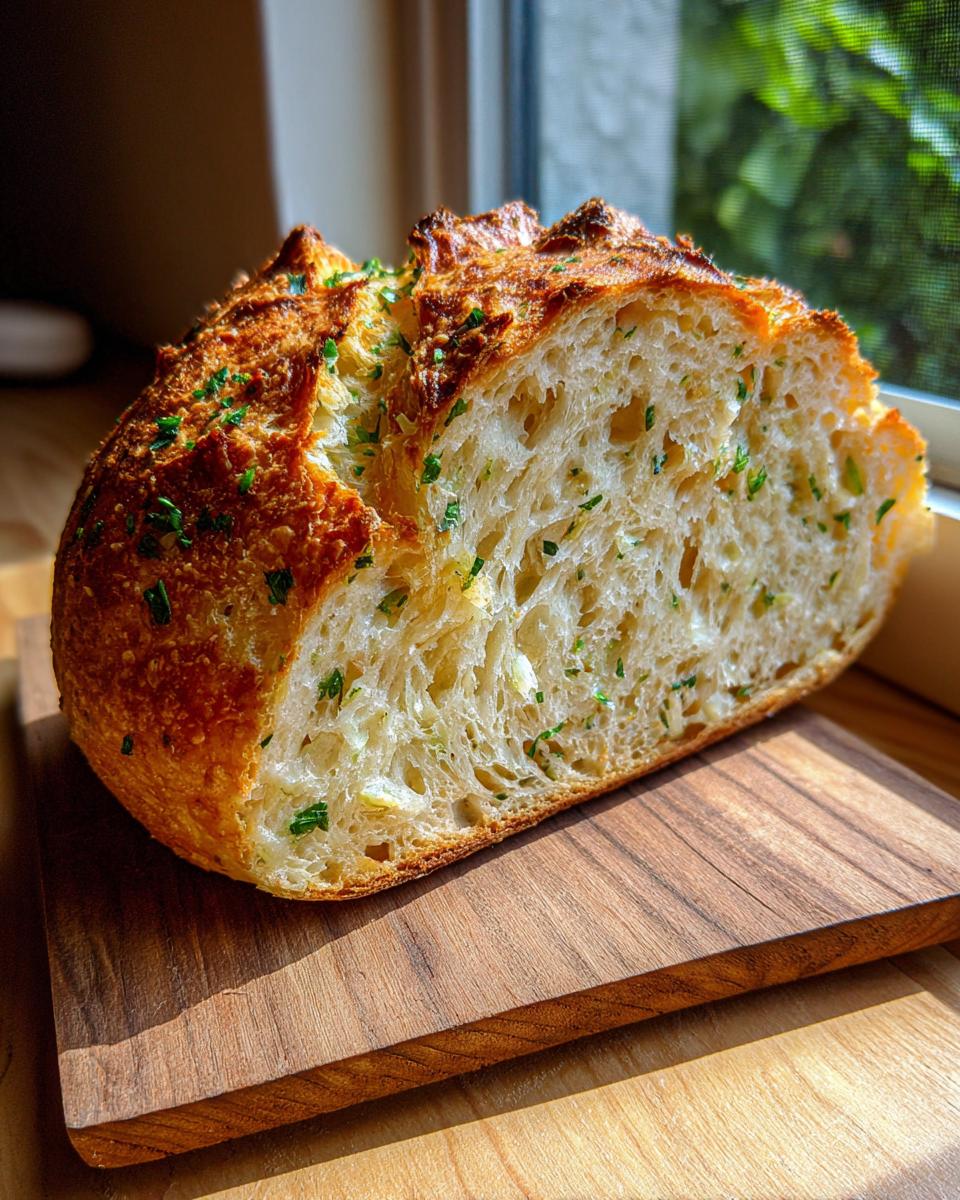
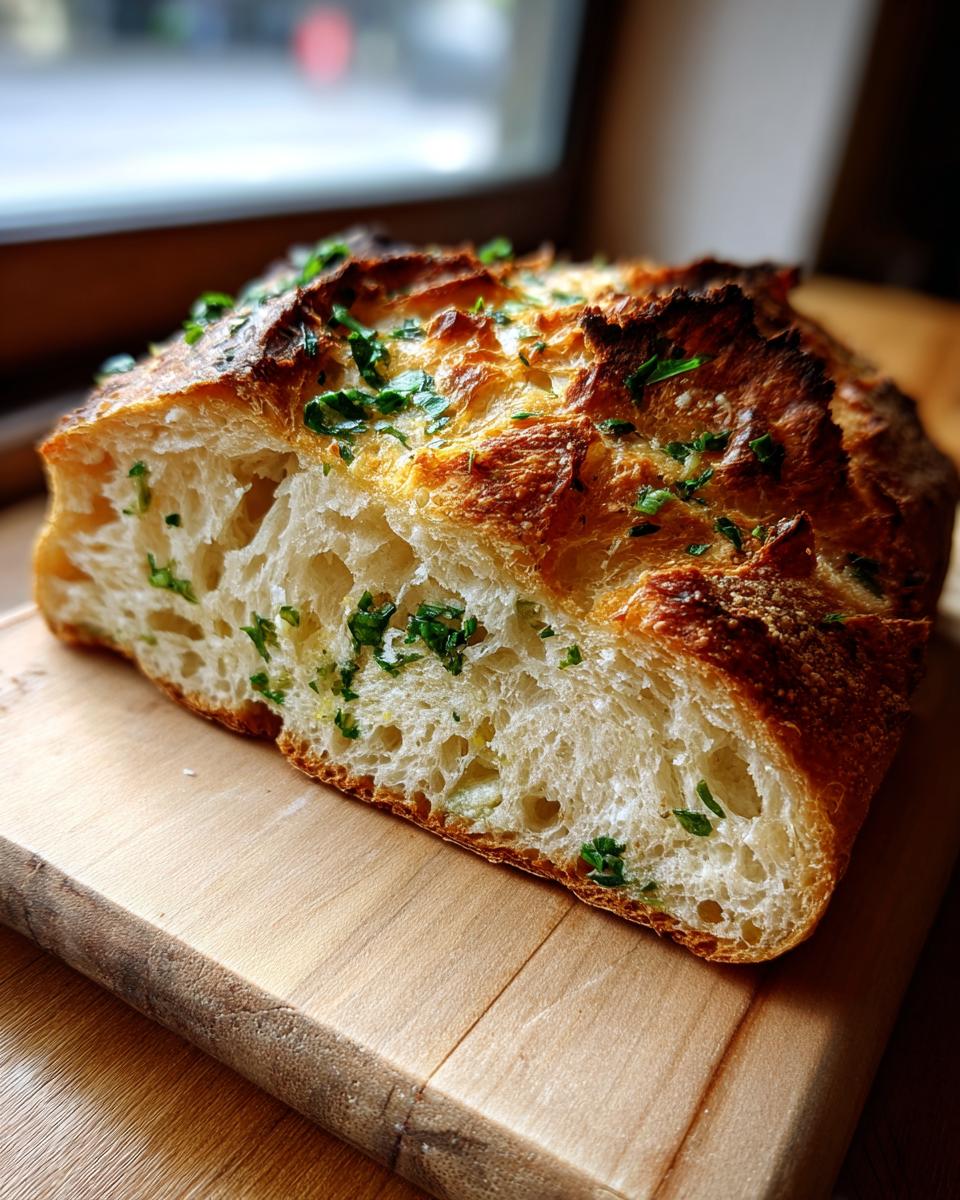
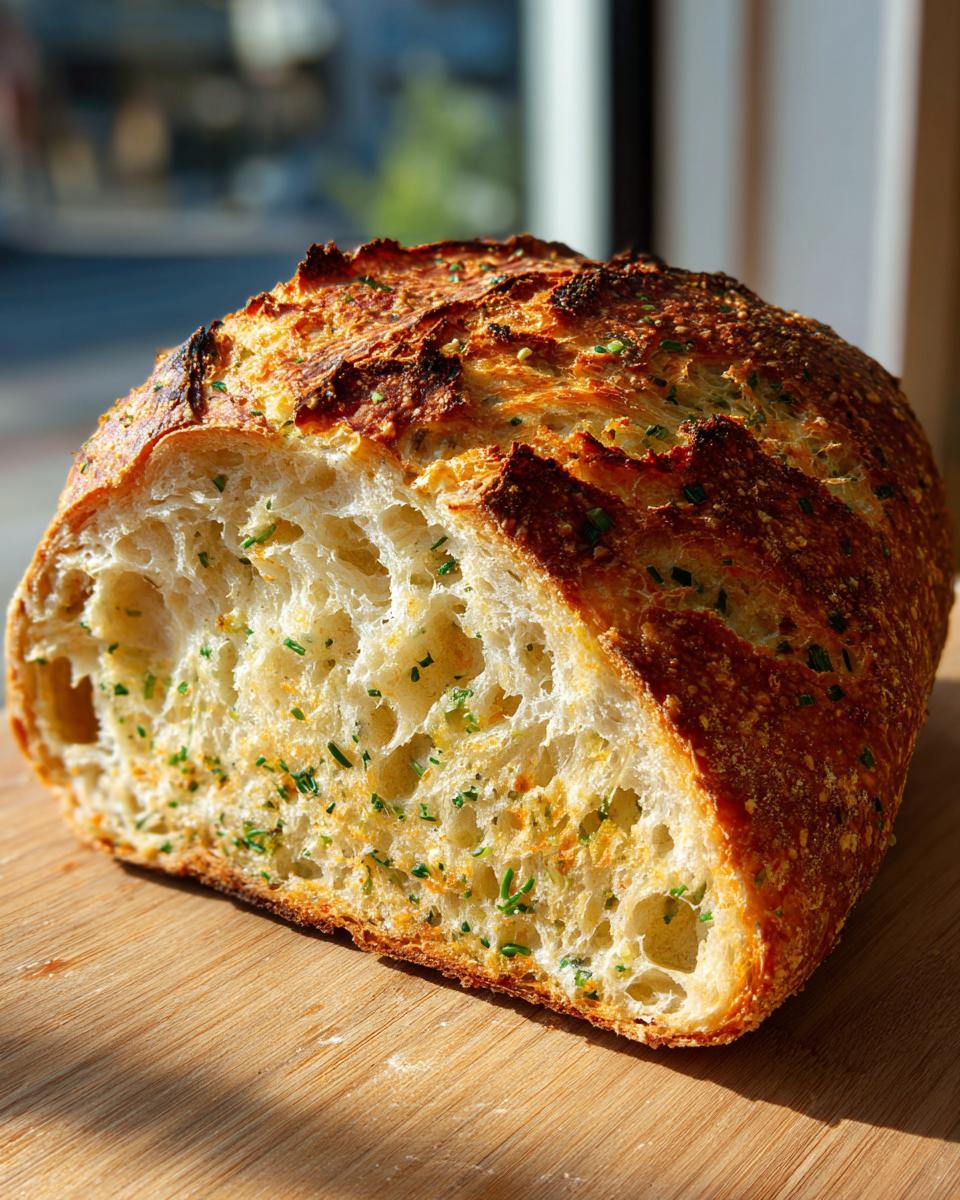
Gently lower the dough (still on the parchment, that’s key for this Dutch Oven Bread technique) right into that blazing hot pot. Put the lid back on immediately—trapping that steam is critical! Bake it covered for 30 minutes. That steam keeps the dough surface soft so it can expand fully. Then, carefully take the lid off for the final 15 to 20 minutes. This last blast of dry heat browns the outside to that deep, golden color we associate with artisan loaves. When it’s done, pull it out and let it cool completely on a wire rack before you slice into that beautiful rustic bread making achievement!
Tips for Achieving a Bakery Style Loaf Every Time
Even with this easy method, little things can make the difference between a ‘good’ loaf and a show-stopping crusty homemade bread. First, let’s talk color. If your bread looks pale after removing the lid, don’t panic! Turn your oven temperature up to 475°F for the last 5 minutes uncovered. That last blast of dry heat gives you that deep golden-brown crust you see in bakeries. It’s a little trick I use when I worry my oven isn’t quite hot enough.
If your dough sticks stubbornly to the parchment when you try to lower it, it usually means you didn’t create enough structure during the initial mixing, or maybe you tried to move it too soon. Be decisive! When you scrape the dough onto the parchment, give the parchment a little intentional wiggle to make sure the dough hasn’t glued itself down yet. This is a super simple upgrade for beginner bread recipes.
Also, for the absolute best crust, resist the urge to skip preheating that pot. If you throw cold dough into a lukewarm pot, you kill the immediate steam explosion needed for that crackly exterior. Think of that hot Dutch oven like a high-pressure cannon for steam—it has to be ready to fire! If you are looking for other techniques that rely on high, quick heat, you might enjoy how I get my Yorkshire puddings to rise so high; the principles of trapped steam are surprisingly similar to my advice over at Yorkshire Pudding Recipe.
Serving Suggestions for Your Homemade Loaf
Now that you’ve wrestled that gorgeous, fragrant, savory loaf out of the oven, what do you do with it? Resist the urge to eat the whole thing standing over the cooling rack! This isn’t just any bread; this is a Garlic Herb Bread powerhouse, and it deserves a stage.
First up, the dunk test. Forget fancy sides; slice thick pieces and just dip them into a good quality olive oil seasoned with a pinch of flaky sea salt. The crust holds up perfectly to soaking, and you get those little bursts of Parmesan flavor with every bite. It’s simple, but it’s absolutely divine.
Because of the rosemary and cheese, this loaf is already dressed up for dinner. It screams “pair me with soup!” Seriously, forget the boring dinner rolls. This bread is sturdy enough to handle the heartiest bowls. It’s phenomenal for soaking up every last drop of broth. If you’re looking for a fantastic pairing, try it alongside my slow-cooker Crockpot Chicken Enchilada Soup. The cheese and herbal notes play perfectly against the spice.
It also shines alongside pasta dishes where you need something textural to cut through rich sauce. It can handle pesto, marinara, or even just plain butter at breakfast. If you want to see another gorgeous recipe for developing a crackly crust perfect for serving alongside anything, check out the tips at Delish Symphony. Honestly, once you master this artisan bread technique, finding ways to use it becomes part of the fun!
Storage and Reheating Instructions for Artisan Bread
This is probably the trickiest part of making any high-quality artisan bread. That beautiful, hard crust you worked so hard for? It hates humidity. If you wrap this loaf up tightly while it’s still even slightly warm, that steam gets trapped, and you turn your gorgeous exterior into something soft and floppy. We do not want floppy bread around here!
The absolute best way to store this homemade loaf is simply on the counter, cut-side down, resting on a clean cutting board. If you must wrap it, only use a paper bag or a loosely draped tea towel. This allows air to circulate but keeps dust off. I find this savory loaf tastes best on day one, obviously, but it holds up surprisingly well for two full days just sitting out.
If you’re looking at day three, or if the crust has softened on day two, listen up, because here is where we save it. Never microwave your bread—that just makes it tough and chewy in a bad way. Instead, you need to use dry heat to revive that crispness. Take your cooled, day-old loaf and give it a quick blast in the oven.
Here’s the quick reheat trick: Preheat your oven to about 350 degrees Fahrenheit. Place the bread directly on the rack—no need for the Dutch oven this time—and bake it for about 5 to 7 minutes. You’ll hear that wonderful crackle return as the surface moisture evaporates and the crust tightens back up. It comes out perfectly crisp again, ready for dipping or making incredible garlic toast!
Frequently Asked Questions About Artisan Bread Recipe
I know you’ve got questions. Baking bread, even no knead bread, can feel a little mysterious the first couple of times. My goal is always to make sure you feel totally confident when you step up to this recipe, so let’s go over some of the things I hear most often about getting that bakery-quality finish on this artisan bread.
Can I make this No Knead Loaf with Bread Flour?
Yes, you absolutely can, but I want you to know what you’re sacrificing! Bread flour has a higher protein content than the all-purpose flour I listed. That extra protein means more gluten development, even without kneading! If you use bread flour, you’ll likely end up with a loaf that is a bit chewier—which isn’t bad if you want a really sturdy, chewy artisan bread—but it might not be quite as soft and open internally. All-purpose flour gives you that perfect balance for this specific recipe. You know, if you’re looking for another style of easy bread, you can check out my easy garlic naan bread recipe where the flour choice really matters!
What if I don’t have a Dutch Oven for this Artisan Bread?
This is a super common hurdle for people attempting from scratch bread at home, but don’t let it stop you! The Dutch oven’s job is simple: trap steam. Steam is what keeps the outside crust from setting too fast, allowing the dough to expand fully (that’s called oven spring!). If you don’t have one, here is your fix for achieving that wonderful rustic bread making result:
- Place a sturdy, oven-safe baking stone or heavy baking sheet on the lowest rack in your oven while it preheats.
- Place your dough (on parchment paper) onto the hot stone/sheet.
- Crucially, you need to create steam below the bread. Pour about a cup of boiling hot water into a separate, empty metal broiler pan on the rack *underneath* your baking surface. Do this quickly right before sliding your dough in.
Be careful when pouring that water in; it’s going to create a huge cloud of steam! You’ll bake covered (maybe with a large metal bowl placed over the loaf if you are worried about direct heat) for that initial 30 minutes, then uncover and finish. It takes a little more juggling, but you can absolutely get that crusty homemade bread!
Here are a few other common questions I get:
- Why is my loaf so flat? Usually, that means one of two things: either you didn’t preheat the Dutch oven long enough (it needs to be scorching hot), or you didn’t let the dough rest the full 12 hours. Flavor and rise take time!
- Can I use Active Dry Yeast instead of Instant? You can, but you have to bloom it first! Dissolve the yeast and a pinch of sugar in a few tablespoons of the measured *warm* (not hot) water and let it get foamy for 5-10 minutes before adding it to the recipe. It might slightly change the rise timing, but it works in a pinch!
Estimated Nutritional Data for This Artisan Bread
Okay, I know sometimes you just need to know what you’re diving into, especially when you bake something this rich and incredible. Because we added Parmesan and used vegetable fats, this artisan bread is more robust than a plain French loaf, but look at that protein count! That comes from the cheese doing some heavy lifting.
Please keep this in mind: This nutritional data is just an estimate based on the ingredients I listed and standard calculations. Every brand of flour or Parmesan cheese is slightly different, so these numbers are a guideline, not a guarantee! You’re dealing with a homemade loaf here, so perfection in measurement is hard!
Here are the estimates for one slice of our Garlic Herb Loaf:
- Serving Size: 1 slice
- Calories: 210
- Fat: 3g
- Saturated Fat: 1g
- Unsaturated Fat: 2g
- Cholesterol: 5mg
- Sodium: 350mg
- Carbohydrates: 40g
- Fiber: 2g
- Protein: 7g
- Sugar: 1g
See? A solid loaf that actually offers some protein, thanks to that savory cheese working its way into the dough during the rise. It’s delicious fuel for dipping into soup—speaking of which, if you’re looking for a great companion recipe, you should check out my homemade granola recipe for something totally different, or just pair this bread with something hearty!
Share Your Bakery Style Loaf Experience
Whew! You did it. You took flour, water, and yeast, and you translated a professional technique into a stunning, crackly, savory artisan bread loaf sitting right there on your cooling rack. That deserves a serious round of applause! Seriously, stand back, admire the color, and listen for that crust to start singing its little song as it cools down.
Now that you know the lingo of the *No Knead* method, you’re officially part of the club. Kitchen Slang is built on sharing what works in our kitchens, and I absolutely need to see your results! Did the Parmesan crisp up just right? Did you manage to get that beautiful wide-open crumb?
If this recipe delivered the bakery style loaf you were dreaming of, please do me a huge favor: rate this recipe right here on the site. Every star helps us get this simple, powerful technique out into more kitchens!
And if you took photos—and I hope you did!—tag us! Seeing your successes is why I translate these restaurant secrets into simple instructions. Send your photos over via the contact page, or tag us on social media. I can’t wait to hear how this homemade loaf tasted with your dinner!
PrintDutch Oven No Knead Artisan Bread with Garlic and Herbs
Bake a bakery-style loaf with a crusty exterior and soft interior using this simple, no-knead method. This recipe incorporates Parmesan, garlic, and herbs for a savory homemade loaf perfect for beginners.
- Prep Time: 10 min
- Cook Time: 50 min
- Total Time: 13 hours 0 min
- Yield: 1 loaf 1x
- Category: Bread
- Method: Baking
- Cuisine: American
- Diet: Vegetarian
Ingredients
- 3 cups all-purpose flour
- 1 1/2 teaspoons salt
- 1/4 teaspoon instant yeast
- 1 1/2 cups cool water
- 1/2 cup grated Parmesan cheese
- 2 cloves garlic, minced
- 1 tablespoon fresh rosemary, chopped
Instructions
- In a large bowl, whisk together the flour, salt, and yeast.
- Add the cool water to the dry ingredients. Mix with a wooden spoon until just combined; the dough will be shaggy.
- Stir in the Parmesan cheese, minced garlic, and chopped rosemary until evenly distributed.
- Cover the bowl tightly with plastic wrap. Let the dough rest at room temperature for 12 to 18 hours. Do not knead the dough.
- About 30 minutes before baking, place a 5 to 6-quart Dutch oven with its lid inside your oven. Preheat the oven to 450 degrees Fahrenheit (232 degrees Celsius).
- Carefully remove the hot Dutch oven from the oven. Gently scrape the dough out of the bowl and place it onto a piece of parchment paper.
- Using the parchment paper as a sling, carefully lower the dough into the hot Dutch oven. Cover with the lid.
- Bake for 30 minutes with the lid on.
- Remove the lid and continue baking for another 15 to 20 minutes, until the crust is deep golden brown.
- Carefully remove the bread from the Dutch oven and let it cool completely on a wire rack before slicing.
Notes
- The long, slow fermentation time develops the flavor and structure, so do not rush the 12 to 18-hour rest period.
- For the best crust, do not skip preheating the Dutch oven with the oven.
- If you do not have fresh herbs, use 1 teaspoon of dried rosemary.
Nutrition
- Serving Size: 1 slice
- Calories: 210
- Sugar: 1
- Sodium: 350
- Fat: 3
- Saturated Fat: 1
- Unsaturated Fat: 2
- Trans Fat: 0
- Carbohydrates: 40
- Fiber: 2
- Protein: 7
- Cholesterol: 5