
Can we just be real for a second? Baking something that looks like it belongs in a fancy patisserie window can feel intimidating, right? I’m Zoe, and I’m here to tell you that wall between the home baker and the showstopper is totally imaginary. We’re tearing it down today. This Strawberry Rose Cake recipe is our secret weapon; it manages to pack in the beautiful, delicate floral notes of rosewater while teaching you how to pipe perfect buttercream roses. Forget wrestling with complicated fondant; we’re keeping it real, keeping it delicious, and making sure you walk away feeling like a total baking rockstar. This isn’t just a layer cake; it’s an edible centerpiece that anyone can master. If you love translating complex flavors into easy bakes, you’ll want to check out my guide on making a perfectly moist lemon cake soon too!
- Why This Strawberry Rose Cake is Your New Showstopping Rose Dessert
- Ingredients for Your Rose Cake: Flavor and Frosting Components
- Baking the Rose Flavored Cake Recipe Layers
- Mastering the Buttercream: Your Buttermilk Rose Cake Tutorial Base
- How to Pipe Buttercream Roses: The Essential Best Rosette Piping Techniques
- Assembling Your Elegant Floral Layer Cake Ideas
- Tips for Success with Your Gourmet Cake Baking
- Storing and Serving Your Romantic Occasion Cakes
- Understanding the Nutrition of This Rose Cake
Why This Strawberry Rose Cake is Your New Showstopping Rose Dessert
Listen, you want a cake that stops people mid-sentence when they see it, but you don’t want to spend three days decorating it. I get it! That’s why this recipe hits every single checkmark for an elegant afternoon tea cake that doubles as a showstopper. We’re blending delicate florals with bright fruit, and topping it all off with piping techniques that look professional but are genuinely simple. Check out why this needs to be your next bake:
- The flavor combination of strawberry and rosewater is subtle, complex, and totally addictive.
- It stays incredibly moist thanks to the diced fresh fruit—no dry edges here!
- We conquer that intimidating buttercream rose look using just one simple piping tip.
- It’s proof that a truly showstopping rose dessert doesn’t need endless pastry school training.
When you’re ready for more inspiration on making wow-factor desserts, peek at my main collection of delicious dessert recipes!
Ingredients for Your Rose Cake: Flavor and Frosting Components
Okay, let’s talk about what you’re actually buying at the store, because quality matters here, especially with floral flavors. When we break down the list for this rose flavored cake recipe, we have two main characters: the tender layers and the fluffy frosting that makes those roses. This is where we start building that reputation for making the best elegant afternoon tea cakes.
I want you focusing on two things being top-tier: the strawberries and the rosewater. If you skimp on the rosewater, you’ll end up with something tasting a little… soapy? Trust me, grab the good stuff. It makes all the difference for that delicate floral note in your cake. If you want to see how I handle flavor translation in another bake, check out my post on the moist lemon cake recipe!
Cake Layer Ingredients for the Rose Flavored Cake Recipe
For the layers, we need our standard dry blend—flour, baking powder, salt—set aside. Then, for the wet side, you need your softened butter and sugar beaten until they look pale. Key moment alert: we’re using exactly one teaspoon of high quality rosewater mixed in with the milk. That small amount is going to perfume the whole crumb beautifully. Don’t forget to fold in those finely diced strawberries right at the end!
Buttercream Ingredients for Piping Realistic Roses
When it comes to the frosting, remember the goal here is structure. We need stiff, stable buttercream for piping, but it also has to taste amazing. You’ll start with softened butter and gradually beat in four cups of powdered sugar, sifted—sifting prevents lumps that will wreck your piping tip, seriously! We add another touch of rosewater here, plus maybe just a tiny drop of pink gel color if you want that soft blush effect for your finished roses.
Baking the Rose Flavored Cake Recipe Layers
Now we get to the actual *baking* part, and remember, for any good layer cake, prep is half the battle. First things first: slap that oven on 350°F (175°C). Get your two 8-inch pans greased, floured, and lined with parchment paper on the bottom. If you skip that parchment, you might struggle later, and we don’t want any sticking near the edges.
Next, we handle the dry stuff. Whisk the flour, baking powder, and salt together and just set that bowl aside. Don’t worry about it for a minute. The real magic happens when you’re creaming that softened butter and sugar. You need to whip this until it looks significantly lighter—think pale yellow and fluffy. That fluffiness? That’s air. Air is what gives your cake that beautiful rise and stops it from being a dense brick. Beat those eggs in one by one so they emulsify properly into the fat.
We talked about the rosewater milk mix already, right? That goes in alternately with your dry ingredients. Start and end with the dry. This method stops the batter from curdling or separating. Mix until you *just* see the flour disappear—seriously, stop right there! Overmixing develops gluten, and we want tender, not chewy. Finally, gently fold in those diced strawberries last, then divide the batter and bake for about 30 minutes. They’re done when a toothpick comes out clean. Let them rest in the pan for ten minutes before flipping them out to cool totally. For more insights on building flavor foundations like this, check out my guide on making homemade granola!
Mastering the Buttercream: Your Buttermilk Rose Cake Tutorial Base
Alright, let’s tackle the frosting, because this is where we turn a good cake into that picture-perfect rose cake topped with realistic little blooms. We are making American buttercream, but we’re using the chef technique for max fluffiness. I know some bakers swear by the classic sour hit of a buttermilk cake, but even though this recipe uses regular milk, the frosting technique is exactly what you’d use for a beautiful base for a buttermilk rose cake tutorial.
The first move is non-negotiable: your butter needs to be softened—room temperature, leaving a slight indent when you press it, but not greasy or melted. Beat that butter until it is totally smooth; this might take a couple of minutes on a stand mixer, or a good five minutes by hand if you’re feeling the workout! This smoothing process incorporates the initial air we need.
Here’s the slangs: Add your powdered sugar, sifted, really slowly—like, a cup at a time while the mixer is on its lowest speed. If you dump it all in, you’ll look up and see a cloud of white dust taking over your kitchen. Once it’s incorporated, bump the speed up and let it whip until it’s pale and light. Then, you add your flavorings: the vanilla and that hint of rosewater. If it looks too stiff to pipe those detailed roses we talked about, splash in milk or cream just one teaspoon at a time. You want it stiff enough to hold a peak but soft enough to glide gracefully out of the tip. That’s the sweet spot for piping!
How to Pipe Buttercream Roses: The Essential Best Rosette Piping Techniques
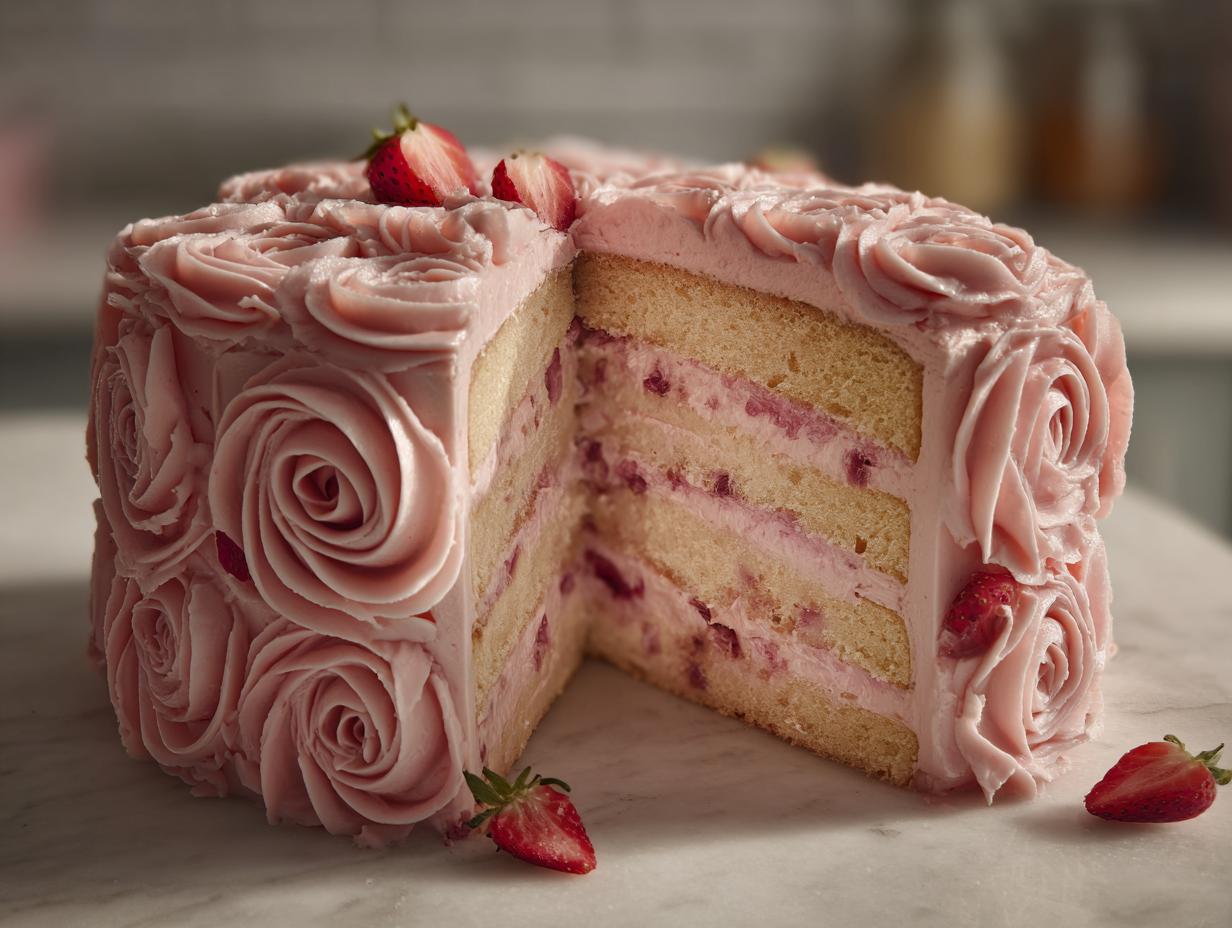
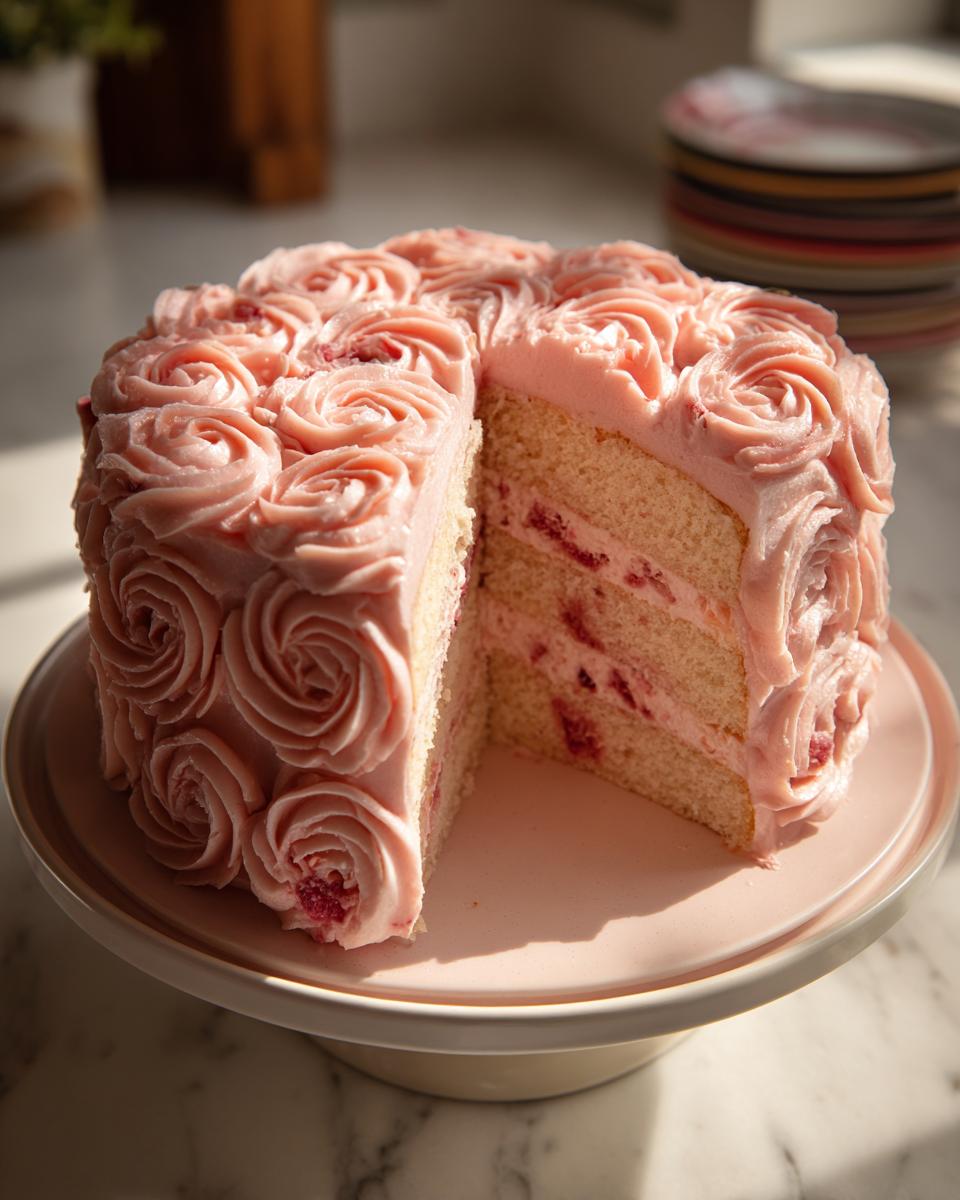
Okay, deep breaths. Piping flowers used to terrify me. I mean, my first attempts at piping made things look less like a rose and more like a sad, melted ice cream cone that had seen better days. But I stuck with it, and now I can tell you the real secret to those gorgeous piped blooms you see everywhere! This is where we nail the visual part of our rose cake, utilizing what I call best rosette piping techniques.
You need a piping bag fitted with a sturdy star tip—I rely on the Wilton 1M for almost everything beautiful on a cake; it gives you those perfect ridges needed for petals. Fit your bag with the tip and fill it evenly about two-thirds full with your rose-flavored buttercream. Seriously, don’t overfill it, or you’ll get messy blowouts.
To make a single rose, you need to pipe a central mound first—just a small, tight swirl in the middle to act as the core. Then, starting right at the base of that center mound, you pipe your first petal by moving the bag up and around in a slight curve, keeping the tip angled slightly inward toward the center. You do this about three times to create the center bud shape.
Next up are the outer petals, which should look more open. You pipe these in a continuous, slightly wider circle around the core bud. Think of it like drawing a spiral that’s getting looser as it moves outward. Make sure the base of each new petal overlaps the top half of the one before it. I always try to move the piping bag in one smooth motion for each petal; jerky movements are what create those wobbles! If you’re making a whole top covered in roses, pipe them close together so they nestle up against each other. Practice makes perfect, and watch this quick tutorial if you need to see that motion in real-time. Once you get the hang of it, you’ll want to try this on my whipped shortbread cookies next!
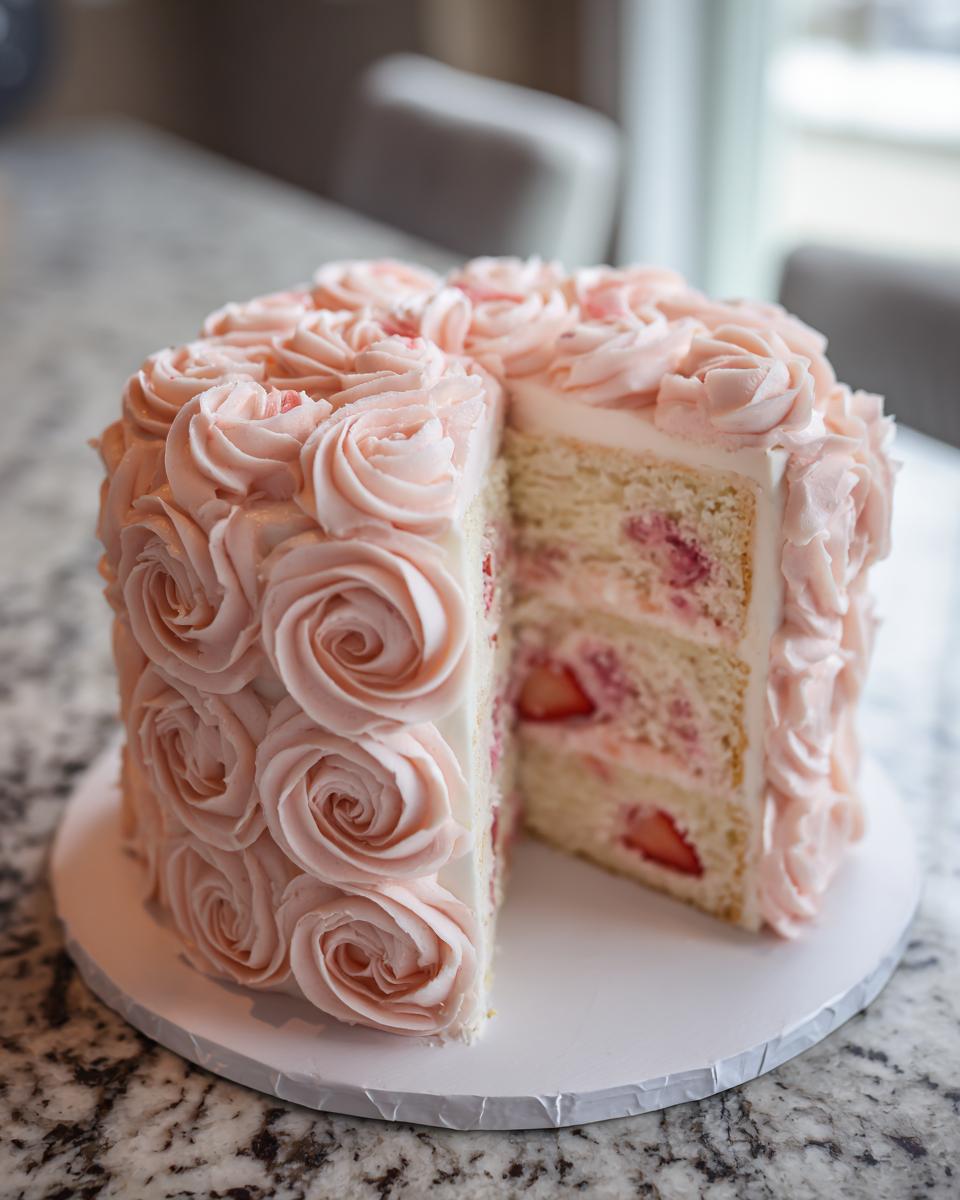
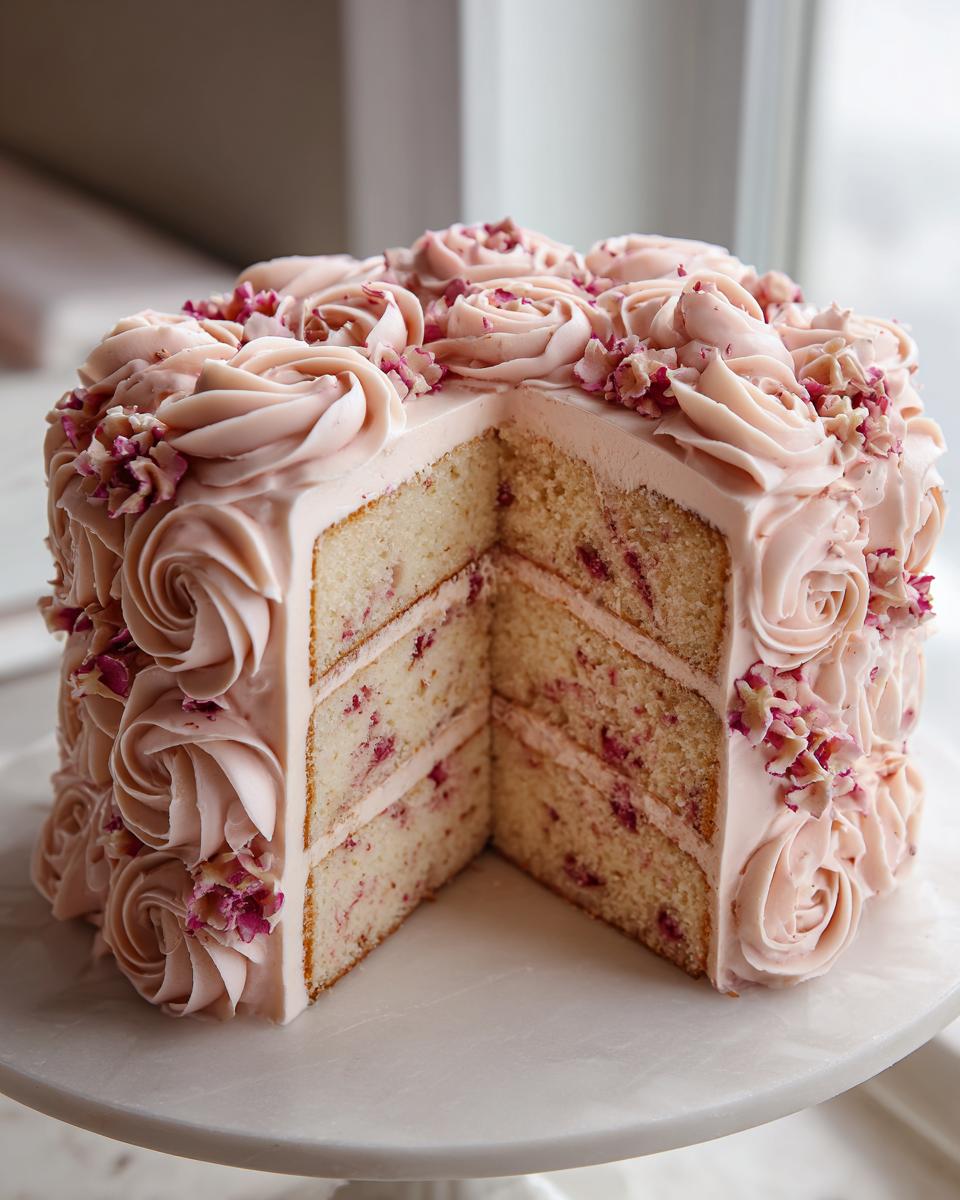
Assembling Your Elegant Floral Layer Cake Ideas
We’ve made cake layers, and we’ve made the frosting that will create our blooms. Now it’s time to put this rose cake together! This is where the professional kitchen trick comes in handy: the crumb coat. Don’t skip this step just because you’re at home. The crumb coat is just a super thin layer of frosting—seriously, scrapings—that traps all those loose strawberry and cake crumbs inside.
Slap that first layer onto your serving plate. Spread a thin, almost translucent layer of frosting over it. Then, you chill the whole thing for about 15 minutes. This locks everything down. When you come back and apply your final, beautiful coat of frosting, it will be perfectly smooth because none of those pesky crumbs got dragged up into your finished look. That’s chef lingo for making your life easier!
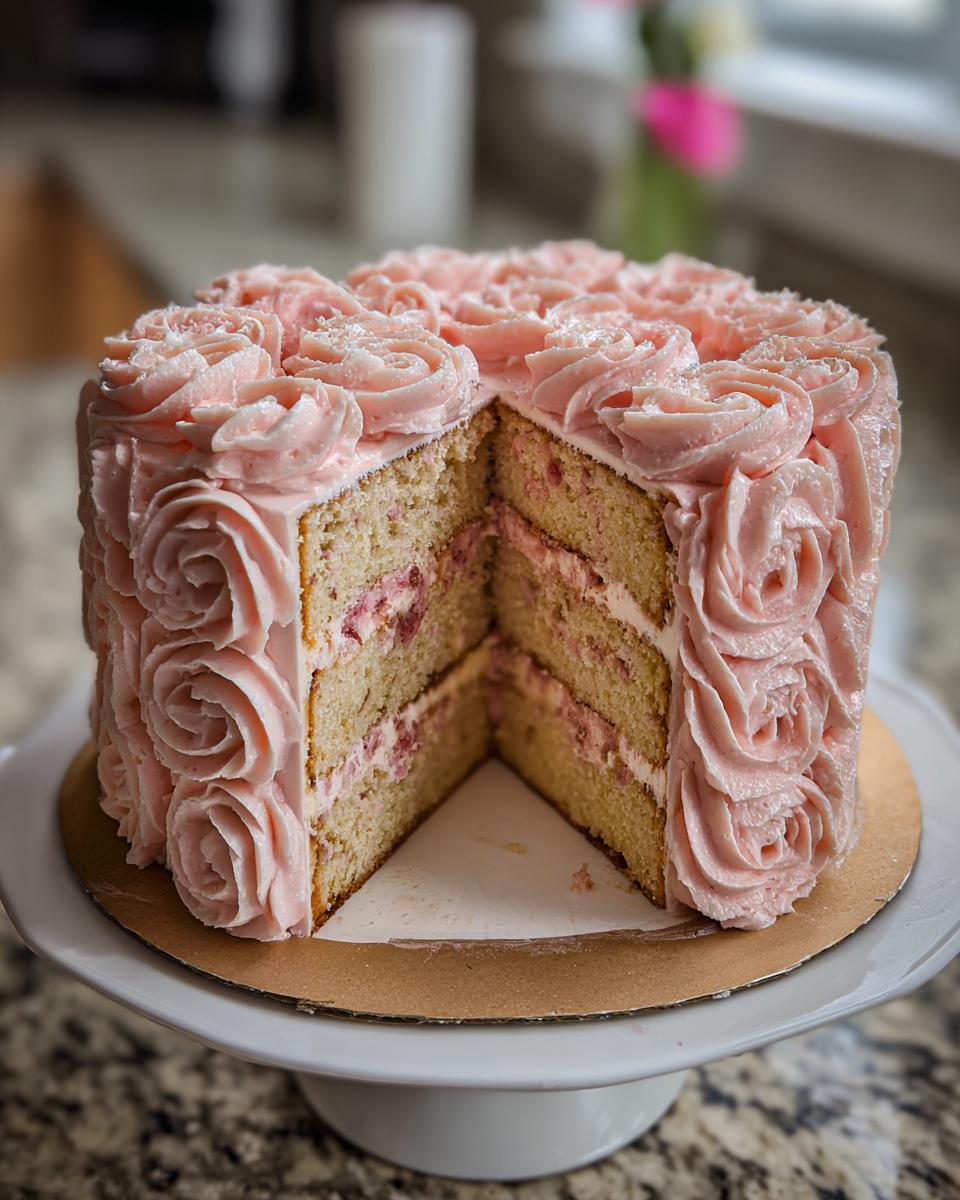
Once that final coat is on, you can move straight to decorating. Remember those amazing buttercream roses we practiced? Now you gently pipe them all over the top—or maybe just around the border, depending on how opulent you want this floral layer cake idea to look! Keep it simple and elegant, or cover every available surface. You’ve earned this beautiful final touch. If you want another great base recipe for layering, check out my guide on coffee cake muffins for flavor inspiration!
Tips for Success with Your Gourmet Cake Baking
Look, making a gourmet cake baking masterpiece like this Strawberry Rose Cake is really about respecting the ingredients. Forget rushing; this isn’t meant to be microwaved, it’s meant to be savored. I have three quick non-negotiables that my bistro chef mentors drilled into me, and they will save your bake every single time.
First up: Temperature, temperature, temperature! Your butter for the cake has to be room temperature soft, and your eggs need to be out of the fridge sitting on the counter for at least an hour before you start. Cold eggs shock the creamed butter mixture and cause it to curdle, which means flat cakes. You want a beautiful lift!
Second, I already said it, but I’m saying it again: when you buy your rosewater, check the label. If the bottle is cheap and tiny, it tastes artificial. You need a good, fragrant one that actually smells like a rose garden, not just perfume trying to hide in a cake. A little bit of the good stuff goes a long way here.
Finally, about those strawberries: dice them small! If you leave big chunks in there, they create pockets of steam which leads to dense, soggy spots in your otherwise perfect crumb. Small dice integrates beautifully and gives you that lovely, subtle fruit note without compromising the structure. Happy baking, and next time you need a quick, cozy treat, try my banana nut muffins!
Storing and Serving Your Romantic Occasion Cakes
So, you’ve made this gorgeous, romantic occasion cakes masterpiece. You can’t just leave it out, especially with all that buttercream holding those beautiful roses hostage! Here’s the deal for keeping it perfect.
You need to treat this cake like a perishable item. Pop it into the fridge—covered loosely with a cake dome or under a large bowl—where it should last happily for a good three to four days. The cold firms up the buttercream, making it stable for transport if you’re taking it somewhere!
But here is the crucial bit: Don’t serve it cold! Cold cakes taste muted. Pull that rose cake out about an hour before you plan to slice it. Letting it warm up slightly brings those subtle rose and strawberry notes right back to life. Trust me, serving it slightly soft is the difference between good and *chef’s kiss* amazing. For another simple dessert you can keep on hand, check out my easy apple crumble recipe!
Understanding the Nutrition of This Rose Cake
I know we talk about flavor and looks over everything else here at Kitchen Slang, but sometimes folks do want a ballpark idea of what they’re diving into when they’re whipping up something this glamorous. This Strawberry Rose Cake delivers rich flavor, but because we are using real butter and plenty of sugar to get those gorgeous roses to stand up, it’s definitely a treat, not an everyday snack.
Based on ten generous slices, here are the estimated numbers. Remember, this is just a general guide, and the exact values will definitely move around depending on the brand of butter and sugar you grab off the shelf. If you are tracking macros closely, definitely play with the numbers based on your ingredients. If you’re looking for something lighter next time you’re prepping meals, check out my high-protein overnight oats!
Here’s the breakdown:
- Serving Size: 1 slice
- Calories: About 450
- Sugar: Roughly 45 grams (That’s the fun part of frosting, right?)
- Fat: Around 25 grams, mostly from that beautiful butter we creamed!
- Protein: A modest 4 grams.
- Carbohydrates: About 55 grams.
Just consider this your official permission slip to enjoy every single bite of your beautiful, homemade rose cake. You earned those roses!
PrintStrawberry Rose Layer Cake with Buttercream Roses
You make this elegant layer cake featuring the delicate flavor of rosewater paired with fresh strawberries. This recipe focuses on creating a moist cake base and piping beautiful, realistic buttercream roses for a showstopping dessert.
- Prep Time: 35 min
- Cook Time: 30 min
- Total Time: 65 min
- Yield: 10 servings 1x
- Category: Dessert
- Method: Baking
- Cuisine: American
- Diet: Vegetarian
Ingredients
- 1 1/2 cups all-purpose flour
- 1 1/2 teaspoons baking powder
- 1/2 teaspoon salt
- 1/2 cup (1 stick) unsalted butter, softened
- 1 cup granulated sugar
- 2 large eggs
- 1 teaspoon vanilla extract
- 1/2 cup whole milk
- 1 teaspoon rosewater, high quality
- 1/2 cup heavy cream, cold
- 1 cup fresh strawberries, finely diced
- For Buttercream: 1 cup (2 sticks) unsalted butter, softened
- 4 cups powdered sugar, sifted
- 1 teaspoon vanilla extract
- 1/2 teaspoon rosewater
- 1–2 tablespoons milk or heavy cream
- Pink food coloring gel (optional)
Instructions
- Preheat your oven to 350°F (175°C). Grease and flour two 8-inch round cake pans. Line the bottoms with parchment paper.
- In a medium bowl, whisk together the flour, baking powder, and salt. Set this dry mix aside.
- In a large bowl, cream the softened butter and granulated sugar together until the mixture is light and fluffy. This takes about 3 minutes.
- Beat in the eggs one at a time, ensuring each is fully incorporated before adding the next. Mix in the vanilla extract.
- In a separate small bowl, whisk together the milk and 1 teaspoon of rosewater.
- Alternate adding the dry ingredients and the rosewater milk mixture to the butter mixture, beginning and ending with the dry ingredients. Mix until just combined; do not overmix.
- Gently fold in the finely diced strawberries.
- Divide the batter evenly between the prepared pans. Bake for 28 to 32 minutes, or until a toothpick inserted into the center comes out clean.
- Let the cakes cool in the pans for 10 minutes before inverting them onto a wire rack to cool completely.
- While the cakes cool, prepare the buttercream. Beat the softened butter until smooth. Gradually add the sifted powdered sugar, mixing on low speed until incorporated, then increase speed to medium-high.
- Add the vanilla extract, 1/2 teaspoon rosewater, and 1 tablespoon of milk or cream. Beat until light and fluffy. Add more liquid, one teaspoon at a time, if the frosting is too stiff. Add a tiny drop of pink gel coloring if you want a blush tone.
- Once the cakes are completely cool, level the tops if necessary. Place one layer on your serving plate. Spread a thin layer of frosting, then scatter a few extra diced strawberries if desired. Top with the second cake layer.
- Frost the entire cake crumb coat first, chilling for 15 minutes. Apply the final layer of frosting.
- Fit a piping bag with a star tip (like Wilton 1M) for rosettes. Fill the bag with buttercream. Pipe rosettes covering the top of the cake or around the sides, working from the outside edge inward.
- Chill the cake briefly before slicing and serving. This is a showstopping rose dessert.
Notes
- Use high-quality rosewater; a little goes a long way in providing that fragrant floral note.
- For the best piping results, your buttercream must be the correct consistency—stiff enough to hold its shape but soft enough to move easily through the tip.
- If you want a stronger rose flavor in the cake layers, substitute 1 tablespoon of the milk with rosewater.
Nutrition
- Serving Size: 1 slice
- Calories: 450
- Sugar: 45
- Sodium: 180
- Fat: 25
- Saturated Fat: 15
- Unsaturated Fat: 10
- Trans Fat: 0
- Carbohydrates: 55
- Fiber: 1
- Protein: 4
- Cholesterol: 85