
Listen up, because when the temperature climbs and everyone starts asking what you’re bringing to the cookout, you need an ace up your sleeve. Forget turning on the oven when it’s ninety degrees outside—that’s just bad strategy. What we need is pure, chilled, layered magic. That’s where the **banana split cake** comes in; it tastes exactly like that decadent ice cream parlor treat but requires zero baking skills. I picked up these streamlined, no-fuss assembly techniques back when I was running orders in the city bistro kitchen, and they work perfectly at home. You can find more simple showstoppers just like this one in my collection of delicious dessert recipes. Trust me, this is the easiest, most impressive summer dessert you’ll whip up all year.
- Why This No-Bake banana split cake is Your New Summer Staple
- Gathering Ingredients for Your banana split cake
- Step-by-Step Guide to Assembling the No Bake banana split cake
- Tips for the Best banana split cake Texture and Flavor
- Variations on the Classic banana split cake
- Serving Suggestions for Your Chilled Fruit Dessert
- Storage and Reheating Instructions for banana split cake Leftovers
- Frequently Asked Questions About banana split cake
- Nutritional Estimate for One Slice of banana split cake
Why This No-Bake banana split cake is Your New Summer Staple
Honestly, the best thing about this recipe is that it lets you skip the oven entirely. That’s a win for your AC bill and a massive win for your sanity during peak summer months. It’s the definition of an easy layered dessert that travelers well, too. I usually make a 9×13 batch anytime we have a family BBQ, and it disappears before I can even think about slicing into the next layer. It has all the fun of a classic banana split—the cool creaminess, the tangy fruit—but it holds together beautifully, making it an incredible option for summer party desserts. It’s quick, it’s impressive, and zero heat is involved. What’s not to love?
Gathering Ingredients for Your banana split cake
Alright, stop right there before you hit the grocery store. For this graham cracker crust recipes queen, preparation is everything, especially since nothing is getting baked to save us from our mistakes. The single most important language translator in this whole recipe is making sure your fruit elements are completely dry before they hit the filling. I’m talking about that crushed pineapple—if it’s sitting in liquid, your lovely cream cheese layer is going to weep into a puddle. You can find my best advice for making sure everything stays solid in my guide on graham cracker crust recipes, but the key here is that squeeze test. Cream cheese has to be truly softened, not just room temperature-ish, if you want that smooth, professional texture without over-mixing.
For the Graham Cracker Crust
- 1 1/2 cups graham cracker crumbs
- 1/2 cup unsalted butter, melted
For the Creamy Filling and Fruit Layers
- 1 (8 ounce) package cream cheese, softened
- 1 cup powdered sugar
- 1 (12 ounce) container frozen whipped topping, thawed, divided (that ‘divided’ part is crucial, don’t forget!)
- 3 ripe bananas, sliced
- 1 (8 ounce) can crushed pineapple, drained very well
- 1 (21 ounce) can strawberry topping
- 1/4 cup chopped nuts (optional, for crunch!)
- Maraschino cherries for topping (optional, but they look so retro!)
Step-by-Step Guide to Assembling the No Bake banana split cake
Okay, let’s talk assembly because this is where the magic happens. Remember, since we aren’t baking, every layer needs your full attention to make sure this no-bake pumpkin cheesecake variation holds its shape. We are building structure here, which is what transforms a bowl of ingredients into a stunning, sliceable creamy banana dessert.
Preparing the Crust and Cream Cheese Base
First things first: Press your buttery graham cracker mix into that 9×13 dish. And I mean press. Use the bottom of a measuring cup to really compact it down. Pop that in the freezer—we need it rock hard. While it’s chilling, grab your electric mixer. Beat that softened cream cheese and powdered sugar until it’s light and fluffy; you want absolutely zero lumps. Then, gently fold in half of your thawed whipped topping. You need to fold, not mix aggressively! We are keeping all that beautiful air in there for lift.
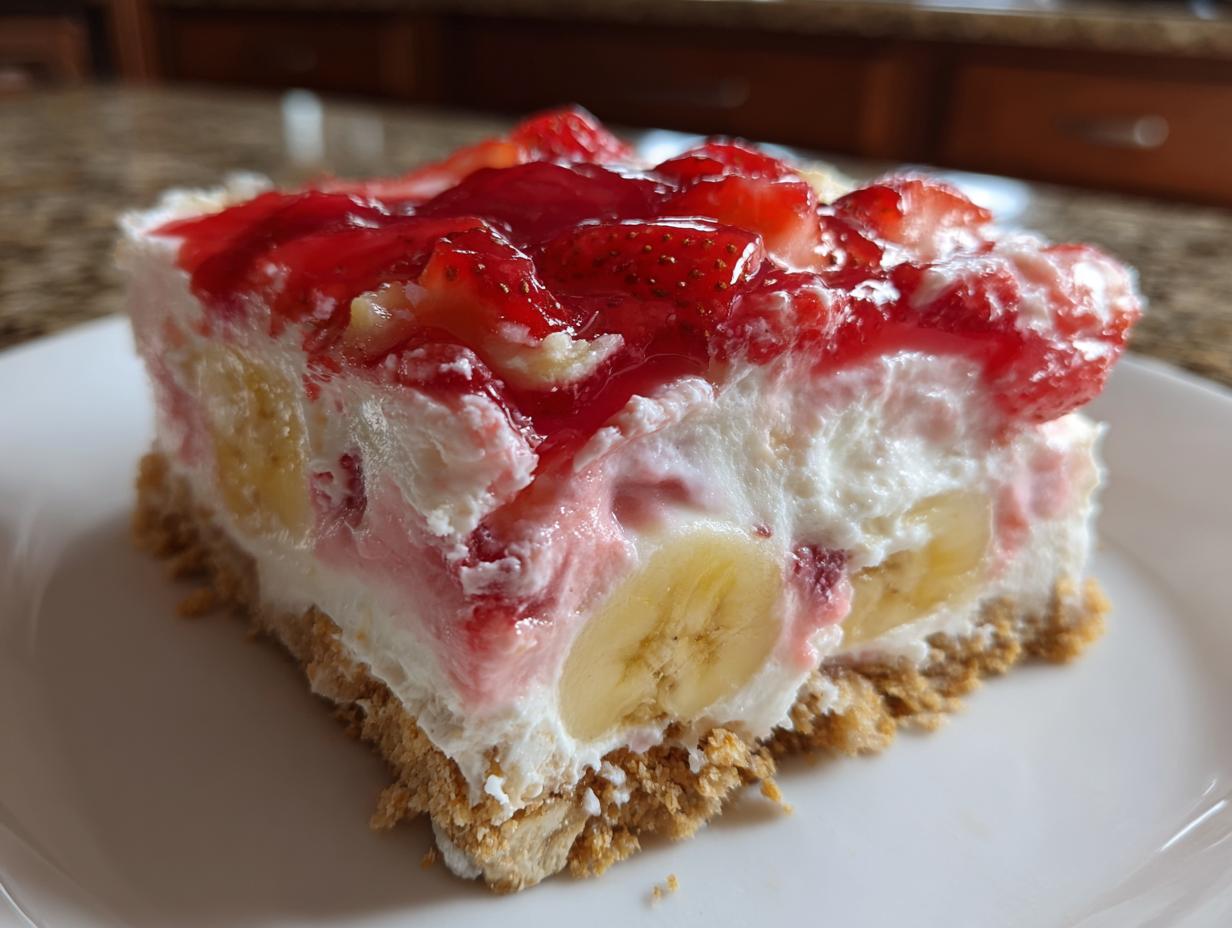
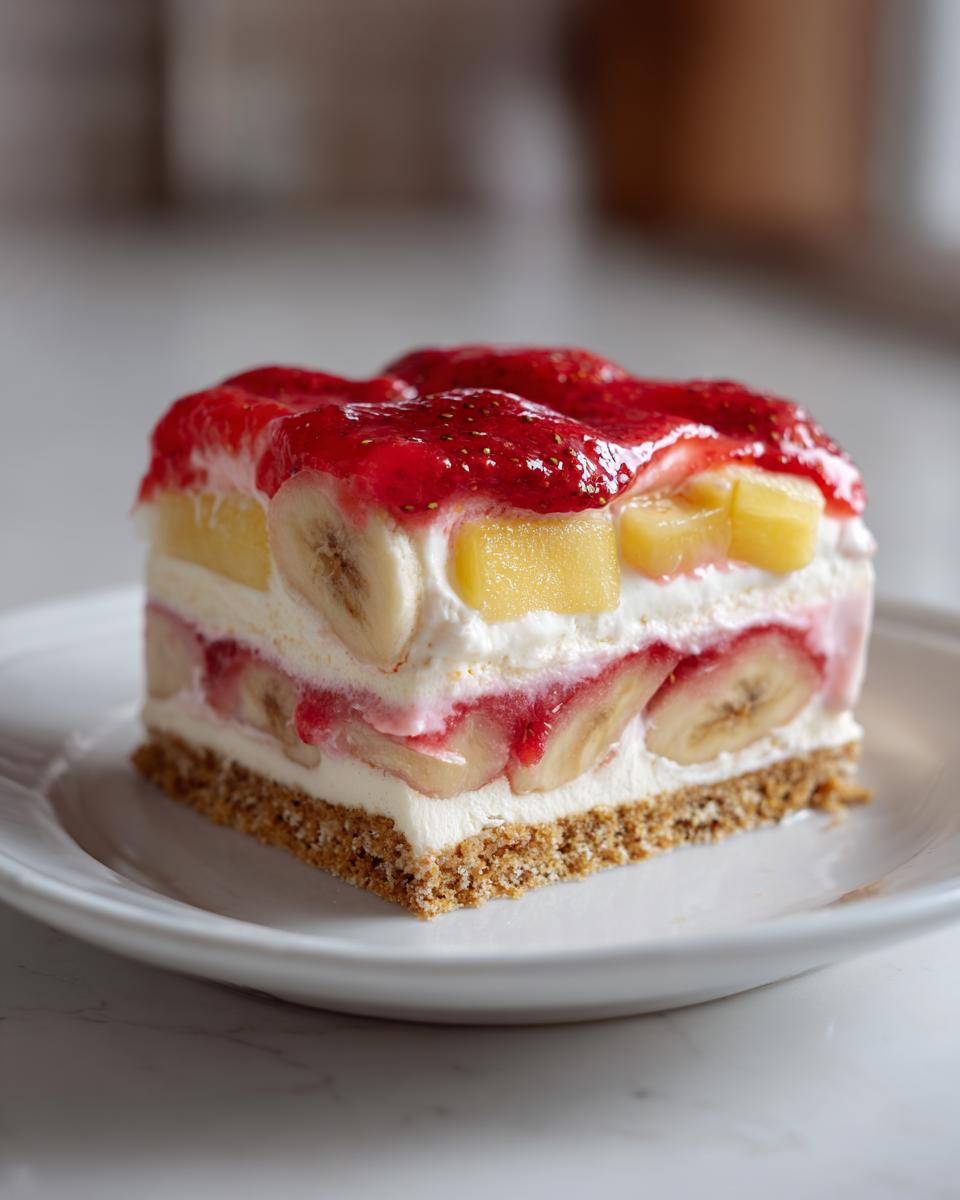
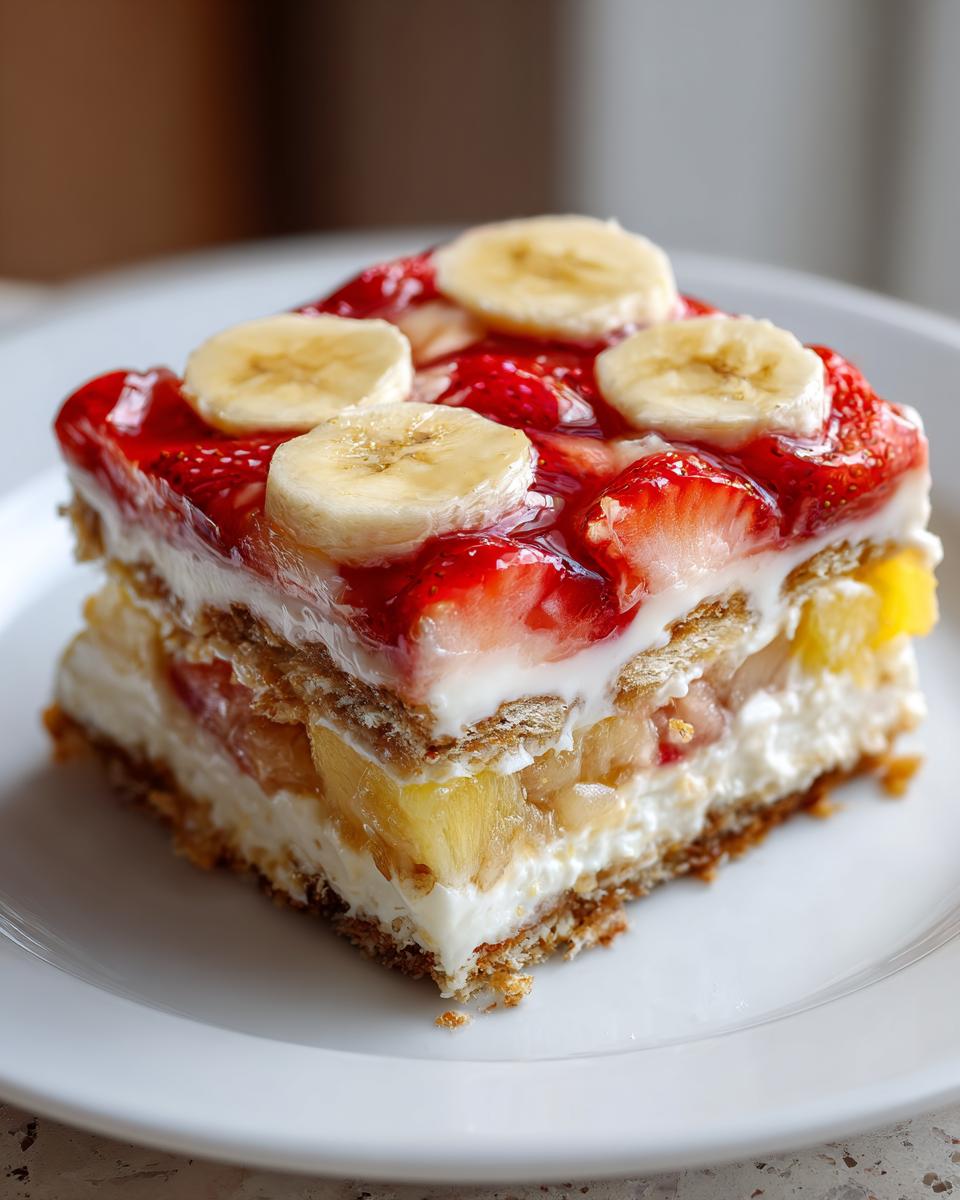
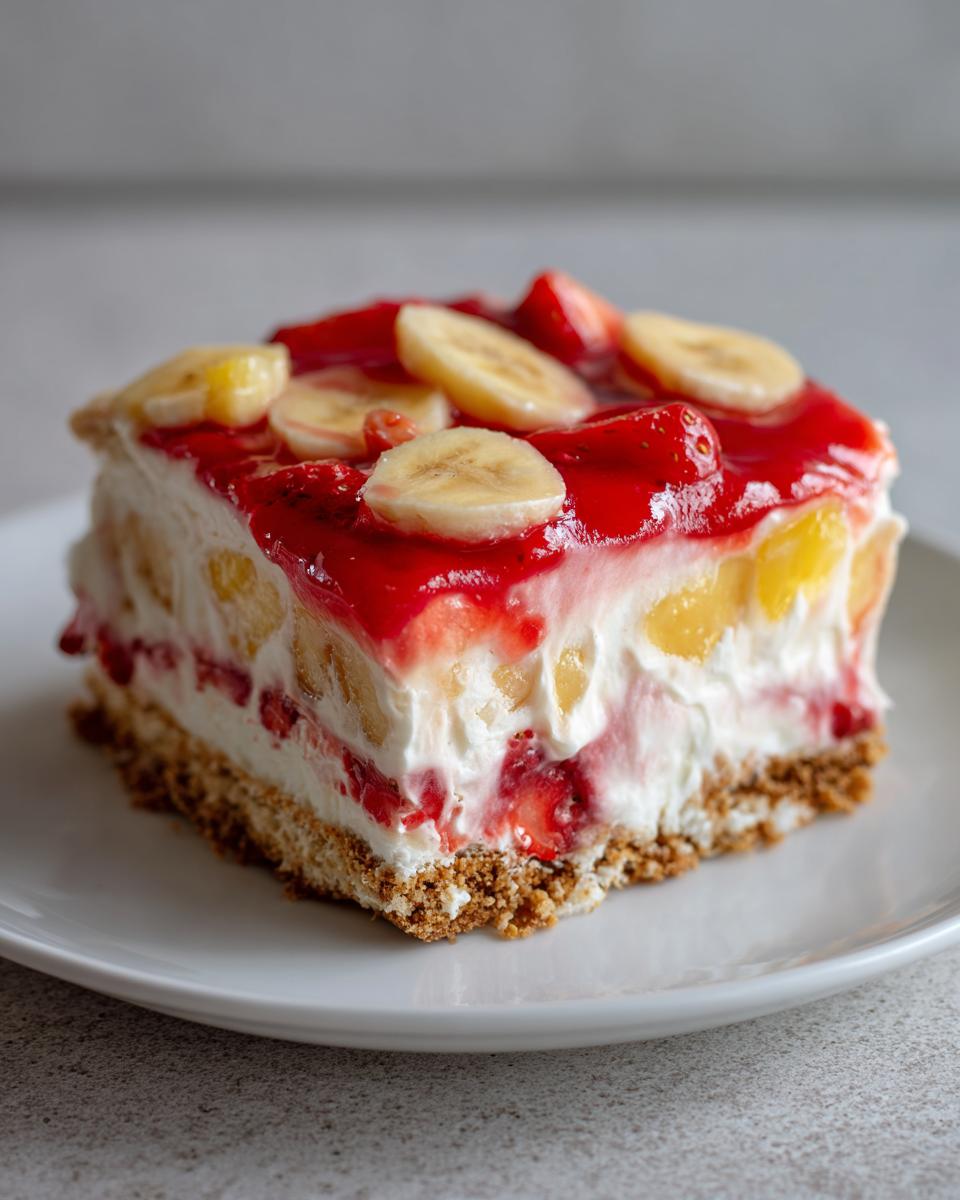
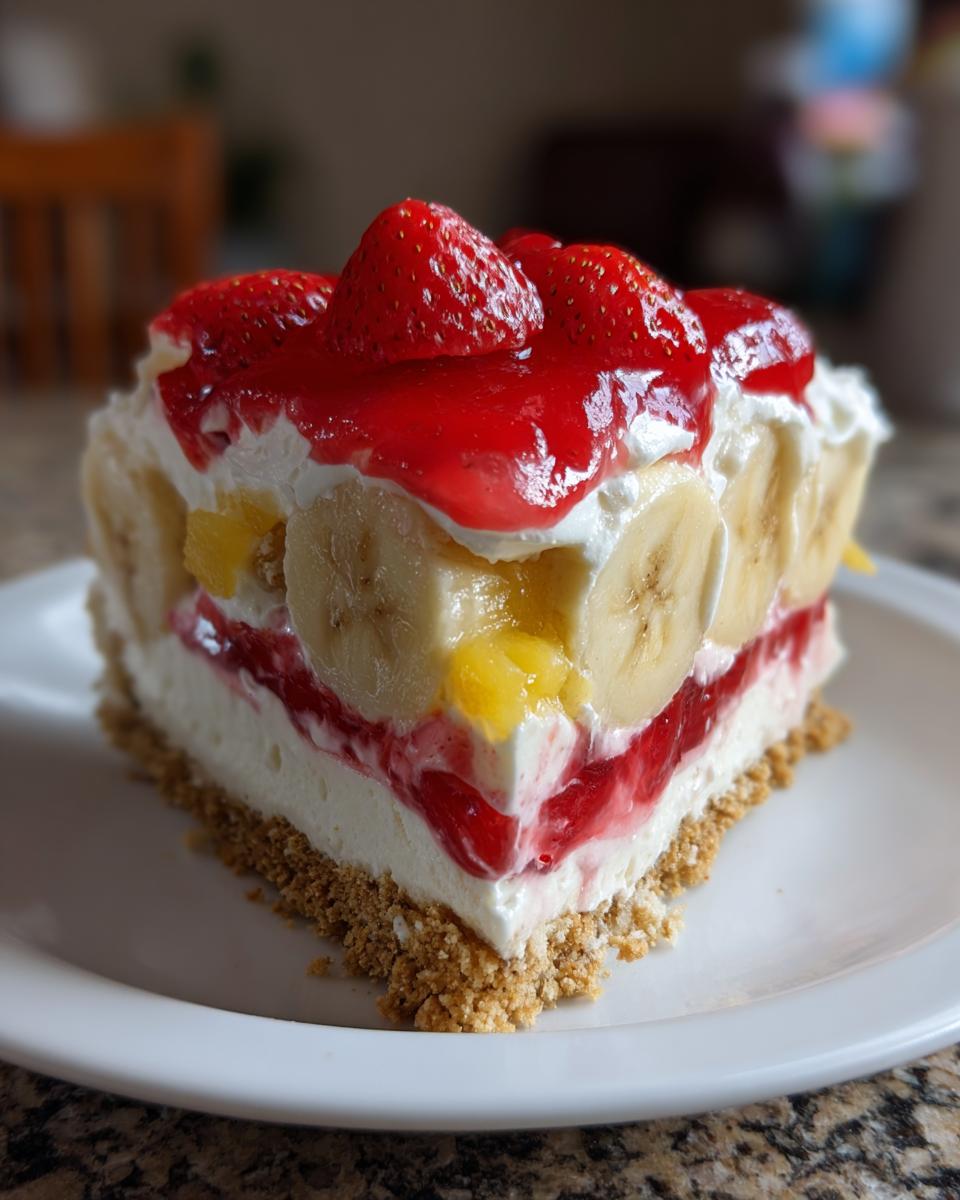
Layering the banana split cake Components
Time to stack! Take that chilled crust out. Spread exactly half of your cream cheese fluff evenly over the top. Next, arrange your slices of banana snugly over that layer. They look so pretty when they’re packed in there! Then, you spread your well-drained pineapple right over the bananas. This is important: carefully spoon the remaining cream cheese mixture over the pineapple. Try to cover all the fruit completely. Finally, take the last half of your whipped topping and spread it gently across the top to create a smooth, white canvas.
Chilling and Finishing Touches for Your Easy Layered Dessert
This is the hardest part, I know, but you absolutely must let this chill for at least four full hours in the fridge. Four hours is the minimum to set up your easy layered dessert. Honestly, if you can leave it overnight—like a true easy make ahead dessert—it slices better and tastes richer. Pro tip from the line: cover it loosely with plastic wrap before chilling so that the top whipped layer doesn’t get that weird, dried-out skin it sometimes forms in the fridge.
Tips for the Best banana split cake Texture and Flavor
I’ve messed this up so many times, and I ended up with a soupy mess in the bottom of the pan. Don’t let that happen to you! Getting this easy make ahead dessert right means paying attention to the prep work. We aren’t baking off excess moisture, so we have to control it manually. My biggest takeaway from years of making this chilled fruit dessert is controlling the liquid content.
Ingredient Prep Secrets
Seriously, when draining that canned pineapple, use a fine-mesh sieve and gently press it down with a spatula. You want it almost dusty dry. Same goes for anything else you might toss in there. For the bananas, avoid using rock-hard green ones, obviously, but don’t use those ones that are starting to brown and get squishy either. You want them ripe enough to taste sweet, but firm enough so they don’t turn to mush under the pressure of spreading that heavy topping. A slight firmness is your friend here!
Achieving the Perfect Chill for this Potluck Perfect Dessert
The recipe says four hours, and look, that will work if you’re desperate. But for this really impressive, sliceable potluck perfect dessert, you want to double that time if you can swing it. Six to eight hours? That’s when it stops being a creamy pile and starts being a true cake that stands up on the plate. When it’s set, if you gently tap the side of the pan, the whole thing should feel totally solid, not wobbly at all in the center. That means the cream cheese and whipped cream matrix has stabilized properly.
Variations on the Classic banana split cake
So you’ve made the no-bake version a few times and now you want to switch things up? I totally get it! Changing the base layer is the quickest way to give this apple pie dump cake vibe a new personality. Instead of the standard graham cracker crust, try crushing up vanilla wafers or even those chocolate-covered wafer cookies for a darker base. That chocolate crunch alongside the fruit is amazing!
If you’re looking for something warm instead of cold—maybe you’re craving a true banana split dump cake for a fall potluck—you can adapt the flavor profile completely. You simply use a box of yellow cake mix, dot it with butter, load up the bananas and pineapple, and top with chocolate chips before baking. Super different, but it hits those same nostalgia notes! For this chilled version, though, a little handful of miniature chocolate chips sprinkled over the pineapple layer before the final whipped topping goes on makes this banana split inspired treat feel extra decadent.
Serving Suggestions for Your Chilled Fruit Dessert
When you pull this spectacular, cold beauty out of the fridge, you want the presentation to match the flavor, right? Since this coffee cake muffins inspiration is already super sweet and loaded with toppings, we keep the serving simple. A plain dollop of extra whipped cream right on top of the slice—just before you hand it to your guest—adds a fresh visual pop and extra fluffiness. If you made the version without nuts, serving it alongside a small bowl of toasted pecans or sliced almonds lets people add that necessary crunch themselves.
Now, for pairings? This big, fruity, creamy dessert really shines next to a strong, hot beverage. Skip the sugary sodas. I always serve this with big mugs of strong black coffee or maybe a nice iced latte if it’s sweltering outside. The deep bitterness of the coffee cuts right through the sweetness of the strawberry topping and the cream cheese layer. It just balances everything out perfectly. It’s a great, easy way to end a big BBQ without making the whole meal feel heavy.
Storage and Reheating Instructions for banana split cake Leftovers
Okay, let’s say you managed to have some of this gorgeousness left over, which is rare, but happens! Since we’re heavy on the dairy and structure comes from chilling, we treat this like a delicate work of art. You need to keep this easy make ahead dessert in an airtight container inside the fridge. It really holds up well for about three days, tasting almost as good as day one.
Now, hear me out: Do NOT try to reheat this. Seriously, don’t even think about it. You’ve got whipped topping and cream cheese in there; that just turns into soup when it gets warm. If you want to freeze some leftovers, wrap tight slices individually in plastic wrap, then foil. It freezes fine for about a month, but you must thaw it slowly in the fridge overnight. No microwave tricks here!
Frequently Asked Questions About banana split cake
I know you have questions because even when a recipe seems simple—especially a no bake banana split cake—we all want to make sure we nail that perfect texture. I’ve gathered the things I get asked most often about assembling this treat. Don’t stress if you need to make a few swaps; that’s the home cook way!
Can I substitute the fruit layers in this banana split cake?
You absolutely can play around with the fruit, but remember, the banana, pineapple, and strawberry combo is what makes it taste like the real deal. If you skip the pineapple, you skip a lot of moisture control, so make sure whatever you swap in is well-drained. Peaches work nicely instead of pineapple if you want a slight change. Just keep the fruit soft! Big chunks of apple, for instance, just aren’t going to work in this no-bake cookies style dessert.
Is this banana split cake suitable for freezing?
Yes, this definitely works as an easy make ahead dessert if you freeze it correctly. Remember, this is not an ice cream cake, so the texture changes slightly when thawed. I find that freezing it solid for up to a month is fine. The trick is unwrapping it from the plastic/foil and letting it sit in the fridge for four to six hours before serving. That slow thaw keeps the cream base from getting grainy. It’s a fantastic way to prep a crowd pleasing dessert way in advance!
What if I don’t have any whipped topping?
If you’re out of the frozen tub stuff, you can whip your own heavy cream with a little bit of powdered sugar until stiff peaks form, but you have to be careful. The frozen topping is stabilized, which helps this fluffy creamy dessert hold its height in the fridge. If you whip your own, you need to make sure you fold it in *very* gently, and definitely plan on serving it within 24 hours, as homemade whipped cream can weep faster.
Nutritional Estimate for One Slice of banana split cake
Okay, I know we’re here to enjoy all the creamy layers and sweet fruit, but I always get asked about what’s actually in a slice of this healthy lunch recipes queen. Because this is a no-bake, fruit-loaded dessert, it’s surprisingly light, but remember that powdered sugar and butter still play a role! Think of these numbers as a general guideline, not a hard truth. We use standard store-bought ingredients, so your specific brand of graham crackers or whipped topping might shift things slightly. This is just a ballpark estimate to give you an idea of what you’re digging into when you grab a piece of this delicious **banana split cake**.
- Serving Size: 1 slice
- Calories: 350
- Sugar: 35g (That’s the fruit and frosting talking!)
- Sodium: 180mg
- Fat: 18g
- Saturated Fat: 10g
- Unsaturated Fat: 8g
- Trans Fat: 0g
- Carbohydrates: 45g
- Fiber: 2g
- Protein: 4g
- Cholesterol: 45mg
No-Bake Banana Split Cake
You make this creamy, layered dessert without turning on the oven. It captures the classic banana split flavors using a graham cracker crust, fruit, and a light, fluffy topping. This is a potluck perfect dessert for summer.
- Prep Time: 20 min
- Cook Time: 0 min
- Total Time: 4 hr 20 min
- Yield: 12 servings 1x
- Category: Dessert
- Method: No Bake
- Cuisine: American
- Diet: Vegetarian
Ingredients
- 1 1/2 cups graham cracker crumbs
- 1/2 cup unsalted butter, melted
- 1 (8 ounce) package cream cheese, softened
- 1 cup powdered sugar
- 1 (12 ounce) container frozen whipped topping, thawed, divided
- 3 ripe bananas, sliced
- 1 (8 ounce) can crushed pineapple, drained well
- 1 (21 ounce) can strawberry topping
- 1/4 cup chopped nuts (optional)
- Maraschino cherries for topping (optional)
Instructions
- Mix the graham cracker crumbs and melted butter in a bowl. Press this mixture firmly into the bottom of a 9×13 inch baking dish. Place the crust in the freezer while you prepare the filling.
- In a large bowl, beat the softened cream cheese and powdered sugar together until the mixture is smooth. Fold in half of the thawed whipped topping until just combined.
- Spread half of the cream cheese mixture evenly over the chilled crust. Arrange the sliced bananas over this layer.
- Spread the drained crushed pineapple over the bananas. Top the pineapple with the remaining cream cheese mixture.
- Spread the remaining half of the whipped topping over the cake. Spread the strawberry topping over the whipped topping layer.
- Chill the cake in the refrigerator for at least 4 hours, or until firm.
- Before serving, sprinkle with chopped nuts and top with maraschino cherries, if you use them. Slice and serve this easy layered dessert cold.
Notes
- Make sure the crushed pineapple is very well drained; excess liquid makes the layers runny.
- For a richer flavor, you can use a store-bought graham cracker crust instead of making your own.
- This is an easy make ahead dessert; it tastes best when chilled for 6 to 8 hours.
Nutrition
- Serving Size: 1 slice
- Calories: 350
- Sugar: 35g
- Sodium: 180mg
- Fat: 18g
- Saturated Fat: 10g
- Unsaturated Fat: 8g
- Trans Fat: 0g
- Carbohydrates: 45g
- Fiber: 2g
- Protein: 4g
- Cholesterol: 45mg