

Oh, there’s just something about kneading dough, isn’t there? That squishy, yielding texture under your hands, the slow transformation into something smooth and elastic – it’s pure magic. And when it comes to Challah bread, that tactile joy becomes even more meaningful. This beautifully braided egg bread isn’t just bread; it’s a symbol, a centerpiece for Jewish holidays and Sabbath dinners, representing blessings and family connection. My goal here is simple: to guide you to that perfect, soft, slightly sweet loaf with a gorgeous golden crust that just begs to be torn apart and shared. I remember learning to make my first real challah with my aunt; she said it felt like weaving love into every strand, and honestly, I still feel that every time I make it.

- Why You'll Love This Challah Bread Recipe
- Ingredients for Your Perfect Challah Bread
- Essential Equipment for Baking Challah Bread
- Step-by-Step Guide to Making Challah Bread
- Tips for Baking the Best Challah Bread
- Serving and Storing Your Homemade Challah Bread
- Frequently Asked Questions about Challah Bread
- Nutritional Information for Challah Bread
- Share Your Challah Bread Creations!
Why You’ll Love This Challah Bread Recipe
Seriously, this challah bread recipe is a keeper! Here’s why it’s going to become your go-to:
- Super Easy to Make: Even if you’re new to bread baking, this recipe makes it totally doable.
- Incredibly Delicious: It’s got that perfect balance of soft, slightly sweet flavor you dream of.
- So Versatile: Amazing for dipping in soup, making killer French toast, or just snagging a slice anytime.
- So Rewarding: There’s nothing quite like pulling a beautifully braided, golden loaf from your oven. Your kitchen will smell divine!
Ingredients for Your Perfect Challah Bread
Alright, let’s talk ingredients! These are the building blocks for your amazing challah. Don’t substitute the eggs or oil willy-nilly though, they’re pretty important for that signature texture.
- 1 cup warm water (think cozy bath water, 105-115°F)
- 2 ¼ teaspoons active dry yeast
- 1 teaspoon granulated sugar (just to wake up that yeast!)
- 4 cups all-purpose flour, plus a little extra for dusting when you get messy
- ½ teaspoon salt
- 4 large eggs, divided (these give it that gorgeous richness!)
- ½ cup granulated sugar
- ½ cup vegetable oil (or canola, or even melted butter in a pinch)
- 1 tablespoon honey
- 1 egg yolk beaten with 1 tablespoon water (this is our shiny glaze secret!)
Essential Equipment for Baking Challah Bread
Before you dive in, let’s make sure you have your tools ready. You’ll want a good-sized mixing bowl – honestly, the bigger the better when you’re kneading! A sturdy baking sheet, some parchment paper for easy cleanup, and a whisk for getting things bubbly are all super helpful. Oh, and a bench scraper can be a lifesaver for taming sticky dough!
Step-by-Step Guide to Making Challah Bread
Alright, let’s get this dough party started! Follow these steps and you’ll have a gorgeous challah bread in no time. Remember, bread making is a bit of an art, so don’t stress if it’s not perfect the first time. Just enjoy the process!
Activating the Yeast for Your Challah Bread
First things first, we need to wake up our yeast! Grab a small bowl, pour in that warm water – remember, not too hot, just cozy like a bath – and sprinkle in your yeast and that teaspoon of sugar. Give it a gentle stir and let it hang out for about 5 to 10 minutes. You’ll know it’s alive and kicking when it gets all foamy and bubbly on top. That means your challah bread is already on its way!
Mixing and Kneading the Challah Dough
Now, in your biggest mixing bowl, whisk together the flour and salt. In a separate bowl, whisk together three of the eggs, the remaining sugar, vegetable oil, and that little touch of honey. Make sure everything is combined well. Pour the yeast mixture and the egg/oil mixture into the flour. Start mixing it all up until it looks shaggy. Don’t worry, it’ll be messy! Turn that dough out onto a lightly floured surface. This is where the real fun begins – kneading! Work it for about 8 to 10 minutes. You’re looking for it to become super smooth and elastic. If it feels sticky, just add a tiny sprinkle more flour. Zoe always says to really feel the dough; it should bounce back slowly when you poke it.
First Rise: Letting Your Challah Bread Dough Rest
Okay, time for a little patience! Lightly oil a clean bowl, pop your beautiful dough in there, and cover it with plastic wrap or a damp towel. Find a nice warm spot in your kitchen – away from drafts! Let it rise for about an hour to an hour and a half, or until it’s doubled in size. This is where all that flavor develops for your challah bread, so don’t rush it!
Shaping and Braiding Your Challah Loaf
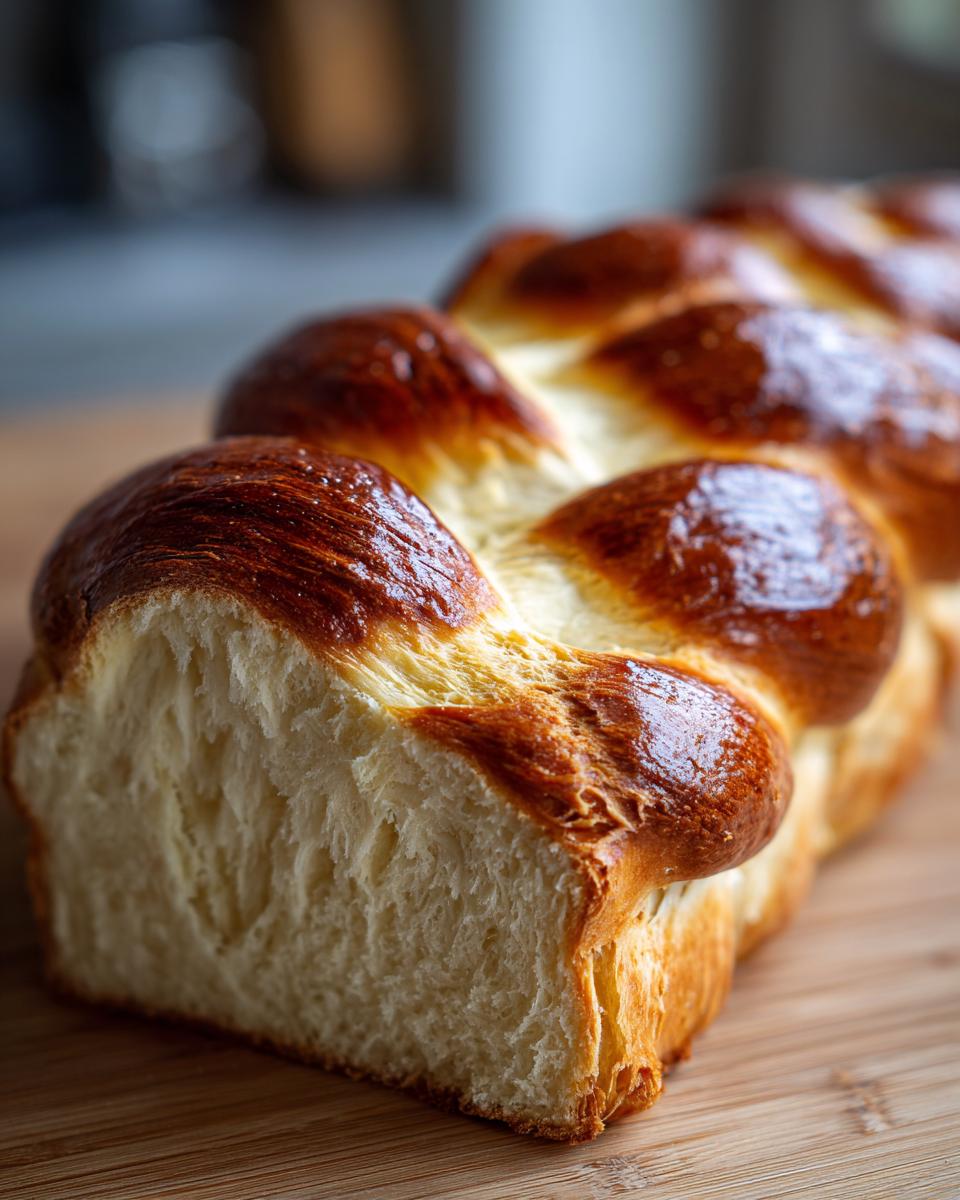
Punch down that fluffy dough to release the air. Now, divide it into three equal pieces. Roll each piece into a long rope, about 16 inches long. Take a deep breath, and pinch the ends of the three ropes together firmly at the top. Now for the braiding! It’s just like braiding hair – cross the right rope over the middle, then the left rope over the new middle, and keep going until you reach the end. Pinch the ends together again and tuck them underneath your loaf. This is how you get that gorgeous braided egg bread look.

Second Rise and Oven Preparation for Challah Bread
Carefully place your braided challah onto a baking sheet lined with parchment paper. Cover it loosely with plastic wrap again and let it have another rest for about 30 to 45 minutes. While it’s rising, go ahead and preheat your oven to 375°F (190°C). Now for that beautiful shine! In a little bowl, mix up your egg yolk with a tablespoon of water. This is what’s going to give your challah bread that amazing golden crust.
Baking Your Golden Crust Challah Loaf
Gently brush the entire top of your risen loaf with that egg wash. Don’t skip this step – it’s key for that gorgeous color! Pop it into your preheated oven and bake for about 30 to 35 minutes. You’ll know it’s done when it’s perfectly golden brown all over and an instant thermometer reads between 190-200°F (88-93°C). If the crust starts to get too dark before the inside is cooked, you can always loosely tent it with foil. Patience, and you’ll have a perfectly baked golden crust loaf!

Tips for Baking the Best Challah Bread
Okay, so you’ve made the challah bread, but how do we make sure it’s truly *the best*? A few little tricks up my sleeve, learned from lots of trial and error (and yes, a few oops moments!). It’s all about feeling the dough and giving it what it needs. Make sure it’s nice and warm for that rise – the dough needs a cozy spot to really puff up. If your dough feels too sticky, don’t panic and dump in a ton of flour all at once; just add a tablespoon at a time. And for the braid? Gently roll those ropes, don’t force them, and try to keep them roughly the same thickness so your loaf bakes evenly. It’s these little things that make a world of difference in your challah bread!
Ingredient Substitutions and Variations for Challah
You can totally play around with this challah recipe! If you don’t have vegetable oil, canola oil works great, or even melted unsalted butter offers a slightly different, richer flavor. For a touch more sweetness or depth, feel free to use a bit more honey. Want to jazz it up? Sprinkle some poppy seeds or sesame seeds on top before baking, or even mix a tablespoon or two of fresh, finely chopped herbs like rosemary into the dough for a savory twist. This basic challah is a lovely canvas for your own creations!
Serving and Storing Your Homemade Challah Bread
Okay, so you’ve got this beautiful, golden challah bread, and now what? Honestly, it’s so good, it’s fantastic just on its own, maybe with a little pat of butter. It’s perfect alongside a hearty soup or stew, soaking up all those yummy flavors. But my absolute favorite thing to do with leftover challah? French toast! Seriously, it makes the most incredible French toast because the bread is already a bit sweet and holds up beautifully. You can find some more brilliant breakfast ideas over here.
Wrappped tightly in plastic wrap and then maybe a layer of foil, it’ll stay fresh on your counter for about 2-3 days. If you need it to last longer, slice it up and pop it in the freezer! Just pop a slice or two in the toaster or microwave to warm it up.
Frequently Asked Questions about Challah Bread
Got questions about making this wonderful challah bread? I get it! Bread baking can sometimes feel like a mystery, but don’t worry, I’m here to help decode it.
Can I make challah bread without eggs?
Oh, that’s a common one! While eggs are key to that classic challah texture and richness, you absolutely *can* make a delicious braided bread without them. You’ll likely need to adjust the liquid a bit, maybe using a bit more water or a dairy-free milk, and the end result will be a bit lighter, more like a regular challah without the eggy richness. It won’t be quite the same, but still yummy!
How do I get a shiny crust on my challah?
That gorgeous shine on a perfect challah loaf comes down to the egg wash! You want to be generous but gentle. For this recipe, we’re using an egg yolk mixed with a little water. Make sure you brush it evenly all over the top of the loaf just before it goes into the oven. It seals in the moisture and caramelizes beautifully as it bakes. Some folks even do a second brush halfway through baking for extra gloss!
Why is my challah dough so sticky?
Sticky dough is super common, especially when you’re working with it for the first time! It usually means you might need a little more flour, but be careful not to add too much. Instead of dumping it all in at once, add it just a tablespoon at a time while you’re kneading. Sometimes, that stickiness is a good thing – it means there’s enough moisture to create a really soft, tender crumb. Just keep kneading, and it will likely smooth out. If it’s *really* unmanageable, a lightly oiled hand can help too!
Can I make challah bread with whole wheat flour?
You sure can! It’ll change the texture a bit, making it a little denser and nuttier, which is delicious in its own way. I’d suggest starting by swapping out about half of the all-purpose flour for whole wheat. Your dough might absorb liquid a little differently, so you might need to adjust the water or flour slightly. It’s a fun variation to play with for your challah bread!
Nutritional Information for Challah Bread
Just a heads-up, these numbers are estimates, okay? They can totally change depending on the exact ingredients you use and how big you slice your loaf. But generally, a slice of this delicious challah bread is around 250 calories, with about 35g of carbs, 10g of fat, and 5g of protein. It’s a good source of energy as you enjoy this lovely bread!
Share Your Challah Bread Creations!
Alright, you’ve baked your beautiful challah bread, and I’m dying to see it! Did it turn out perfectly braided? Did your kitchen smell amazing? Drop a comment below with your experience, tell me what you think, and maybe even share a photo! Your feedback helps everyone and makes me so happy to see you rocking this recipe. Don’t forget to give it a star rating if you loved it! And if you have any questions or just want to share more kitchen adventures, feel free to reach out via our contact page!
PrintClassic Challah Bread Recipe

Bake a soft, slightly sweet, and beautifully braided challah bread, a traditional Jewish egg bread perfect for any occasion.
- Prep Time: 25 min
- Cook Time: 35 min
- Total Time: 2 hours 35 min
- Yield: 1 loaf 1x
- Category: Baking
- Method: Baking
- Cuisine: Jewish
- Diet: Vegetarian
Ingredients
- 1 cup warm water (105-115°F)
- 2 ¼ teaspoons active dry yeast
- 1 teaspoon granulated sugar
- 4 cups all-purpose flour, plus more for dusting
- ½ teaspoon salt
- 4 large eggs, divided
- ½ cup granulated sugar
- ½ cup vegetable oil
- 1 tablespoon honey
- 1 egg yolk beaten with 1 tablespoon water (for egg wash)
Instructions
- In a small bowl, combine warm water, yeast, and 1 teaspoon sugar. Let stand for 5-10 minutes until foamy.
- In a large bowl, whisk together flour and salt.
- In a separate bowl, whisk together 3 eggs, ½ cup sugar, vegetable oil, and honey.
- Add the yeast mixture and the egg mixture to the flour mixture. Mix until a shaggy dough forms.
- Turn the dough out onto a lightly floured surface and knead for 8-10 minutes until smooth and elastic.
- Place the dough in a lightly oiled bowl, cover with plastic wrap, and let rise in a warm place for 1-1.5 hours, or until doubled in size.
- Punch down the dough and divide it into three equal portions.
- Roll each portion into a rope about 16 inches long.
- Pinch the ends of the ropes together and braid them. Tuck the ends under.
- Place the braided loaf on a baking sheet lined with parchment paper. Cover loosely and let rise for another 30-45 minutes.
- Preheat your oven to 375°F (190°C).
- Brush the top of the loaf with the egg wash.
- Bake for 30-35 minutes, or until golden brown and the internal temperature reaches 190-200°F (88-93°C).
- Let cool on a wire rack before slicing.
Notes
- For a richer flavor, you can add an extra egg yolk to the dough.
- If you don’t have vegetable oil, canola oil or melted butter can be substituted.
- For a shiny crust, ensure you brush the loaf evenly with the egg wash.
- This bread is excellent for French toast the next day.
Nutrition
- Serving Size: 1 slice
- Calories: 250
- Sugar: 10g
- Sodium: 150mg
- Fat: 10g
- Saturated Fat: 2g
- Unsaturated Fat: 8g
- Trans Fat: 0g
- Carbohydrates: 35g
- Fiber: 1g
- Protein: 5g
- Cholesterol: 50mg