
Let’s be real: holiday baking can feel like a high-stakes performance. You’re juggling shopping lists, guest lists, and the secret pressure to produce a dessert that looks like it belongs on a magazine cover. It’s enough to make you want to stick to store-bought cookies, right? Stop right there! That’s exactly why I’m translating this recipe for you. We’re ditching the intimidation factor for something that screams Christmas spirit but whispers “I made this in under an hour.” This **Christmas Poke Cake** is about to become your secret weapon. It’s vibrant, it’s unbelievably moist, and honestly, it’s one of the most reliable **Festive Holiday Desserts** you’ll ever need in your rotation. Forget complex layers; we’re talking easy translation into holiday joy.
- Why This Christmas Poke Cake is Your New Holiday Must-Make
- Gathering Ingredients for Your Christmas Poke Cake
- Step-by-Step Jello Poke Cake Tutorial
- Tips for the Perfect Christmas Poke Cake Presentation
- Ingredient Notes and Substitutions for Your Christmas Poke Cake
- Making Your Christmas Poke Cake Ahead of Time
- Serving Suggestions for this Festive Holiday Dessert
- Storing and Reheating Your Christmas Poke Cake
- Common Questions About Making a Christmas Poke Cake
- Share Your Christmas Poke Cake Success
Why This Christmas Poke Cake is Your New Holiday Must-Make
Look, I get it. You need something that wows people but doesn’t eat up your entire afternoon. This Jello-infused marvel is what I call a total win-win. It’s practically the definition of **Easy Christmas Cake Recipes** because the oven does most of the hard work, and the rest is just pouring and chilling. It looks like you spent hours fussing over it, but you didn’t! Hello, holiday free time!
- It’s fast! Prep time is barely anything before the chill starts.
- The red and green layers scream Christmas without needing fancy piping bags.
- It stays ridiculously moist—no more dry slices sitting out on the buffet table.
If you’re looking for a great companion for this cake, check out my recipe for easy holiday punch—they are made for each other.
The Secret to a Super Moist Christmas Poke Cake
Okay, here’s the lingo translation for moisture: the Jello isn’t just for color. When you pour that liquid gelatin mixture over the warm cake, the cake structure essentially drinks it up. That process guarantees you end up with a tender, deeply flavored, and incredibly **Moist Holiday Sheet Cake**. It’s the opposite of those dry, crumbly desserts we’re trying to avoid!
Gathering Ingredients for Your Christmas Poke Cake
Alright, time to get our mise en place ready. This is where we translate the recipe into reality. The beauty of this cake is that you’re starting with mostly pantry and fridge staples, which keeps it firmly in the realm of **Simple Christmas Baking**. No hunting down exotic items—just good, solid foundation pieces. We need three main components: the base cake, the colorful liquid that makes the magic, and the cool, creamy finish. If you’re planning other baked goods, maybe check out my thoughts on Christmas jam to keep things efficient!
Cake Base Ingredients
You’re starting with the workhorse: a simple white cake mix. Don’t overthink this part; we are saving time! Grab one standard box of white cake mix. Then, you must include whatever the box tells you to add—usually eggs, oil, and water. That mix is going into a 9×13 inch pan, so make sure you have that ready for baking.
Red and Green Gelatin Soak
This is the flavor and color injection system! You need one 3-ounce package of red gelatin (yep, the classic strawberry or cherry flavor) and one 3-ounce package of green gelatin. You need 1 cup of boiling water for *each* flavor, and then 1 cup of cold water for *each* flavor as well. Remember, we are doing these two colors separately so they layer nicely.
Creamy Topping and Garnish
For that cloud-like finish, grab one 8-ounce container of frozen whipped topping, and make sure you let it thaw in the fridge before you need it—no shortcuts here, melted Cool Whip is soupy, and we don’t want soupy! Lastly, for the festive look that makes this a great **Red and Green Dessert**, you need a good handful of red and green sprinkles. Let’s get mixing!
Step-by-Step Jello Poke Cake Tutorial
Okay, now we put the theory into practice. This is where we go from a warm cake to a perfectly saturated, colorful holiday showstopper. Remember, our goal here is to translate the chef’s timing into something that works perfectly in your home kitchen. Don’t rush the chilling steps—that’s what locks in the flavor and moisture. If you’re feeling extra ambitious, maybe check out my guide on no-bake pumpkin cheesecake for another easy make-ahead dessert!
Baking and Initial Poking
First up, bake that white cake mix exactly as the box tells you to use that 9×13 inch pan. Once it’s out of the oven, you don’t let it cool completely! This is critical. While the cake is still warm—not piping hot, but definitely warm—grab the handle of a wooden spoon, or even a large fork, and start poking. You want holes all over the surface, spaced about an inch apart. Go deep enough to hit the bottom but don’t stab through it; we want the liquid to soak *in*, not pool underneath.
Infusing the Red Layer
Take your red gelatin, the 3-ounce box, and dissolve it completely in 1 cup of boiling water. You have to stir for a solid two minutes; don’t cheat this part, or you’ll get grainy texture spots. Then, stir in 1/2 cup of cold water. Now, pour this red mixture slowly and evenly over the warm, poked cake. Watch it disappear into those holes! Put the whole thing in the fridge for at least one hour. You want it mostly set up—jiggly but not liquidy.
Adding the Green Layer and Final Chill
Once the red layer has firmed up, it’s time for green! Repeat the exact process: dissolve the green gelatin in 1 cup of boiling water, stir for two minutes, then add the remaining 1/2 cup of cold water. Pour this green mixture evenly over the set red layer. That’s what gives us that great Christmas Poke Cake look. Back into the fridge it goes—this time, let it rest for at least two more hours, or until that green layer is completely firm to the touch. Patience pays off here!

Finishing the Christmas Poke Cake with Topping
This is the simple finale! In a small bowl, whisk together your thawed whipped topping with the sweetened condensed milk and the vanilla extract. Whisking them slightly before spreading helps stabilize the topping. Now, gently spread this creamy mixture all over the chilled, set gelatin layers. Don’t press hard; just cover the top smoothly. Right before you bring it out to the party, hit the whole surface with a generous shower of red and green sprinkles. That’s it; you’re done transforming simple ingredients into a holiday masterpiece!
Tips for the Perfect Christmas Poke Cake Presentation
Look, we’ve locked in the flavor, but now we need to talk about the visual game. Serving a **Festive Holiday Dessert** means making sure it looks as good as it tastes, especially when everyone brings their favorite casserole. The goal here is to get those clean, sharp layers so when you slice into it, it looks like you spent days assembling a masterpiece. Trust me, getting the timing right on the chilling phase is the chef’s secret jargon for presentation perfection.
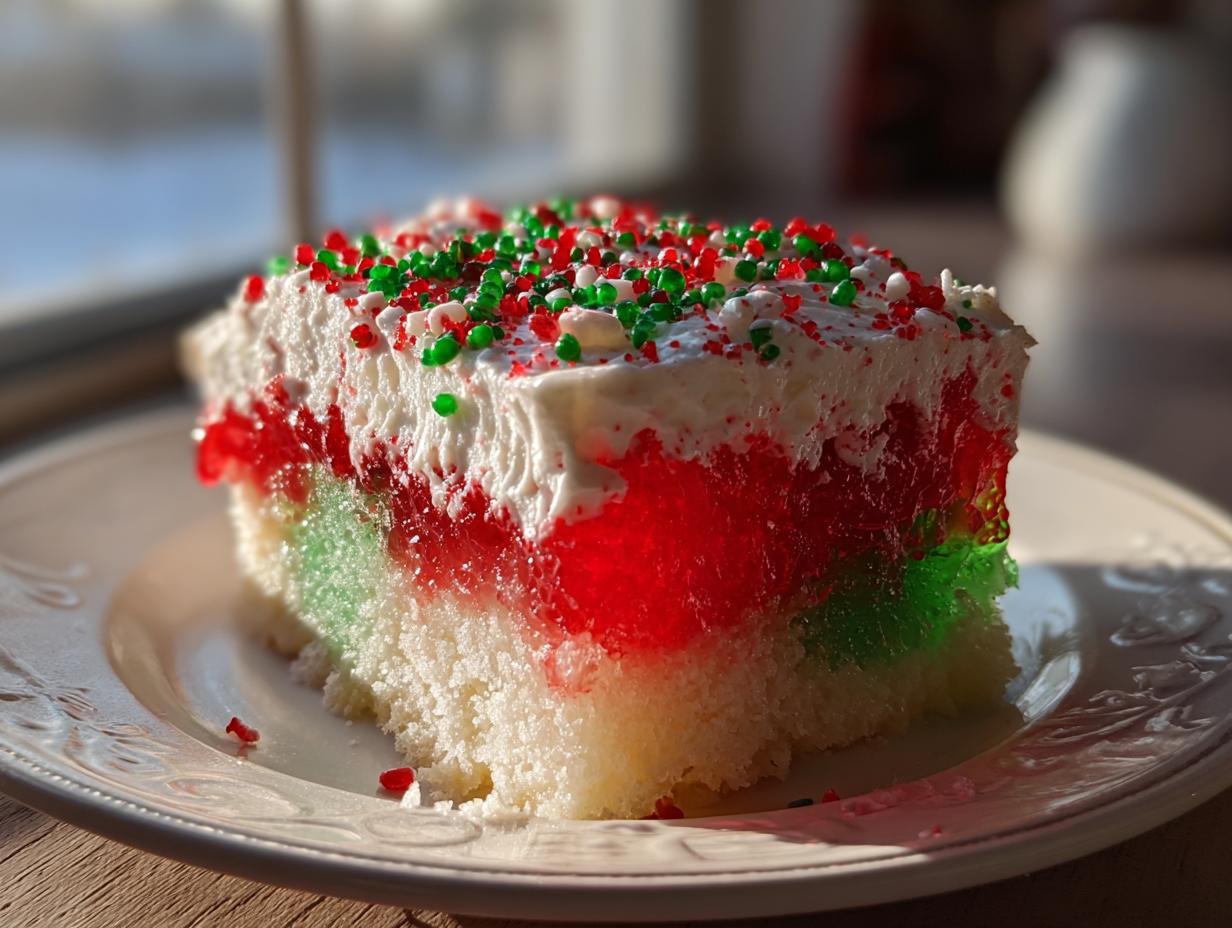
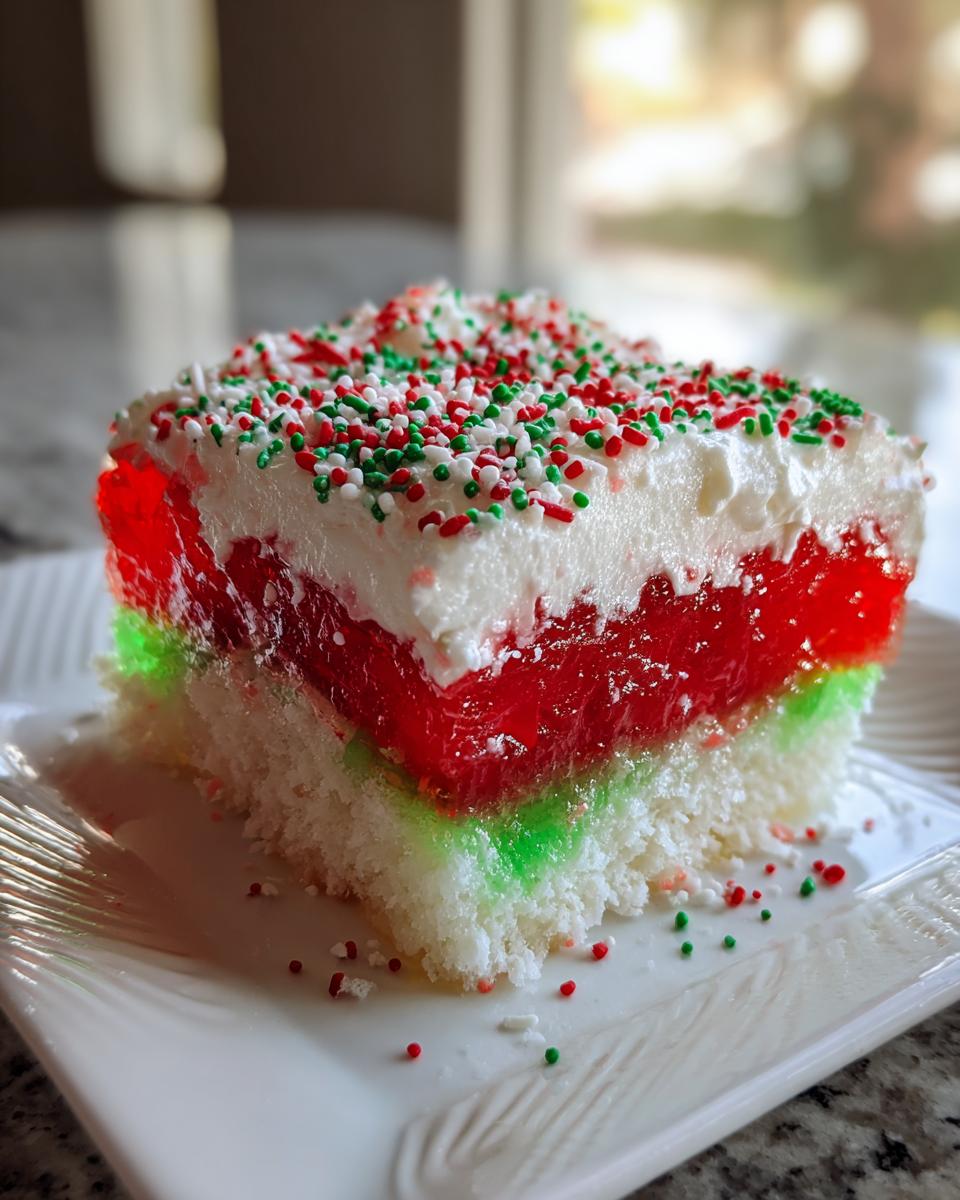
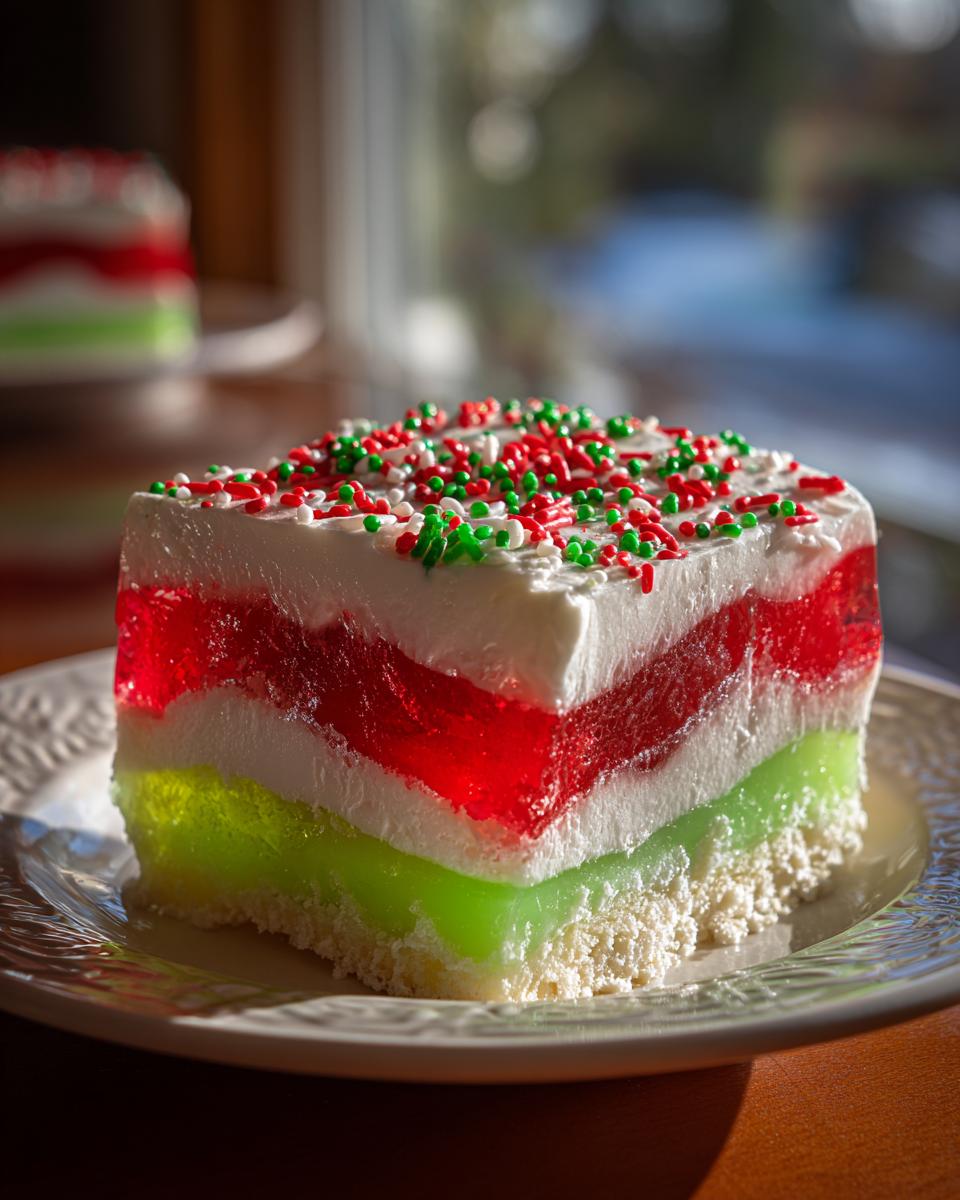
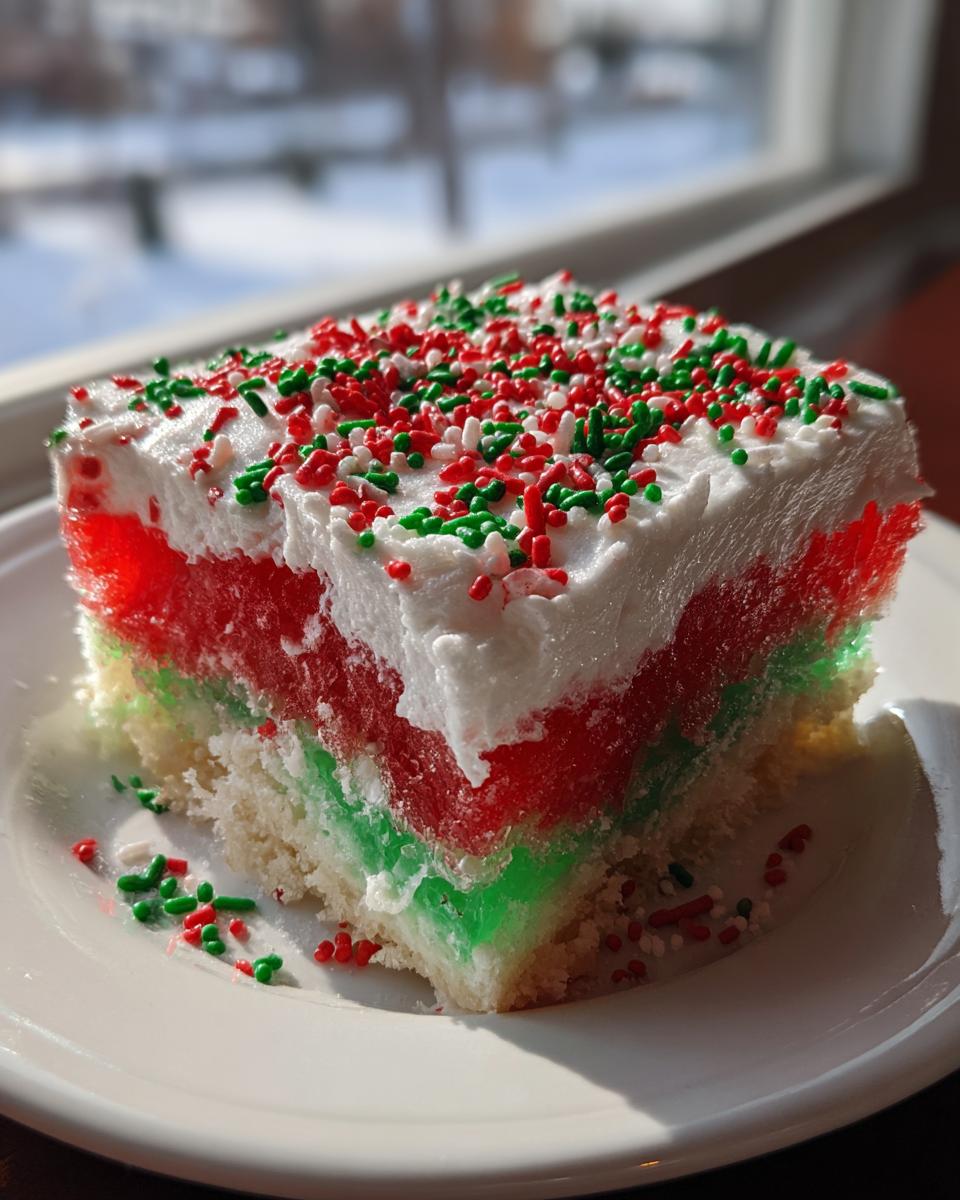
Achieving Sharp Red and Green Layers
This is where you prove you mastered the translation! The absolute key to making this a true **Red and Green Dessert** that knocks socks off is making sure that first Jello layer is solid before you pour the second on top. If the red layer is still too liquidy when you pour the green over it, they just merge into a muddy brown mess—and nobody wants brown Jello cake! Wait until that first layer is really mostly set and firm; it gives you a solid foundation for the next burst of color. It’s about giving each layer its moment to shine before they stack up!
If you’re interested in making sure your other bake sale goodies look this sharp, you might want to check out my tips on getting cookie icing to harden fast. Same principle: timing is everything!
Ingredient Notes and Substitutions for Your Christmas Poke Cake
So, you’ve got the basic recipe down, but maybe you want to customize it slightly, right? That’s the beautiful thing about translating these recipes—you gain the confidence to tweak them! We’re talking about making sure this cake fits *your* party perfectly, whether that means keeping it strictly family-friendly or bumping up the grown-up flavor profile. It’s all about knowing what you can swap out without messing up that gorgeous Jello saturation we worked so hard to achieve.
Flavor Infusions: Keeping it Family Friendly
I mentioned this in the instructions, but I want to stress it here because it’s a pro move for adult gatherings! When you get to the point where you add the cold water to the dissolved Jello, you can substitute half, or even all, of that cold water with a clear spirit. Think vodka or maybe a nice white rum. It just enhances the fruitiness of the gelatin when it soaks in. But listen—if there are kids running around, skip the booze! We want **Festive Family Desserts**, not unexpected surprises. Keep it clean if you need to; the cake is still amazing.
If you’re thinking about other ways to make your holiday drinks festive, I have a great guide on making fall sangria that uses similar flavor layering concepts.
Topping Variations (Beyond Cool Whip)
The box recipe calls for that standard frozen whipped topping because it’s quick, which keeps it in the **Quick Holiday Treats** category. But maybe you want something richer—something that feels a bit more homemade? No problem! Instead of that tub of topping, whip up 1 cup of heavy cream until soft peaks form. Then, beat in about 1/4 cup of powdered sugar and a tiny splash of vanilla. That homemade version replaces the standard **Poke Cake with Cool Whip Topping** texture with something way more luxurious. Sprinkle those colors on top of that, and you elevate the whole thing!
Making Your Christmas Poke Cake Ahead of Time
This is one of the best parts about this recipe: it’s built for planning! You absolutely can whip up this **Christmas Poke Cake** the day before your party or gathering. That means less stress on the actual December 25th, right? The chilling time isn’t just recommended; it’s mandatory for the Jello to fully set and saturate those cake pockets. I find that making it the day before really lets those flavors meld together wonderfully. You can definitely use this as one of your go-to **Make Ahead Christmas Desserts** and just top it with the whipped cream right before serving.
If you want my thoughts on other great make-ahead goodies, check out my guide for easy freezer jam—it shares some of the same make-ahead principles!
Just make sure you wrap it tightly in plastic wrap while it’s in the pan once the topping goes on. Don’t worry about checking out other versions until after you’ve made this one—you’ll see why this technique works so beautifully!
Serving Suggestions for this Festive Holiday Dessert
Okay, the cake is stunning, moist, and ready to shine! Since this **Christmas Poke Cake** is already sweet and full of fruity color, you don’t want to overwhelm it. What goes best? A really strong, hot cup of coffee or a simple, crisp tea. It cuts through the sweetness perfectly. If you’re building out a whole spread of **Christmas Potluck Ideas**, keep the sides simple—maybe some plain shortbread or simple sugar cookies that won’t compete with the jiggly layers. Seriously, this cake is the centerpiece; everything else should just support it!
If you need a great pairing for your morning coffee the next day, check out my recipe for coffee cake muffins—they are amazing leftovers!
Storing and Reheating Your Christmas Poke Cake
This cake is all about the cool factor, literally! Because we’re working with Jello and that lovely whipped topping, you have to treat this like a chilled item. Forget about reheating this bad boy; warming it up is going to turn your beautiful layers into soup real quick. The rule here is strict refrigeration from the moment the topping is on until you serve it. This ensures everything stays perfectly set and that Cool Whip stays fluffy—trust me on this. It holds up great covered in the fridge for two or three days.
If you want to browse other great **Easy Christmas Cake Recipes** that might freeze better later on, feel free to peek at my collection, but for this one, just keep it cold! Maybe check out my list of easy Christmas cake recipes for comparison.
Common Questions About Making a Christmas Poke Cake
When you start making a recipe like this for the first time, you always have those nagging little questions floating around. Don’t worry, I’ve picked up a few things over the years translating these desserts for the home cook. It’s about eliminating the guesswork so you can focus on the fun parts. Let’s translate a few of the things people always ask me about our favorite **Festive Holiday Desserts**.
Can I use different Jello flavors for this Christmas Poke Cake?
Absolutely! While the red and green combination is what makes this cake scream Christmas morning, you can totally switch it up if you want to explore different **Christmas Flavor Profiles**. Cherry and lime work great, or maybe you want a tropical vibe with pineapple and lime? Go for it! But honestly, for maximum holiday impact, stick to red and green for that perfect visual effect.
What if I don’t want to use Jello?
If Jello just isn’t your thing, you can certainly adapt! A common swap is mixing the sweetened condensed milk with instant vanilla or even chocolate pudding mix. However, I need to translate the result for you: it won’t have that signature, slightly jiggly, deeply saturated poke cake texture that the Jello creates. It becomes much denser, more like a rich, creamy sheet cake. It’s still tasty, but it loses that key textural element. For the classic look, you have to stick with the gelatin. If you want to check out another delicious dense cake idea, look at my guide on Red Velvet Cake Pops for comparison.
Why must the cake be warm when I poke it?
This is one of those technique translations we talked about—it’s crucial! If you try to poke a completely cooled white cake, the gelatin mixture will just sit on top, maybe slightly seeping in, but you won’t get that deep saturation. The cake needs to be warm so the crumbs are slightly yielding and actively pull that liquid down into every single hole. This infusing action is what makes this an incredibly moist dessert and a true **Quick Holiday Treat** that tastes like you spent hours on it!
If you want to see another great recipe that prioritizes visual cues, check out what the folks over at Cooking White are doing with their holiday bakes.
Share Your Christmas Poke Cake Success
Alright, you’ve successfully translated the lingo and now you have this stunning, colorful **Christmas Poke Cake** sitting in your fridge! That’s a huge win. I seriously want to see your results! Head down to the comments and give me a rating, or better yet, share a picture with me. That’s what Kitchen Slang is all about—translating intimidating skills into shared success. If you have any other questions about making your next **Festive Holiday Dessert**, you can always reach out via my contact page. Happy holidays!
PrintEasy Christmas Jello Poke Cake

Make this festive Christmas Jello Poke Cake for a moist, colorful, and simple holiday dessert perfect for any party or potluck.
- Prep Time: 20 min
- Cook Time: 35 min
- Total Time: 2 hours 55 min
- Yield: 12 servings 1x
- Category: Dessert
- Method: Baking and Chilling
- Cuisine: American
- Diet: Vegetarian
Ingredients
- 1 box white cake mix plus ingredients listed on box (eggs, oil, water)
- 1 cup boiling water
- 1 (3 ounce) package red gelatin (Jello)
- 1 (3 ounce) package green gelatin (Jello)
- 1 cup cold water
- 1 (14 ounce) can sweetened condensed milk
- 1 teaspoon vanilla extract
- 1 (8 ounce) container frozen whipped topping, thawed
- Red and green sprinkles for topping
Instructions
- Prepare the white cake according to the package directions, using a 9×13 inch baking pan. Bake and let it cool slightly on a wire rack.
- While the cake is still warm, use the handle of a wooden spoon or a large fork to poke holes all over the top of the cake, about 1 inch apart.
- In a separate bowl, dissolve the red gelatin in 1 cup of boiling water. Stir for 2 minutes until completely dissolved. Stir in 1/2 cup of cold water. Pour this mixture evenly over the warm cake, letting it soak into the holes.
- Chill the cake in the refrigerator for at least 1 hour, or until the red gelatin is mostly set.
- Repeat the gelatin process with the green gelatin: dissolve it in 1 cup of boiling water, stir in the remaining 1/2 cup of cold water, and pour evenly over the set red layer.
- Return the cake to the refrigerator and chill for at least 2 more hours, or until the green gelatin is completely firm.
- In a small bowl, whisk together the sweetened condensed milk and vanilla extract.
- Spread the whipped topping evenly over the chilled, set gelatin layers.
- Decorate the top with red and green sprinkles before serving.
- Keep the cake refrigerated until you serve it.
Notes
- For extra flavor infusion, you can substitute the cold water in the gelatin mixture with vodka or white rum, but skip this step if serving to children.
- If you want a thicker topping, use 1 cup of heavy cream whipped with 1/4 cup of powdered sugar instead of the frozen whipped topping.
- You can make this dessert a day ahead of time to let the flavors fully meld.
Nutrition
- Serving Size: 1 slice
- Calories: 350
- Sugar: 45g
- Sodium: 300mg
- Fat: 15g
- Saturated Fat: 8g
- Unsaturated Fat: 7g
- Trans Fat: 0g
- Carbohydrates: 55g
- Fiber: 1g
- Protein: 4g
- Cholesterol: 25mg