

You know that feeling when the holiday music starts playing and you instantly just want everything to taste like your childhood? I live for that sweet hit of nostalgia, but honestly, holiday baking can feel like a marathon when you’re trying to host. That’s where we translate the fancy stuff into real-life magic. Forget those overly fussy desserts; we’re taking the absolute icon of seasonal treats—you know the one. We are turning the Little Debbie Christmas Tree Cake into the ultimate **Nostalgic Holiday Dessert**: the **Christmas Tree Cheesecake**. Trust me, this recipe takes that beloved flavor combo and elevates it into something creamy and stunning, but without needing you to stand over an oven all day. It’s pure, simple, delicious holiday memory, kitchen-slang translation style. And hey, if you still need a no-bake fix after this, you should check out my recipe for no-bake pumpkin cheesecake—it’s another easy winner!
- Why This No-Bake Christmas Tree Cheesecake is a Holiday Must-Make
- Gathering Ingredients for Your Christmas Tree Cheesecake
- Step-by-Step Instructions for the Best Christmas Cheesecake
- Expert Tips for a Perfect Christmas Tree Cheesecake Presentation
- Storage and Serving Suggestions for Your Christmas Tree Cheesecake
- Frequently Asked Questions About Little Debbie Christmas Tree Cake Cheesecake
- Estimated Nutritional Snapshot for This Christmas Tree Cheesecake
- Share Your Nostalgic Holiday Dessert Experience
Why This No-Bake Christmas Tree Cheesecake is a Holiday Must-Make
Listen, the holiday season is chaos wrapped in tinsel, right? I *love* baking, but juggling appetizers, main courses, and family expectations means I need some wins where I don’t have to rely on my oven space. This **Christmas Tree Cheesecake** is one of those massive wins. It absolutely delivers on being one of the best **Easy Christmas Dessert Ideas** because it uses that magic no-bake formula. Seriously, this takes the effort out of creating a stunning centerpiece. You get all the wow factor associated with a **Festive Layered Cheesecake** without turning your kitchen into a sauna. It’s honestly my secret weapon when I need dessert ready two days before Christmas!
Nostalgic Flavor Meets Creamy Texture
The real trick here is the flavor infusion. We’re not just coloring white cheesecake green; we are trapping those authentic, soft Little Debbie cakes right in the middle. Think about it: that little bit of cake flavor, the subtle vanilla, all wrapped up in that dreamy, smooth filling? It tastes exactly like Christmas morning memories. It keeps the spirit of the **christmas tree cheesecake** alive while giving you that luxurious, rich mouthfeel you crave in a proper cheesecake.

Zero Oven Time for Stress-Free Holiday Baking Inspiration
This is the big one for me. It’s a **No Bake Cheesecake Holiday** dream come true. You mix, you layer, you chill. That’s it! My cinnamon roll casserole takes up the oven for breakfast, so having a dessert that sets up beautifully in the fridge is non-negotiable. This recipe lets you prep it on Tuesday, and it’s ready to go by Thanksgiving dinner if you need it to be. Total lifesaver, truly.
Gathering Ingredients for Your Christmas Tree Cheesecake
Okay, so getting the right stuff is half the battle in any solid recipe, especially when we’re trying to nail that specific nostalgic flavor. For this **Christmas Tree Cheesecake**, we’re keeping things straightforward because the magic is in the assembly, not sourcing fancy extracts. You’ll need to make sure your cream cheese is perfectly soft—room temperature, people!—so we don’t end up with lumps. We are aiming for pure silk here, not chunky frosting! I’ve broken down exactly what you need for the crust, that dreamy filling, and, of course, the stars of the show.
Crust Components
The base has to hold up to all that creamy goodness, and we’re not messing around with sponge. For our buttery foundation, you’ll need a good 1 1/2 cups of graham cracker crumbs. Then mix that with 1/4 cup of granulated sugar—just regular white stuff works great here. The most crucial part? Six tablespoons of unsalted butter, nice and melted, mixed in until it feels like wet sand. That mixture goes right into that 9-inch springform pan you’ve got waiting.
The Creamy Christmas Tree Cheesecake Filling
Now for the main event! Grab two full packages of cream cheese, and this is important: they absolutely have to be softened. If they’re cold, you’ll be beating air into lumps, and we don’t have time for that! You’ll mix that with 1 cup of powdered sugar and 1 teaspoon of vanilla extract. Once that’s smooth as glass, thin it out with 1/4 cup of milk. Finally, Whip 1 cup of heavy whipping cream separately until you get stiff peaks—it makes the whole thing lighter!—and carefully fold that gorgeous cream into the cream cheese base.
The Star Ingredient: Little Debbie Integration
Here’s where the *tree* comes in! You need one whole package of those Little Debbie Christmas Tree Cakes—the ones wrapped individually in waxy paper. Don’t forget to unwrap every single one! We use them in two layers within the cheesecake. If you want to make this decoration extra festive, grab some green food coloring and sprinkles now, but those are totally optional for the actual set cheesecake.

If you need help sourcing any of those standard pantry items, don’t stress; sometimes it’s easier to just grab what you need before you start, like when I need to make sure I have the right stuff for my easy garlic naan bread. Organization prevents panic!
Step-by-Step Instructions for the Best Christmas Cheesecake
Okay, the ingredients are ready, your cream cheese made friends with the counter, and you’ve got your 9-inch springform pan waiting patiently. Now we get to the fun part: assembly! Since this is a no-bake recipe, we move fast, but precision at each step ensures we get that unbelievably smooth texture we’re aiming for in our **Christmas Tree Cheesecake**. Don’t worry about getting things absolutely perfect; this is meant to be fun, not fussy. Just follow these steps, and you’ll have the most amazing **Nostalgic Holiday Dessert** ready for tomorrow! If you want to see another great chilled recipe, check out how good my no-bake pumpkin cheesecake turns out!
Building and Chilling the Graham Cracker Crust
First up is the base! In a medium bowl, combine those graham cracker crumbs and the 1/4 cup of sugar. Then, pour in the 6 tablespoons of melted, unsalted butter. Use a fork or your clean hands to mix everything up really well until it looks like damp brown sugar. You want it thoroughly coated so it holds together! Press this mixture *firmly* and evenly into the bottom of your springform pan. I use the bottom of a measuring cup to really pack it down tight. A sturdy crust means the final slice holds its shape! Once it’s packed, pop that pan into the fridge to chill for at least 15 minutes while you whip up that gorgeous filling.
Layering the Christmas Tree Cakes and Filling
This is the signature move for our **christmas tree cheesecake**, so pay attention! Once the crust is chilled, take half of your unwrapped Little Debbie Christmas Tree Cakes and arrange them in a single, neat layer right over that crust. They shouldn’t overlap too much, they just need to cover the surface. Next, grab that fluffy cheesecake filling you mixed up earlier. Gently pour half of the filling mixture right over that first layer of cakes. Now, place the rest of your Little Debbie cakes on top of that filling layer. Finally, spoon the remaining filling on top and spread it gently with an offset spatula so you don’t disturb the cakes underneath. We want nice, clean layers!
Achieving the Perfect Set: Chilling the Christmas Tree Cheesecake
This is the hardest part, I know—waiting! Since there’s no oven doing the hard work, the refrigerator has to work overtime to set all that wonderful cream cheese and heavy cream. You absolutely must chill this for a minimum of 6 hours, but if you have the willpower, go for overnight. Letting it chill overnight is what transforms this into one of the most satisfying **Creamy Holiday Cheesecakes** you’ve ever made. It allows the flavors time to really mingle and ensures when you slice into it, everything is perfectly firm and beautiful. If you’re looking for a baked alternative, you can check out my keto cheesecake recipe for oven technique guidance, but for this one, the fridge is your best friend!

Expert Tips for a Perfect Christmas Tree Cheesecake Presentation
Now that you know the basics of layering, let’s talk about making this **Christmas Tree Cheesecake** look as good as it tastes. I like offering a few little insider tricks here because, let’s face it, presentation is half the fun when you’re making **Unique Christmas Treats**! Getting your dessert out of the pan cleanly is a huge part of the success, and so is adding that final festive pop.
Crust Swaps for this Festive Layered Cheesecake
So, you ran out of graham crackers? Don’t panic! I learned a long time ago that you need to be flexible, and that goes for the crust, too. My grandmother always said, use what’s available. If you want a slightly sweeter, butterier base for your **Festive Layered Cheesecake**, try swapping the graham cracker crumbs entirely. You can use Golden Oreo crumbs instead! Just crush up those vanilla sandwich cookies instead of the crackers. It gives the crust a lovely pale color and a fantastic vanilla undertone that complements the creamy filling perfectly. It’s a simple change, but wow, does it add another layer of deliciousness without adding any extra work.
Decorating Your Holiday Creation
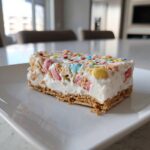
When you finally get that cheesecake set—after all those precious hours of chilling—you want to decorate it up! Remember the optional green food coloring I mentioned? That’s where you make it truly look like a little holiday centerpiece. Mix just a tiny drop of green food coloring into the last bit of heavy whipping cream you have left (or whip up another tiny half-cup if you’re feeling ambitious). You want a nice light pastel green, not swamp green! Whip it until it holds stiff peaks. Then, you can either carefully spread it over the top with an offset spatula, or if you want more control, put it in a piping bag fitted with a large star tip. Once the green is set, scatter those red and green sprinkles everywhere! It makes the whole thing sparkle and really finalizes that fun, nostalgic look for your **christmas tree cheesecake**.

If you’re looking for other easy, festive edible crafts that turn out great, you absolutely have to see how I make my whipped shortbread cookies. They are simple and basically melt in your mouth!
Storage and Serving Suggestions for Your Christmas Tree Cheesecake
So, you made this spectacular **christmas tree cheesecake**, and now you have leftovers—which, let’s be honest, feels like winning the lottery during the holidays! Since this is a no-bake recipe packed with dairy, storage is pretty straightforward, but we want to make sure it stays beautiful until the last slice is gone. In my house, this always becomes a **Family Favorite Holiday Recipe** that lasts a few days because nobody can resist another slice!
The best way to store your cheesecake is to keep it covered tightly in its springform pan. If you have already released the sides—which is often necessary before serving, right?—wrap the entire cheesecake very snugly in plastic wrap, making sure the wrap doesn’t touch the top layer if you added decorative cream. Pop it into the refrigerator. Because it’s so simple and rich, it keeps really well!
It lasts beautifully for about four to five days in the fridge, which is a huge advantage when you’re trying to prep meals ahead of time! The flavor actually deepens a little bit overnight, so if you can wait, it tastes even better the next day. When you’re ready to serve, I always let it sit on the counter for about ten minutes just to take the deep chill off. That small rest time makes the creamy filling feel softer and richer as you cut into those layers. You want those neat slices to really let the hidden Little Debbie cakes shine!
If, by some miracle, you have leftover cheesecake after Christmas is over, you can totally freeze it! Just make sure it’s wrapped extra securely in plastic wrap, and then maybe another layer of foil to keep freezer smells out. It freezes well for about a month. When you want to eat it, just pull it out the night before and let it thaw slowly in the fridge. It tastes just as amazing, even after coming back from a frosty vacation. For other make-ahead holiday sweets, don’t forget to check out my recipe for no-bake chocolate rum balls—they are another fantastic freezer staple!
Frequently Asked Questions About Little Debbie Christmas Tree Cake Cheesecake
I always get so many questions when I bring this **Christmas Tree Cheesecake** out at parties—it definitely grabs people’s attention! Here are some of the common things folks ask when they’re planning to make this **Nostalgic Holiday Dessert** for the first time. If you’re worried about sticking to the **No Bake Cheesecake Holiday** method, these answers should help you feel totally confident!
Can I bake this specific Christmas Tree Cheesecake recipe?
That’s a great question, because sometimes you just want that slightly firmer, baked texture! While the recipe I shared is specifically designed to be the super simple, **No Bake Cheesecake Holiday** version, you absolutely *can* bake it if you prefer. If you decide to bake it, just transfer the entire layered mixture into your pan, and bake it at 325°F for about 45 to 55 minutes. Just remember, baking changes the texture of the Little Debbie cakes inside, making them softer, but it still tastes amazing! For me, the no-bake is just easier during the hectic holidays, but the option is there!
What if I cannot find Little Debbie Christmas Tree Cakes?
Oh, I totally understand that sometimes the shelves are picked clean, or maybe they just aren’t available where you shop. The whole point of the **christmas tree cheesecake** is that layered nostalgic surprise, so we need something similar! If you can’t find them, don’t throw in the towel. You can substitute the Little Debbie cakes with layers of plain vanilla cake pieces—maybe crumbled up store-bought pound cake or even pieces of angel food cake. The goal is to have a slightly drier, cakey element nestled inside the creamy filling to give you texture contrast. It won’t have that exact iconic flavor, but it keeps that beautiful **Festive Layered Cheesecake** structure intact!
How far in advance can I make this dessert?
This is one of my favorite secrets for stress-free holiday hosting! Unlike some baked cheesecakes, this version actually *improves* with time. I strongly suggest making this **Creamy Holiday Cheesecakes** recipe a day ahead of when you plan to serve it. Allowing it to chill overnight gives those Little Debbie cakes time to slightly soften and really meld with the vanilla cheesecake filling. When you let it sit overnight, the flavors deepen and the whole thing sets up even firmer. So yes, plan this as your make-ahead dessert, and you’ll thank yourself later! If you need more simple recipes for planning ahead, maybe stop by my guide on eggplant parmesan—it reheats like a dream, too!
Estimated Nutritional Snapshot for This Christmas Tree Cheesecake
Okay, so while this **Christmas Tree Cheesecake** is definitely a main event dessert and maybe not an everyday snack, you know I always like to give you the full picture! When we’re talking about a decadent treat loaded with cream cheese, heavy cream, and those sugary Little Debbie cakes, we’re looking at a rich profile. But don’t stress about the numbers too much; it’s the holidays, right? Just know that this is a showstopper meant to be enjoyed in moderation!
Based on the standard ingredients we used to make this creamy beauty, here is a general idea of what one slice brings to the table. I always tell people to think of these as helpful guidelines rather than strict rules, because, honestly, every slice is a little different size!
- Serving Size: 1 slice
- Calories: About 450
- Fat: Around 28 grams (with 16 grams being saturated fat—that’s the butter and cheese doing their work!)
- Carbohydrates: Roughly 48 grams
- Sugar: This comes in high, around 45 grams, mostly from the powder sugar and the Little Debbie cakes themselves.
- Protein: About 6 grams
See? It’s decadent! If you’re interested in balancing out your heavy holiday meals with something a little lighter, you should definitely check out my recipe for high-protein overnight oats during the mornings. But when it comes to your **Creamy Holiday Cheesecakes**, lean into the deliciousness! This snapshot is just to give you an idea of the richness you’re packing into that perfect slice of nostalgia!
Share Your Nostalgic Holiday Dessert Experience
Alright friends, now it’s your turn! I’ve given you all my best secrets for translating that sweet, fuzzy memory of the Little Debbie Christmas Tree Cakes into this show-stopping **christmas tree cheesecake**, and I really, really want to see what you do with it! This recipe is meant to bring joy and a little bit of easy magic to your busy holiday schedule.
When you make this, please, please come back here and let me know how it went! Rating the recipe helps other cooks know they can trust this method, especially since it’s a fun mashup dessert. Did your layers set perfectly? Did you decide to go wild with the green food coloring? Tell me everything in the comments below!
And while you’re at it, I’d love to hear about your connection to those little foil-wrapped treats. What is your absolute favorite holiday memory that involves a Little Debbie cake or some other wonderfully simple, **Nostalgic Holiday Dessert**? Sharing those stories makes the kitchen feel warmer, even when you’re just typing away on your phone!
If you snap a picture of your gorgeous **Creamy Holiday Cheesecakes**, tag me on social media so I can cheer you on! Seeing your finished products is the best payoff for sharing these translated, tested recipes. If you ever have a question about your results, or just need to reach out about anything at all, feel free to head over to the contact page. Happy assembling, and Merry Christmas!
PrintNo-Bake Little Debbie Christmas Tree Cheesecake
Make this nostalgic holiday dessert by layering creamy vanilla cheesecake filling with iconic Little Debbie Christmas Tree Cakes on a buttery graham cracker crust. This recipe is easy and requires no oven time.
- Prep Time: 25 min
- Cook Time: 0 min
- Total Time: 6 hr 25 min
- Yield: 10 servings 1x
- Category: Dessert
- Method: No-Bake
- Cuisine: American
- Diet: Vegetarian
Ingredients
- 1 1/2 cups graham cracker crumbs
- 1/4 cup granulated sugar
- 6 tablespoons unsalted butter, melted
- 1 package (10.5 oz) Little Debbie Christmas Tree Cakes, unwrapped
- 2 (8 oz) packages cream cheese, softened
- 1 cup powdered sugar
- 1 teaspoon vanilla extract
- 1/4 cup milk
- 1 cup heavy whipping cream
- Green food coloring (optional, for topping)
- Red and green sprinkles (optional, for topping)
Instructions
- Prepare the crust: Mix graham cracker crumbs, 1/4 cup granulated sugar, and melted butter in a bowl until combined. Press the mixture firmly into the bottom of a 9-inch springform pan. Chill the crust for 15 minutes.
- Place half of the unwrapped Little Debbie Christmas Tree Cakes in a single layer over the chilled crust.
- Prepare the cheesecake filling: In a large bowl, beat the softened cream cheese until smooth. Add the powdered sugar and vanilla extract, mixing until fully combined.
- Beat in the milk until the mixture is smooth. In a separate bowl, whip the heavy whipping cream until stiff peaks form. Gently fold the whipped cream into the cream cheese mixture until just combined.
- Pour half of the cheesecake filling over the layer of Christmas Tree Cakes in the pan. Top with the remaining Little Debbie Christmas Tree Cakes.
- Spread the remaining cheesecake filling evenly over the top layer of cakes.
- Cover the pan loosely with plastic wrap and refrigerate for at least 6 hours, or preferably overnight, until the cheesecake is firm.
- For the topping (optional): Whip a small amount of extra heavy cream with a drop of green food coloring until stiff. Pipe or spread the green cream onto the set cheesecake. Decorate with red and green sprinkles.
- Release the sides of the springform pan before slicing and serving.
Notes
- You can use Golden Oreo crumbs instead of graham crackers for a different crust flavor.
- For a baked version, bake at 325°F for 45-55 minutes, then cool completely before chilling.
- This dessert tastes best when made a day ahead to allow the flavors to meld.
Nutrition
- Serving Size: 1 slice
- Calories: 450
- Sugar: 45
- Sodium: 280
- Fat: 28
- Saturated Fat: 16
- Unsaturated Fat: 12
- Trans Fat: 0.5
- Carbohydrates: 48
- Fiber: 1
- Protein: 6
- Cholesterol: 85