

Oh, that smell! You know the one – warm, sweet apples dancing with cinnamon, wafting through the house and practically begging you to gather around the table. That’s the magic of a truly great apple pie, and trust me, it’s WAY easier to make than you might think. Here at Kitchen Slang, we’re all about breaking down those fancy chef secrets so you can nail that classic apple pie with a flaky, homemade crust and a filling that’s just bursting with flavor. It’s a tradition I grew up with, and it’s a cornerstone of holiday baking, perfect for those moments when you just want something comforting and familiar. Zoe Thompson and our whole team believe everyone deserves to cook delicious food with confidence, and this pie is proof!
- Why You'll Love This Classic Apple Pie
- Mastering Your Apple Pie: The Best Apples and Crust
- Crafting the Perfect Cinnamon Apple Filling
- Assembling and Baking Your Classic Apple Pie
- Tips for Success with Your Thanksgiving Apple Pie
- Frequently Asked Questions About Apple Pie
- Estimated Nutritional Information for Apple Pie
- Share Your Apple Pie Creations!
Why You’ll Love This Classic Apple Pie
Seriously, what’s not to love? This isn’t just any pie; it’s that hug-in-a-dish you’ve been craving.
- It’s surprisingly simple to whip up, even if you’re a baking newbie.
- That cinnamon-spiced apple filling? Pure comfort!
- The crust? Oh, it’s SO flaky and buttery.
- Perfect for holidays, celebrations, or just because you deserve a treat.
Mastering Your Apple Pie: The Best Apples and Crust
Okay, let’s talk real talk about what makes an apple pie truly sing. It all comes down to two main things: the apples you pick and that amazing crust. You can have the best intentions, but if your apples turn to mush or your crust is tough, well, that’s just sad. We’re aiming for perfection here, folks! If you’re feeling ambitious, you might even want to check out our apple pie cookies for another fun baking adventure!
Choosing the Best Apples for Your Apple Pie
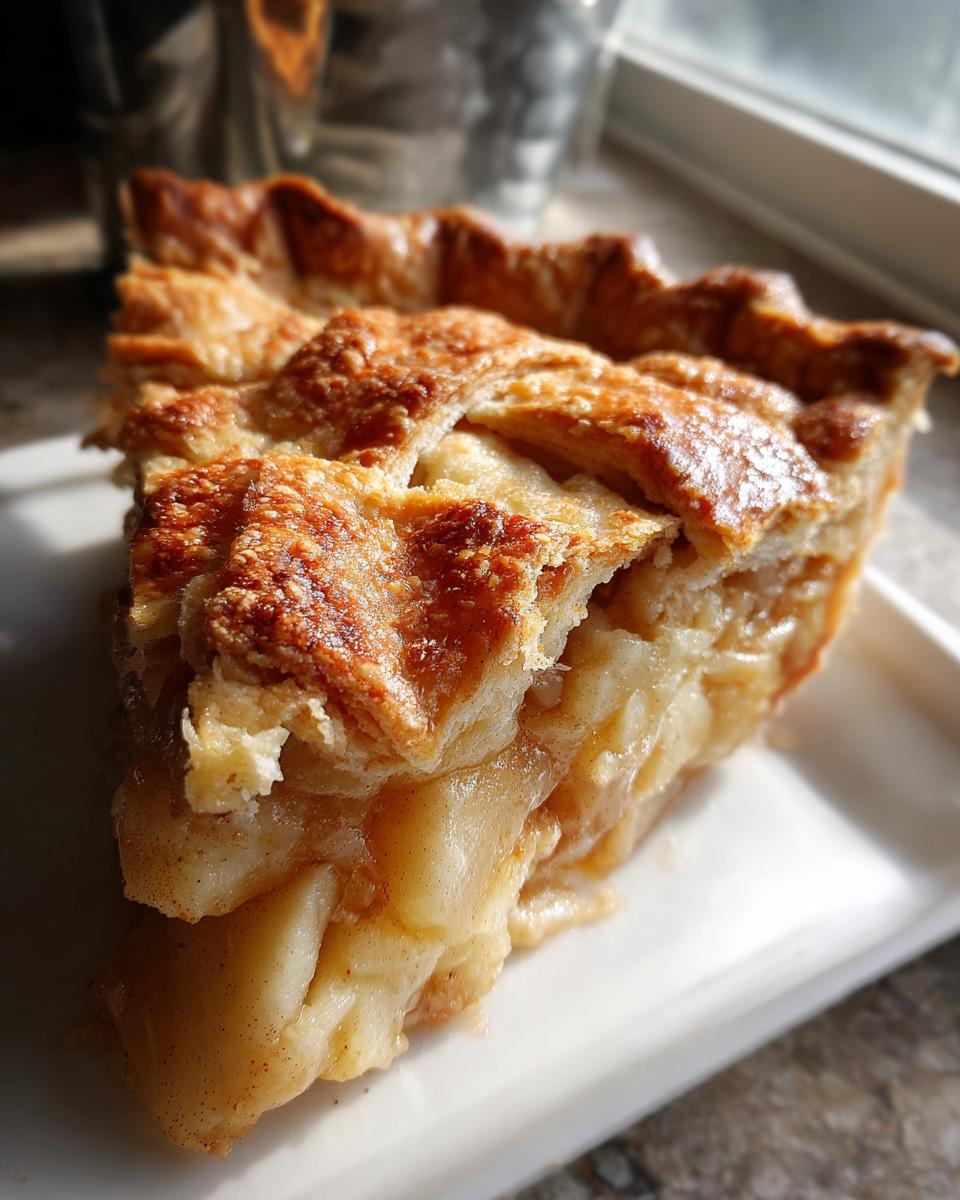
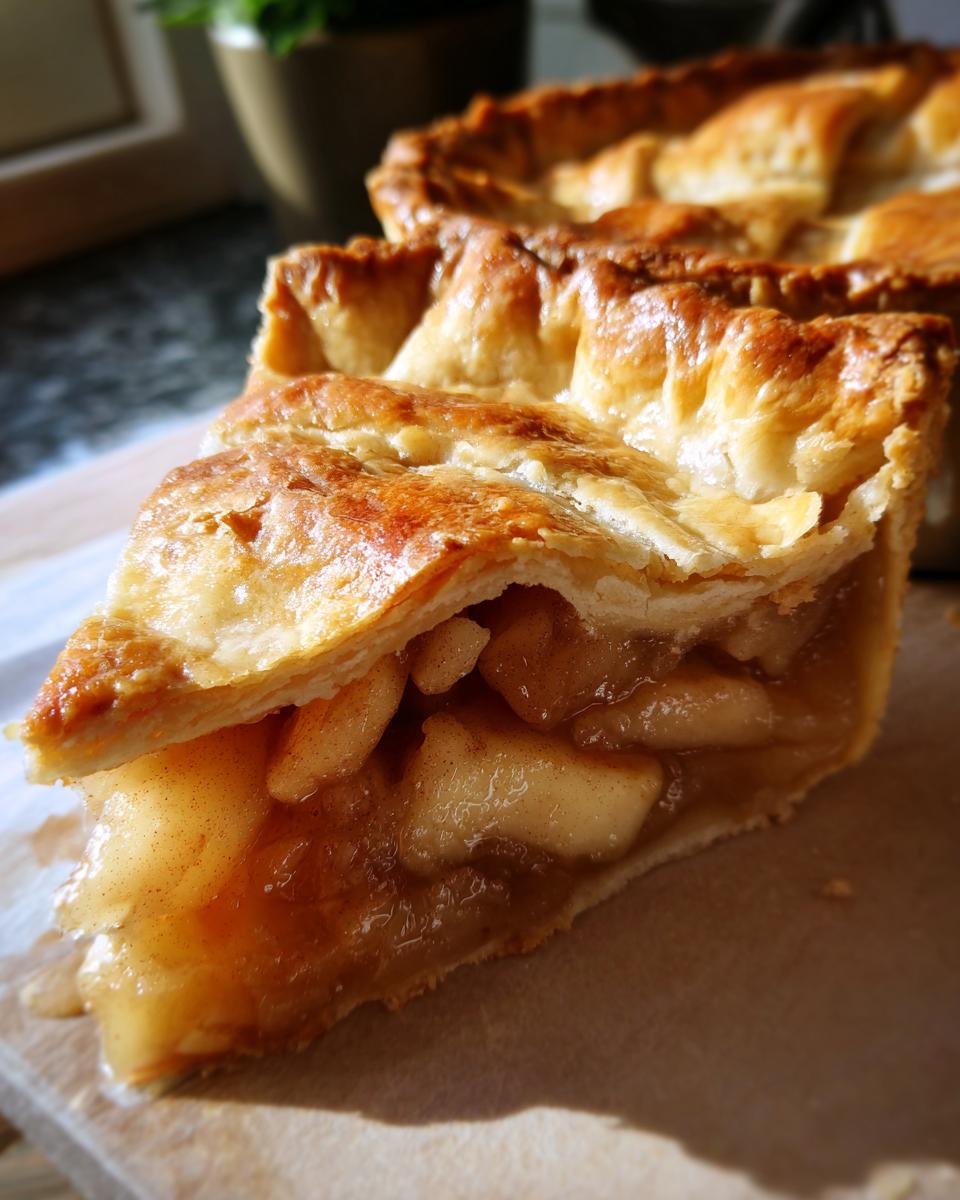
For this classic apple pie, we’re going with a dynamic duo: Granny Smith and Honeycrisp. Granny Smiths bring that wonderful tartness and hold their shape beautifully, so you don’t end up with apple sauce in your pie. Honeycrisps add a lovely sweetness and a great crunch. Mixing them gives you the best of both worlds!
Achieving a Perfectly Flaky Pie Crust
Listen, a truly flaky pie crust for apples is an art form, but it’s totally doable. The key is keeping everything cold! Work the butter into your flour until it looks like coarse crumbs, then add just enough ice water to bring it together. Don’t overwork the dough, seriously! Chilling it is non-negotiable – it lets the gluten relax and keeps the butter from melting too soon in the oven. You want those gorgeous flaky layers, not a tough disc!
Crafting the Perfect Cinnamon Apple Filling
Now for the heart of our apple pie – that incredible cinnamon apple filling! This is where all those cozy fall flavors come to life. We’re talking about a filling that’s perfectly spiced, juicy, and just sweet enough without being overwhelming. It’s truly the star of the show, and getting it right makes all the difference. I know it might seem like just a step, but letting those apples sit with the sugars and spices is a game-changer; it really helps them soften up and release their juices, giving you that amazing depth of flavor that makes our cinnamon apple filling so special. You might even want to try our easy apple crumble recipe sometime too!
Assembling and Baking Your Classic Apple Pie
Alright, pie-making time! This is where it all comes together, and honestly, seeing that beautiful apple pie take shape is one of my favorite parts. We’re going to build ourselves a masterpiece, and getting this classic apple pie recipe right is totally achievable. Forget those store-bought imposters! I’ll walk you through how to get that perfect golden crust and that bubbly, delicious filling. And hey, if you’re looking for something super easy, you might want to peek at our apple pie dump cake sometime!
Step-by-Step Assembly for Your Apple Pie
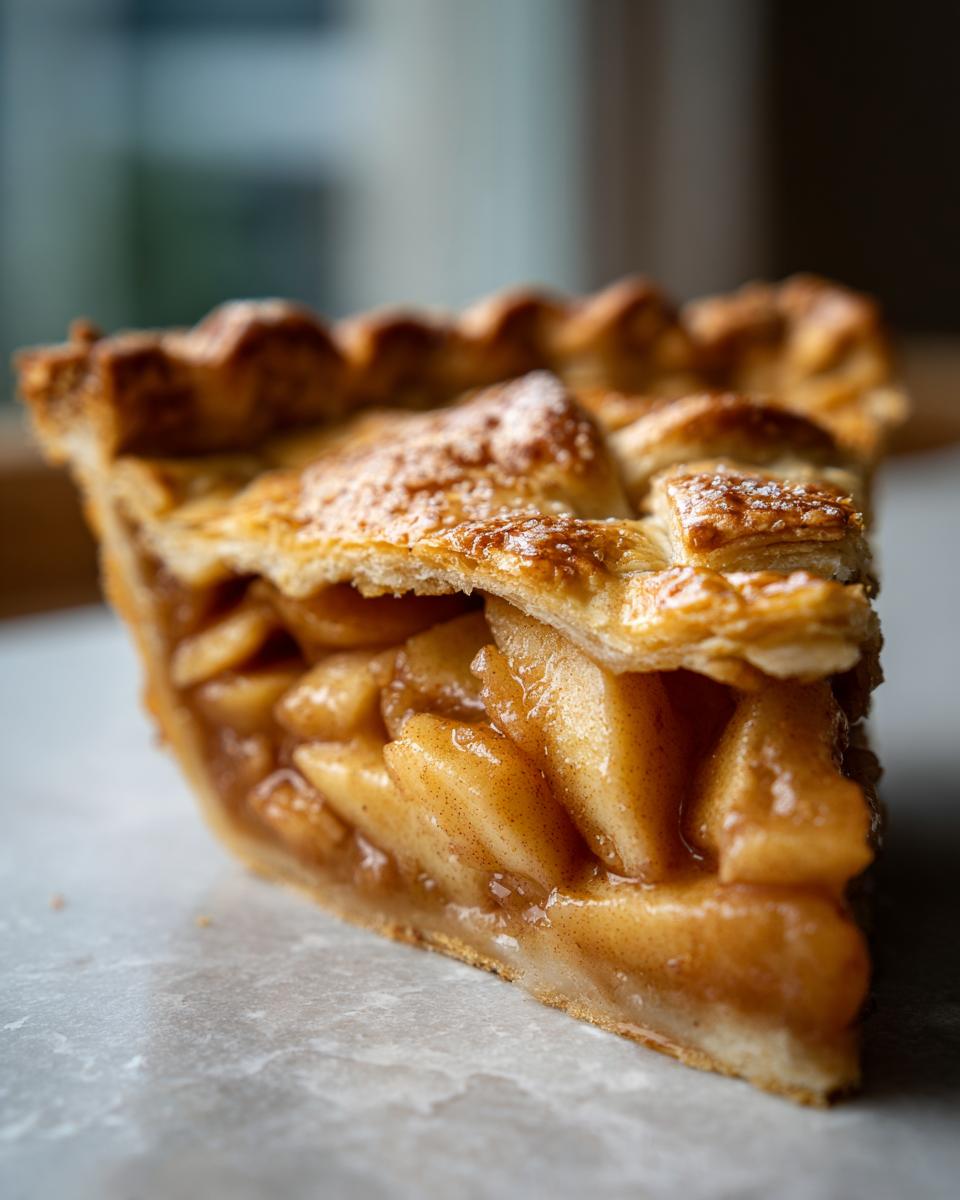
First things first, grab your chilled pie dough. Roll one disc out nice and even, about 12 inches wide, and gently lay it into your 9-inch pie plate. Let it drape over the edges a bit – we’ll trim that later. Now, pour in that glorious apple filling we made. Make sure it’s packed in there, but don’t mound it too high. Dot the top with those little pieces of butter; it adds such a lovely richness. Then, it’s time for the grand finale: the top crust! You can do a solid crust by rolling out the second disc and placing it on top, cutting some vents, or go fancy with a lattice top. Weave those strips, press them into the bottom crust’s overhang, trim everything, and crimp those edges like a pro! A quick brush of egg wash and a sprinkle of sugar, and your apple pie is ready for its close-up.

Baking Your Apple Pie to Golden Perfection
Into the hot oven it goes! We start at a higher temperature, 425°F (220°C), for about 15 minutes. This blast of heat helps set the crust and start that lovely browning. Then, we turn it down to 375°F (190°C) for another 35-45 minutes. Keep an eye on it! If the edges start getting too dark, just loosely tent them with foil. You’re looking for a gorgeous, bubbly filling and a crust that’s deep golden brown. The hardest part? Letting this beautiful apple pie cool on a wire rack for at least 2-3 hours. I know, I know! But trust me, this is crucial for the filling to set up properly so you get those clean slices. Patience is a baker’s virtue, especially with pie!
Tips for Success with Your Thanksgiving Apple Pie
Baking for the holidays can feel like a marathon sometimes, right? But with this classic apple pie recipe, you can totally get ahead of the game! Think of it as your secret weapon for a stress-free Thanksgiving apple pie that’s still totally homemade and delicious. You’ve got this! And, speaking of holiday baking, have you seen our sourdough pumpkin bread recipe? It’s another keeper!
Make-Ahead and Freezing Your Apple Pie
Want to get a jump start on your holiday baking? You’re in luck! You can totally make this apple pie ahead. Assemble the whole thing, then wrap it up tight and pop it in the freezer. When it’s time to bake, just pop it in the oven (you might need a few extra minutes!). Or, bake it completely, let it cool, wrap it well, and freeze it. Thaw it overnight in the fridge, then give it a quick warm-up in the oven. Easy peasy!
Frequently Asked Questions About Apple Pie
Got questions? I’ve got answers! Baking can be tricky sometimes, so let’s clear up any doubts you might have about making your pie absolutely perfect.
What is the best way to prevent a soggy bottom in my apple pie?
Great question! To avoid a soggy bottom, make sure your crust is well chilled before baking. Also, letting the apple filling sit to release some juice, and then draining that excess liquid before filling the pie really helps!
Can I use different types of apples in my apple pie?
You sure can! While Granny Smith and Honeycrisp are our favorites for that perfect tart-sweet balance and texture, feel free to experiment. Just try to pick apples that hold their shape well when baked, like Gala or Fuji, to get a similar great result.
How long does it take for an apple pie to cool?
You’ve got to be patient here! Let your beautiful pie cool on a wire rack for at least 2 to 3 hours. This gives the filling time to thicken up so you get those lovely, clean slices when you cut into it.
Estimated Nutritional Information for Apple Pie
Just a little heads-up that these numbers are estimates, okay? They can totally change depending on exactly what you use and how you slice it. But generally, for one slice of this delicious pie, you’re looking at around 350 calories, 18g of fat, 3g of protein, 45g of carbs, and about 30g of sugar. Everything in moderation, right?
Share Your Apple Pie Creations!
So, did you make this pie? I’d absolutely LOVE to hear about it! Share your photos, your tips, or any fun twists you tried in the comments below. You can also drop a rating or get in touch via our contact page. Happy baking!
PrintClassic Apple Pie

A traditional apple pie with a flaky homemade crust and a warm, cinnamon-spiced apple filling. Perfect for holiday baking.
- Prep Time: 45 min
- Cook Time: 60 min
- Total Time: 105 min
- Yield: 8 servings 1x
- Category: Dessert
- Method: Baking
- Cuisine: American
- Diet: Vegetarian
Ingredients
- 1 recipe for double pie crust
- 6 medium Granny Smith apples, peeled, cored, and sliced 1/4-inch thick
- 2 medium Honeycrisp apples, peeled, cored, and sliced 1/4-inch thick
- 3/4 cup granulated sugar
- 1/4 cup packed light brown sugar
- 1/4 cup all-purpose flour
- 1 teaspoon ground cinnamon
- 1/4 teaspoon ground nutmeg
- 1/4 teaspoon salt
- 2 tablespoons unsalted butter, cut into small pieces
- 1 large egg, beaten (for egg wash)
- 1 tablespoon granulated sugar (for sprinkling)
Instructions
- Prepare your double pie crust according to your favorite recipe. Divide the dough in half, shape into two discs, wrap in plastic, and refrigerate for at least 1 hour.
- In a large bowl, combine the sliced Granny Smith and Honeycrisp apples.
- In a separate small bowl, whisk together the granulated sugar, brown sugar, flour, cinnamon, nutmeg, and salt.
- Pour the sugar mixture over the apples and toss gently to coat evenly. Let the apples sit for about 15-20 minutes to release some of their juices.
- Preheat your oven to 425°F (220°C).
- On a lightly floured surface, roll out one disc of pie dough into a 12-inch circle. Carefully transfer it to a 9-inch pie plate. Trim the edges, leaving about a 1-inch overhang.
- Drain any excess liquid from the apple mixture, then pour the apples into the prepared pie crust. Dot the top of the apples with the small pieces of butter.
- Roll out the second disc of pie dough. You can either place it as a solid top crust, cutting vents for steam, or cut it into strips to create a lattice top.
- If making a lattice, arrange the strips over the filling, weaving them over and under each other. Trim the lattice strips and press them into the bottom crust’s overhang. Crimp the edges of the pie crust decoratively.
- Brush the top crust (or lattice) with the beaten egg wash and sprinkle with the tablespoon of granulated sugar.
- Place the pie on a baking sheet (to catch any drips). Bake for 15 minutes at 425°F (220°C).
- Reduce the oven temperature to 375°F (190°C) and continue baking for another 35-45 minutes, or until the crust is golden brown and the filling is bubbly. If the crust starts to brown too quickly, loosely tent the pie with aluminum foil.
- Let the pie cool on a wire rack for at least 2-3 hours before slicing and serving. This allows the filling to set properly.
Notes
- For a crispier bottom crust, you can pre-bake the bottom crust for about 10-15 minutes before adding the filling, or use a thickening agent like tapioca starch.
- This pie can be made ahead. You can freeze the unbaked pie or bake it completely and freeze it. Thaw overnight in the refrigerator and reheat gently.
- The best apples for pie are a mix of tart and sweet varieties. Granny Smith provides tartness and holds its shape, while Honeycrisp adds sweetness and a good texture.
Nutrition
- Serving Size: 1 slice
- Calories: 350
- Sugar: 30g
- Sodium: 200mg
- Fat: 18g
- Saturated Fat: 10g
- Unsaturated Fat: 8g
- Trans Fat: 0g
- Carbohydrates: 45g
- Fiber: 3g
- Protein: 3g
- Cholesterol: 40mg