

There’s just something magical that happens when you turn plain white sugar into something rich, gooey, and golden. I absolutely agree with Zoe Thompson and the whole crew here at Kitchen Slang—we shouldn’t need a culinary degree to make fantastic treats at home! That’s why this one is so special. We are skipping the scary candy thermometer and making a genuinely rich, buttery, homemade caramel sauce right on the stovetop. Trust me, once you taste this easy caramel recipe, you’ll realize that professional kitchen secrets are actually pretty simple when you have the right translation. We handle the complicated parts so you can just focus on scooping it onto everything you own. If you’re looking for other amazing sweets after this, check out more of our delicious dessert recipes we’ve translated!
This recipe is all about translating that inside chef lingo into something you can whip up after work. We’re giving you the direct path to that thick, salty drizzle that makes desserts sing, all without needing any fancy gear. Now, go grab your whisk!
- Why This Is The Best Easy Caramel Recipe
- Gathering Ingredients for Rich Creamy Caramel Sauce
- Step-by-Step Instructions for Homemade Caramel Sauce
- Tips for Success with Your Salted Caramel Drizzle
- Serving Suggestions for Your Buttery Caramel Dessert Topping
- Storage and Reheating Instructions for Homemade Caramel
- Frequently Asked Questions About Making Caramel
- Understanding the Estimated Nutrition of This Caramel
- Share Your Homemade Caramel Creations
Why This Is The Best Easy Caramel Recipe
Look, if you’re like me, you want that deep, buttery flavor without standing over a boiling pot praying you hit 248 degrees exactly right. That’s why this no thermometer caramel method works so brilliantly! We are skipping the hard guesswork and using simple ratios of sugar, butter, and cream to guarantee a thick, pourable topping. It’s genuinely foolproof, which is the whole point of translating these professional secrets for your kitchen. The final product is impossibly rich; you won’t believe how little effort went into making something this decadent.
Quick Prep and Cook Times for Your Caramel
Doesn’t that sound amazing? You get all that rich flavor in almost no time at all. We’re talking 5 minutes of prep time—just measuring stuff out. Then, the cooking time wraps up in about 10 minutes. Seriously, you can have homemade salted caramel drizzle ready before you even decide what you’re going to put it on. It’s the perfect quick dessert staple for any night of the week!
Gathering Ingredients for Rich Creamy Caramel Sauce
Alright, let’s talk about what you need to make this stunning, rich creamy caramel sauce. I’ve listed exactly what you need below. I know some recipes just throw ingredients at you, but in caramel making, the preparation of your ingredients matters a ton. That’s why I’m so specific on the prep needed for everything—it ensures that when the sugar hits the butter, things go smoothly instead of ending up with a sticky mess.
- 1 cup granulated sugar
- 6 tablespoons unsalted butter, cut into pieces
- 1/2 cup heavy cream, warmed slightly
- 1 teaspoon sea salt, plus more for finishing
See? Not scary at all! But those small details—like cutting the butter or warming the cream—are what give us the bragging rights that this is the best caramel sauce recipe around.
Ingredient Notes and Substitutions for Perfect Caramel
Let’s go over the little secrets that make these ingredients behave perfectly. First thing: that heavy cream? You need to warm it up gently before you add it to the melted sugar. If you dump cold cream in, the whole mixture seizes up hard around the sugar crystals. It still might bubble like crazy when you add it, but warming the cream just eases that temperature shock, which keeps your sauce beautifully smooth.
Also, if you have a tendency for sugar to crystallize while you’re melting it down—don’t panic! That’s super common. If you see any grains starting to form on the sides of the pan, just add one tiny teaspoon of water right at the beginning when you start melting the sugar. That little bit of extra moisture helps keep everything dissolved perfectly so you get that beautiful amber color.
And really, don’t skimp on the butter here. Since this is primarily butter, sugar, and cream, the quality of your butter is what gives you that incredible depth of flavor. Use the good stuff for truly buttery caramel dessert topping!
Step-by-Step Instructions for Homemade Caramel Sauce
This is where the actual magic—or the panic—happens! But I promise you, if you follow these steps exactly as written, you’ll get that gorgeous, smooth caramel. Remember, we are treating this like professional work here, translating the precise timing that chefs use. The key is knowing when to move from heat to cool down, and how to bring things back together when they look like they are separating. Take your time, watch the color, and don’t step away from the stove during the initial sugar melt; that’s the most important part!
If you want to see what we often use this incredible sauce on, I’ve got some great ideas over on my easy weeknight dinners page, but honestly, spooning it straight from the jar is always my favorite move.
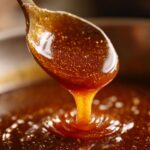
Melting Sugar: The Foundation of Great Caramel
First things first: sugar goes into your heavy-bottomed saucepan over medium heat. Here’s the rule that feels backward but is crucial: Do not stir it! I know, it hurts your instincts, but if you use a spoon now, the sugar grains will cling to it and crystallize everywhere. You have to let it melt on its own. After about five minutes, the edges will start to liquefy. Now, you can gently swirl the pan until all the sugar is melted and it smells sweet and looks like a deep, beautiful amber tea. Don’t go too dark, or it tastes burnt—we are looking for that perfect golden-brown warmth.

Incorporating Butter and Cream Safely
The second the sugar is fully amber, pull that pan right off the hot burner! Now we add the butter pieces, one chunk at a time, whisking like mad. It’s going to bubble up intensely! That’s the water in the butter trying to escape, so just keep whisking until it’s flat again. The very next step requires the same energetic pace: slowly pouring in that warmed heavy cream while you keep that whisk moving constantly. It will bubble up even more violently this time. Don’t let that scare you! Just keep incorporating until everything looks smooth and uniform. This control prevents burning and ensures you don’t get hard candy chunks in your sauce.

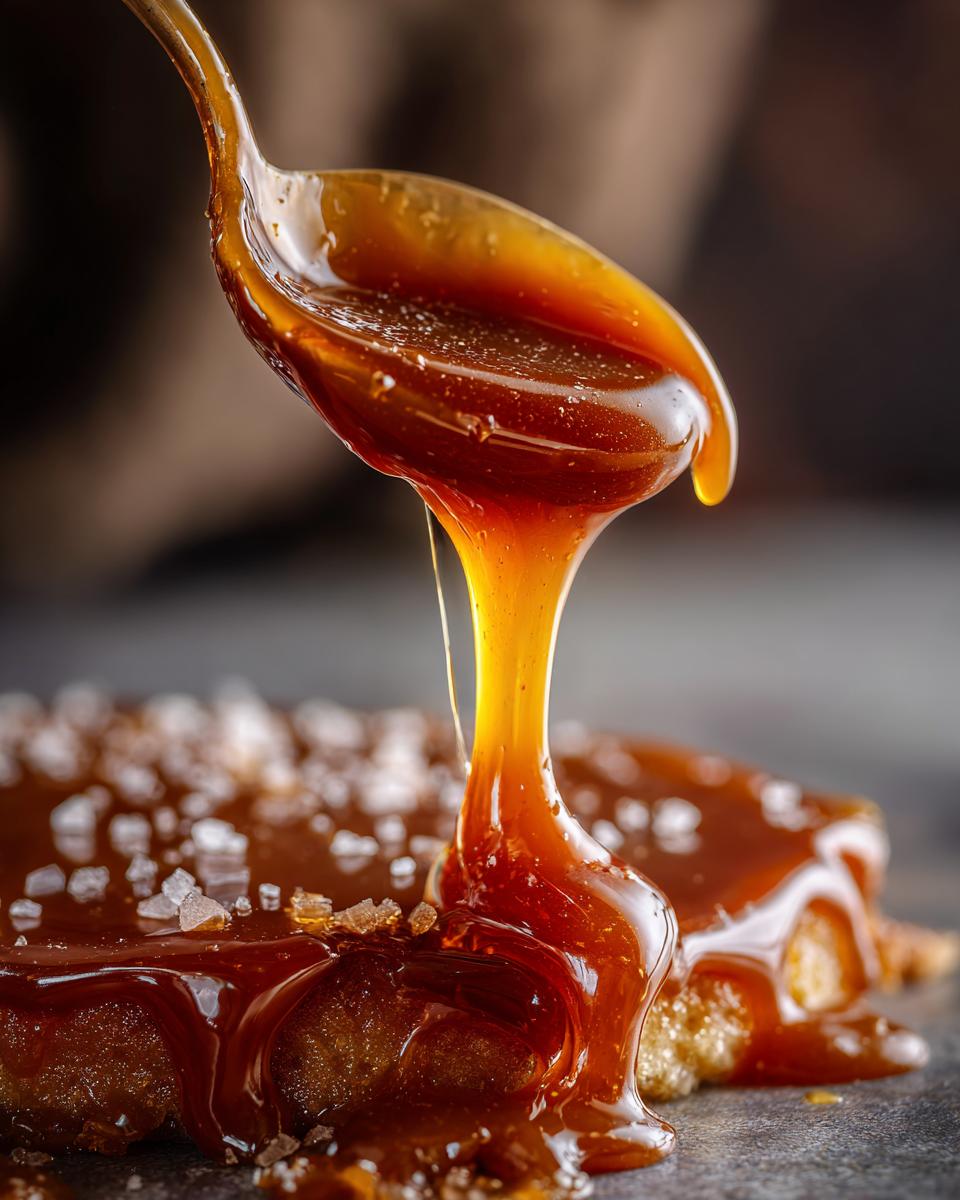
Tips for Success with Your Salted Caramel Drizzle
Okay, you’ve whisked the ingredients and you’ve got that gorgeous, beautiful liquid gold. Now, you need to know what happens next because that’s where most people get tripped up. Remember, this recipe is designed to be a spectacular Salted Caramel Drizzle, meaning it should be pourable, but only when it’s warm!
Here is the biggest secret you need to know: As this sauce cools down, it’s going to firm up a lot—like, significantly. Don’t panic and think you messed up! That’s the butter and sugar getting happy together as they settle. If you pull this straight out of the fridge the next day and it’s basically a caramel brick, it just needs a little wake-up call. You can fix it instantly by warming just the amount you need in the microwave for 10-20 second bursts or setting the jar in a bowl of warm water on the stove. It melts right back into that perfect, flowing drizzle.
Also, let me circle back to something important from the instructions: if you can, always reach for a heavy-bottomed saucepan—I can’t stress this enough. Sugar burns so fast, and those thinner pans just get too hot on the bottom, leading to scorched patches that ruin the flavor of your whole batch of caramel. A heavy pan spreads that heat out evenly, making it so much easier for us home cooks to manage that critical amber stage.
When you’re storing this, make sure it’s in an airtight jar. It will last ages, but we want to keep the air out so it stays perfectly smooth. If you’re planning on just spooning little bits over your desserts, you should definitely check out all the delicious dessert recipes we have on the site for inspiration!
Serving Suggestions for Your Buttery Caramel Dessert Topping
So, you’ve got this jar of liquid gold sitting on your counter. Now what? You can’t just drink it straight, though heaven knows I’ve considered it! This Buttery Caramel Dessert Topping is ridiculously versatile, and it’s time to let it shine.
My absolute favorite—and this is definitely the easiest use—is using it as a Caramel for Ice Cream Topping. Warm it up just a bit so it cascades down vanilla bean ice cream like a waterfall. That salted contrast against the cold, sweet ice cream? Perfection. It’s a game-changer, seriously.
But don’t stop at ice cream! This rich, homemade sauce qualifies as one of the best Delicious Dessert Toppings you can keep on hand. Try drizzling it over freshly made pancakes or waffles in the morning—it makes breakfast feel like a celebration. It’s fantastic swirled into coffee or hot chocolate. Since we used sea salt, it cuts through the sweetness in coffee beautifully.
If you’re baking, try using it as a layer. It’s amazing spread thinly over brownies before they go into the oven, or just poured over a slice of simple pound cake. Speaking of simple baked goodness, if you need a great base to pour this amazing caramel over, you absolutely have to check out our recipe for the Easy Cinnamon Oat Crumble! That warm, spiced apple flavor mixed with cool, salty caramel is the ultimate comfort dessert. You deserve to smother everything you eat in this sauce!

Storage and Reheating Instructions for Homemade Caramel
We’ve made this incredible caramel, and now we need to make sure it stays perfect until the very last drop. Luckily, since this recipe is mostly sugar, fat, and cream, it keeps really well! The absolute key here is finding a good container. You need something airtight—a clean Mason jar with a tight-fitting lid is my absolute favorite way to store this stuff.
Pop that jar right into the refrigerator. It will keep for several weeks, maybe even a month, but honestly, I’ve never had a batch last that long because we use it up too fast! Just make sure that lid is snug to keep any weird fridge smells out of your sweet sauce.
Now, remember what I told you about cooling? When you pull it out of the fridge, it’s going to be super firm—maybe even spoon-bendingly hard. Don’t even think about trying to drizzle it like that! You just need to gently bring it back up to temperature. You have two great options for reheating your caramel.
If you just need a little bit, take what you need out of the jar and pop it into a microwave-safe bowl. Heat it up in short bursts—I mean 10 or 15 seconds at a time—stirring in between each burst. You’ll be surprised how quickly it loosens up and becomes that perfect, flowy sauce again.
If you need a bigger batch warmed up, you can put the whole jar (if it’s microwave-safe!) in the microwave, or you can set the jar—with the lid off—into a small saucepan filled with just an inch or two of simmering water on the stove. Keep the heat on low, and stir occasionally until it reaches your ideal drizzling consistency. It’s that easy to manage! This practical step means your delicious, rich caramel is ready whenever the craving hits you.
Frequently Asked Questions About Making Caramel
I know when you’re staring at hot sugar, your brain starts spinning with questions! It’s totally normal. Making something this delicious usually involves professional know-how, but that’s why we’re here—to translate. Here are the most common things folks ask me when they are making this caramel sauce for the first time, especially when they are trying variations or running into those little hiccups along the way.
Can I use brown sugar instead of granulated sugar for this caramel?
That’s a fantastic question about ingredients! You absolutely *can* use brown sugar, but you need to know it changes the game a little bit. Granulated sugar melts quietly and honestly, it gives you the clearest color transformation, making it perfect for that pure amber hue we are aiming for with this recipe. Brown sugar has molasses in it already, which means it will be darker from the start and can actually start to burn faster because the molasses cooks differently than plain sucrose. If you use it, watch your heat like a hawk! For this specific recipe, I really designed the timing and visual cues around the clean melt of white sugar to guarantee that beginner success, so I stick with the granulated sugar for this easy caramel recipe.
How do I make this into Soft Chewy Caramels instead of sauce?
Oh, I love the chewiness of a great homemade candy! If your goal is the treat you wrap in wax paper, that is a slightly different cooking process—it’s about pushing the temperature higher. This recipe is specifically calibrated to stop when the mixture is liquid enough to pour beautifully over ice cream or splash into coffee, which happens at a lower temperature. To get those soft chewy caramels that hold their shape, you need to continue cooking the mixture past the point of adding the cream, usually until it hits about 245°F (118°C). Then, you’d pour it into a prepared square pan to set up instead of putting it in a jar. So, while this sauce *can* be made firmer, this instructional run-through is purely focused on the fantastic, rich creamy caramel sauce result!
My caramel seized up after adding the cream. What happened?
Ugh, the dreaded seize-up! This is the most common, and frankly most dramatic, moment in caramel making, and it’s almost always about temperature shock. When that super-hot melted sugar meets cold heavy cream, the sugar hardens instantly around the cream, turning your smooth liquid into grainy mush. It looks ruined, but it often isn’t!
The fix is exactly why I told you to warm up your cream slightly! If it still happens, don’t panic or over-whisk. Just set the pan back on *very* low heat and stir gently. Usually, that low heat will slowly melt those sugar hard spots back into the cream. If you need backup on fixing other tricky bits, check out some great tips we have collected for baking foundations that use heat management!
Understanding the Estimated Nutrition of This Caramel
I always try to keep things real in the kitchen, and that includes being upfront about what we’re eating! When you’re making something as purely decadent as homemade caramel sauce from scratch, you know it’s not exactly diet food, but honestly, knowing the numbers helps keep things in perspective. The figures below are based on the exact measurements listed in the recipe, aiming to give you a solid ballpark estimate for each serving size.
But here’s the translator’s note on nutrition: Because we use real butter and heavy cream—the good stuff—these numbers rock a little more fat and calories than anything store-bought. That’s why it tastes so amazing, right?
Remember, these numbers are just estimates, and they will shift depending on the brand of butter you choose or exactly how you eyeball that last little splash of heavy cream we add in. If you use a lighter cream, for instance, the fat content will drop. It’s the nature of cooking! Always take this label as a starting point, not a scientific guarantee.
- Serving Size: 2 tablespoons
- Calories: 190
- Sugar: 25g
- Sodium: 150mg
- Fat: 10g
- Saturated Fat: 6g
- Carbohydrates: 26g
- Protein: 0g
I look at this and tell myself it’s worth every calorie when I use it to top my homemade apple crumble. You deserve a little indulgence now and then, and knowing exactly what’s in your caramel makes enjoying it guilt-free!
Share Your Homemade Caramel Creations
Whew! We did it! You just successfully navigated the world of high-heat sugar cooking and now you’re the proud owner of the Best Caramel Sauce Recipe imaginable. I am so excited for you!
Now that you know the lingo and you’ve got that rich, thick, salty goodness in a jar, I really want to hear about it. Did you pour it over vanilla ice cream? Did you stir it into your morning coffee? Did you sneak some bites with just a spoon? Please, please, please—drop a rating down below and leave a comment telling me how your first batch of homemade caramel turned out for you.
What was the moment you realized, “Wow, I actually made this!”? I thrive on hearing about those moments of kitchen confidence. If you snapped a picture of your gooey masterpiece, tag us on social media so we can see it!
And hey, while you’re feeling confident and on a roll with mastering these simple techniques, don’t let that energy fade! We have so many more recipes here at Kitchen Slang that are just waiting for you to translate them into reality. If you have any lingering questions about the process, or if you just want to say hi, you can always reach us through our contact page. Happy drizzling, everyone!
PrintEasy Homemade Salted Caramel Sauce (No Candy Thermometer)
Make rich, buttery salted caramel sauce easily on the stovetop without needing a candy thermometer. This recipe yields a thick, pourable topping perfect for desserts.
- Prep Time: 5 min
- Cook Time: 10 min
- Total Time: 15 min
- Yield: About 1 1/4 cups 1x
- Category: Dessert Topping
- Method: Stovetop
- Cuisine: American
- Diet: Vegetarian
Ingredients
- 1 cup granulated sugar
- 6 tablespoons unsalted butter, cut into pieces
- 1/2 cup heavy cream, warmed slightly
- 1 teaspoon sea salt, plus more for finishing
Instructions
- Place the sugar in a medium, heavy-bottomed saucepan over medium heat. Do not stir initially.
- Allow the sugar to melt completely, swirling the pan occasionally to ensure even melting. Watch closely as it turns amber brown. This takes about 5 to 8 minutes.
- Once the sugar is fully melted and a deep amber color, immediately remove the pan from the heat.
- Carefully whisk in the butter pieces, one piece at a time, until fully melted and incorporated. The mixture will bubble vigorously.
- Slowly pour in the warm heavy cream while whisking constantly until smooth. The mixture will bubble again.
- Return the pan to low heat and cook for 1 minute, stirring constantly. Do not let it boil rapidly.
- Remove from heat and stir in 1 teaspoon of sea salt.
- Pour the caramel sauce into a heatproof jar or container. Let it cool completely before using. The sauce will thicken as it cools.
- Sprinkle a little extra sea salt on top before serving if desired.
Notes
- Warm the heavy cream slightly before adding it to the melted sugar to prevent the mixture from seizing up too hard.
- If the sugar crystallizes while melting, add one teaspoon of water at the beginning to help prevent this.
- This sauce thickens significantly as it cools. If it becomes too thick to pour, gently reheat a small amount in the microwave or on the stovetop.
Nutrition
- Serving Size: 2 tablespoons
- Calories: 190
- Sugar: 25g
- Sodium: 150mg
- Fat: 10g
- Saturated Fat: 6g
- Unsaturated Fat: 4g
- Trans Fat: 0g
- Carbohydrates: 26g
- Fiber: 0g
- Protein: 0g
- Cholesterol: 35mg