
Alright, listen up! Whenever a big celebration rolls around—a birthday, a milestone, or even just surviving Monday—you need something impressive that doesn’t require you standing over a hot oven. That’s why I’m spilling the beans on my absolute favorite showstopper: the Ultimate Easy No-Bake Oreo Ice Cream Cake. Forget those intimidating bakery versions; we’re talking about translating a truly epic frozen dessert into something you can confidently whip up right on your countertop. This isn’t just another dessert; it’s the easiest, most crowd-pleasing ice cream cake you will ever make, trust me!
- Why This Easy No-Bake Oreo Ice Cream Cake is Your New Celebration Go-To
- Gathering Your Ingredients for the Ultimate Ice Cream Cake
- Equipment Needed for Your No Bake Ice Cream Cake
- Step-by-Step Instructions to Assemble Your Ice Cream Cake
- Pro Tips for the Best Homemade Ice Cream Cake
- Ingredient Notes and Substitutions for Your Ice Cream Cake
- Storage and Make Ahead Tips for Your Ice Cream Cake
- Frequently Asked Questions About Making an Ice Cream Cake
- Serving Suggestions for Your Showstopper Ice Cream Cake
Why This Easy No-Bake Oreo Ice Cream Cake is Your New Celebration Go-To
I promise you, this recipe is the secret handshake for anyone hosting a party or needing a showstopper dessert in a pinch. The biggest advantage? Zero oven time. That’s right, we are keeping things frozen! This makes it ideal for those scorching summer days when turning on the stove feels like a crime, or when you just don’t want your kitchen heating up before the guests arrive.
It’s built for birthdays and perfect for any party because it’s so customizable, but here’s the real deal on why you’ll love pulling this together:
- No Oven Nightmares: We skip the baking entirely, which means less stress and a cleaner operation.
- Birthday Ready: This is prime easy birthday cakes territory. It looks incredibly formal but takes virtually no skill.
- Simple Layering: The technique is just stacking soft things on top of other soft things (that you freeze!), so there’s no tricky batter folding here.
- Crowd-Pleasing Sweets: Between the Oreos and the fudge swirl, this hits every sweet tooth nerve imaginable. It’s guaranteed to make everyone grab a second slice.
Gathering Your Ingredients for the Ultimate Ice Cream Cake
The beauty of this recipe is that it relies on store-bought staples, giving us maximum flavor payoff with minimal effort. When we talk about homemade creamy frozen treats, ingredient quality matters, even for things you buy off the shelf! The key here is finding ice cream that is just *slightly* softened—nothing soupy, just pliable enough to spread without tearing up the crust.
Here’s the lineup you need for this spectacular assembly:
- One whole package of those classic Oreo cookies—don’t skimp!
- Half a cup of unsalted butter, melted down until smooth.
- One and a half quarts of vanilla ice cream. Remember, *slightly* softened!
- Another quart and a half of chocolate ice cream, also softened just a touch.
- A good cup of your favorite fudge topping. Warm this up just enough so it flows nicely.
- A cup of whipped topping, thawed completely.
- And finally, maybe a quarter cup of extra crushed Oreos just for hamming it up on top!
Seriously, using good quality ice cream makes all the difference between a dessert that’s just okay and one that feels like true indulgence.
Equipment Needed for Your No Bake Ice Cream Cake
Before we even think about softening ice cream—which, let’s be real, is the most dangerous part of this whole process—you need to make sure your kitchen tools are ready to go. This recipe really hinges on having the right structure, which means the right pan is non-negotiable. No complicated baking means no need for whisks or cake pans, thankfully!
You’ll need just a few things to make sure this layering process goes smoothly. Think assembly line, not a full-on carpentry project:
- A 9-inch springform pan. This is the MVP here. It lets us get those clean sides without having to flip or struggle with a stuck homemade ice cream dessert.
- A food processor. You *could* crush Oreos in a Ziploc bag with a rolling pin, but honestly, why stress yourself out? The processor gives us that perfect, consistent fine crumb for the crust.
- An offset spatula. Seriously, get yourself one of these. Trying to smooth out that soft ice cream layer with a regular knife is a recipe for disaster and messy edges. The spatula lets you glide across the top cleanly.
- Plastic wrap or parchment paper, just for a little insurance lining the bottom of the pan.
Have these sitting out while your ice cream is softening. Organization is chef slang for being ahead of the game, and we want you looking like a pro when it’s time to build this thing!
Step-by-Step Instructions to Assemble Your Ice Cream Cake
Okay, now that we have our gear and our ingredients chilling (or almost chilling), it’s time for the actual construction! This is where the magic happens, and honestly, it’s all about timing the freezes right. If you rush the freezing steps, your layers will blend together—and we want distinct, beautiful layers in our layered ice cream desserts. Take your time; the freezer does all the hard work here!
Creating the Crunchy Oreo Ice Cream Cake Crust
First things first: prep that pan! Line the bottom of your 9-inch springform pan with parchment paper. This is your insurance policy against sticking, which is a lifesaver later on. Now, grab those Oreos. Toss the whole package into that food processor—yes, the whole thing, filling and all—and pulse it until you get fine crumbs. We aren’t looking for chunks here; we want sand!
Drizzle in that melted butter and pulse again until it looks like very wet sand. Press this mixture hard and even into the bottom of your prepared pan. You need to compact it down *tightly* so it holds its shape. Once it’s packed down, slide that pan into the freezer for just 15 minutes. This quick chill sets the crust so the ice cream doesn’t mix into it when you add the next layer.
Layering the Ice Cream for Perfect Ice Cream Cake Slices
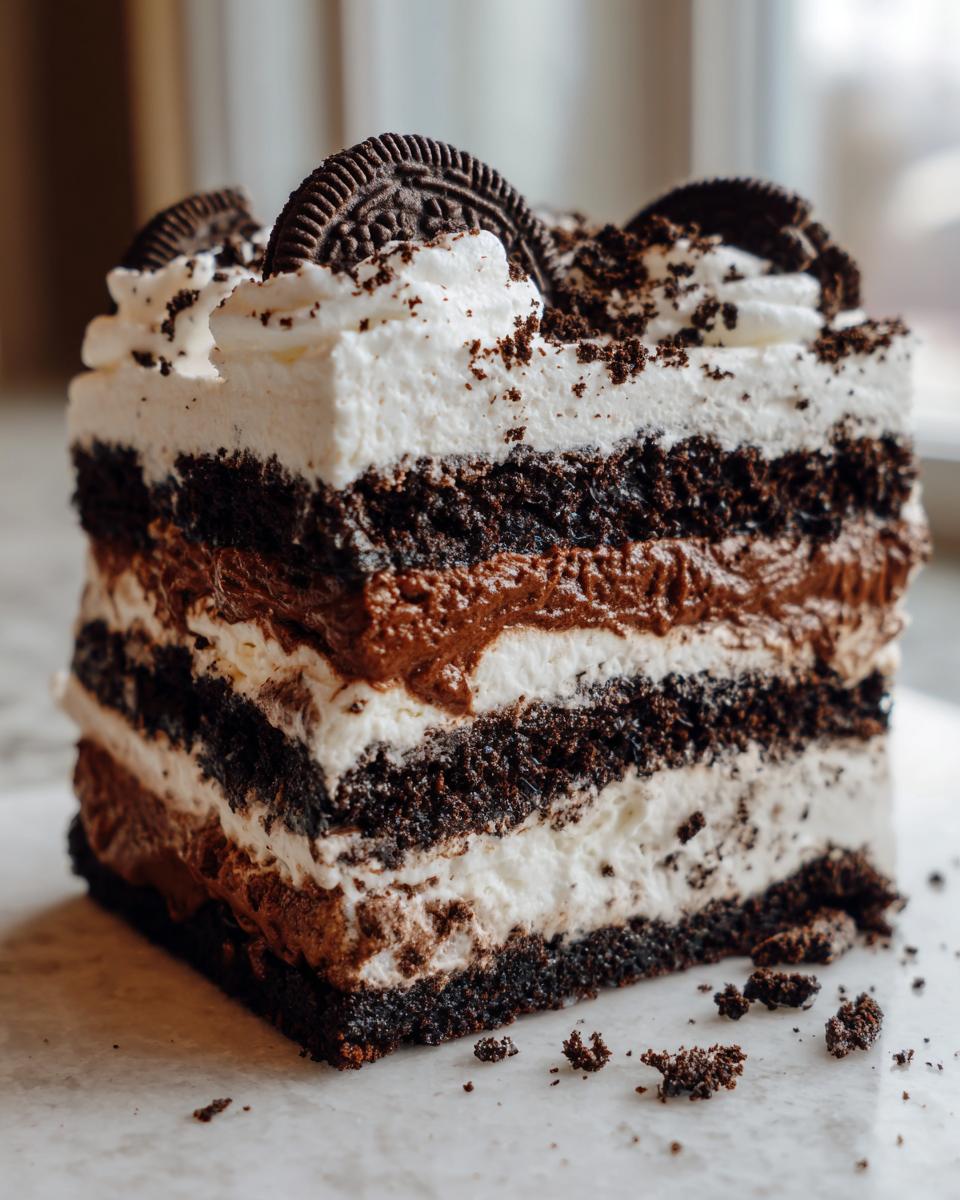
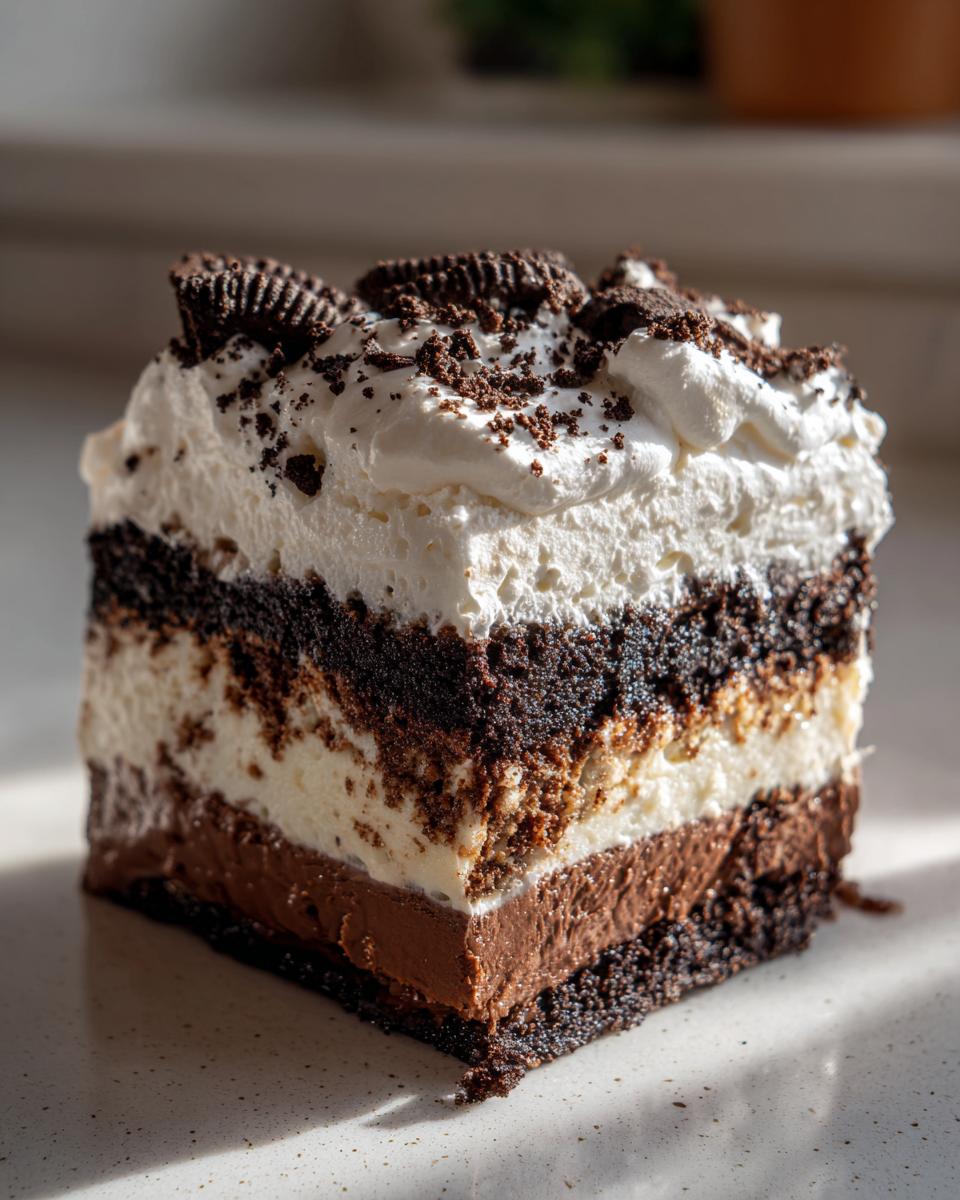
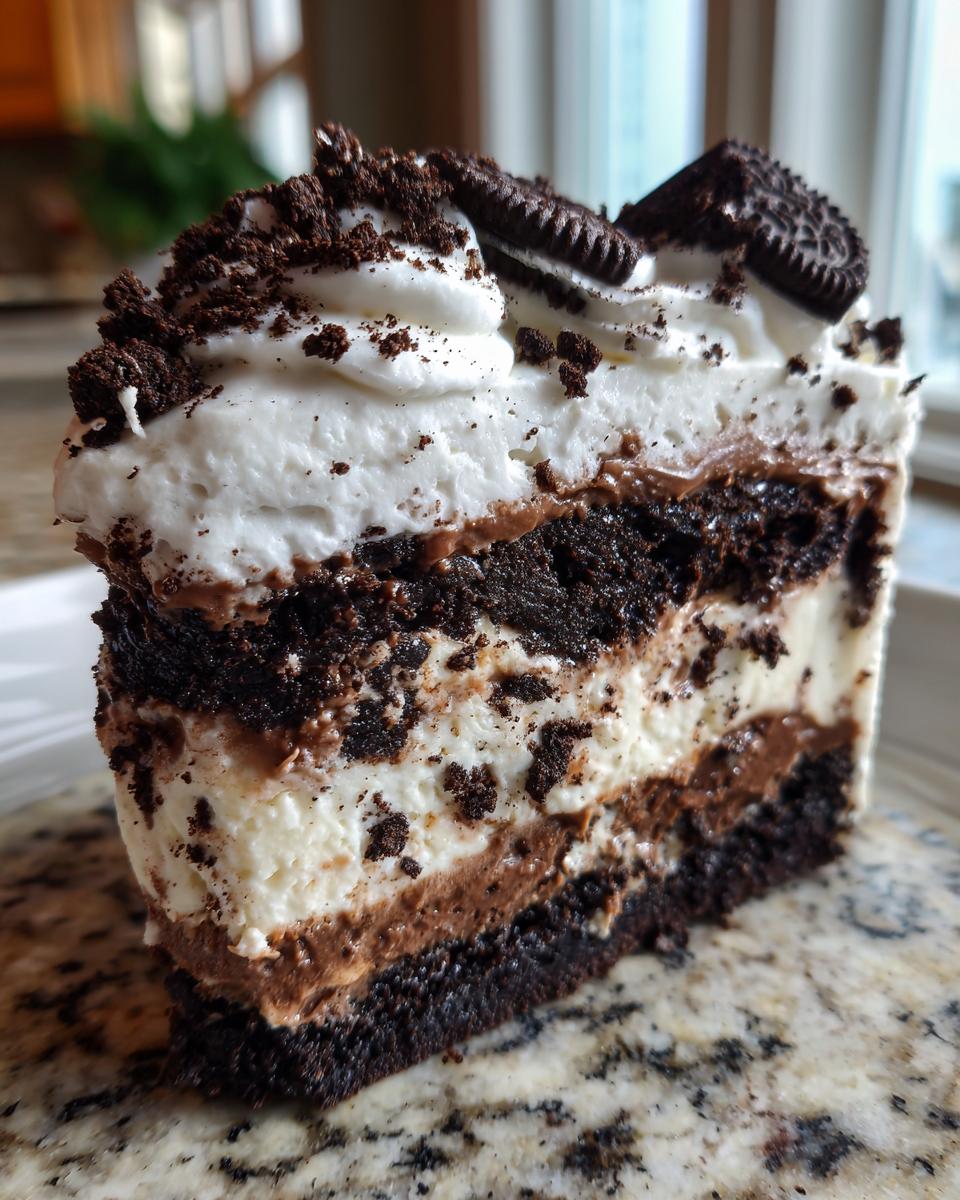
Pull the pan out. Now, work quickly because things melt fast! Scoop out that slightly softened vanilla ice cream and spread it evenly over the firm crust. Use that offset spatula to smooth out the top as best you can, making it level. Back into the freezer it goes! This layer needs time to set up hard again, so let it chill for a full hour. Don’t skip this hour, or the next layer will just sink in.
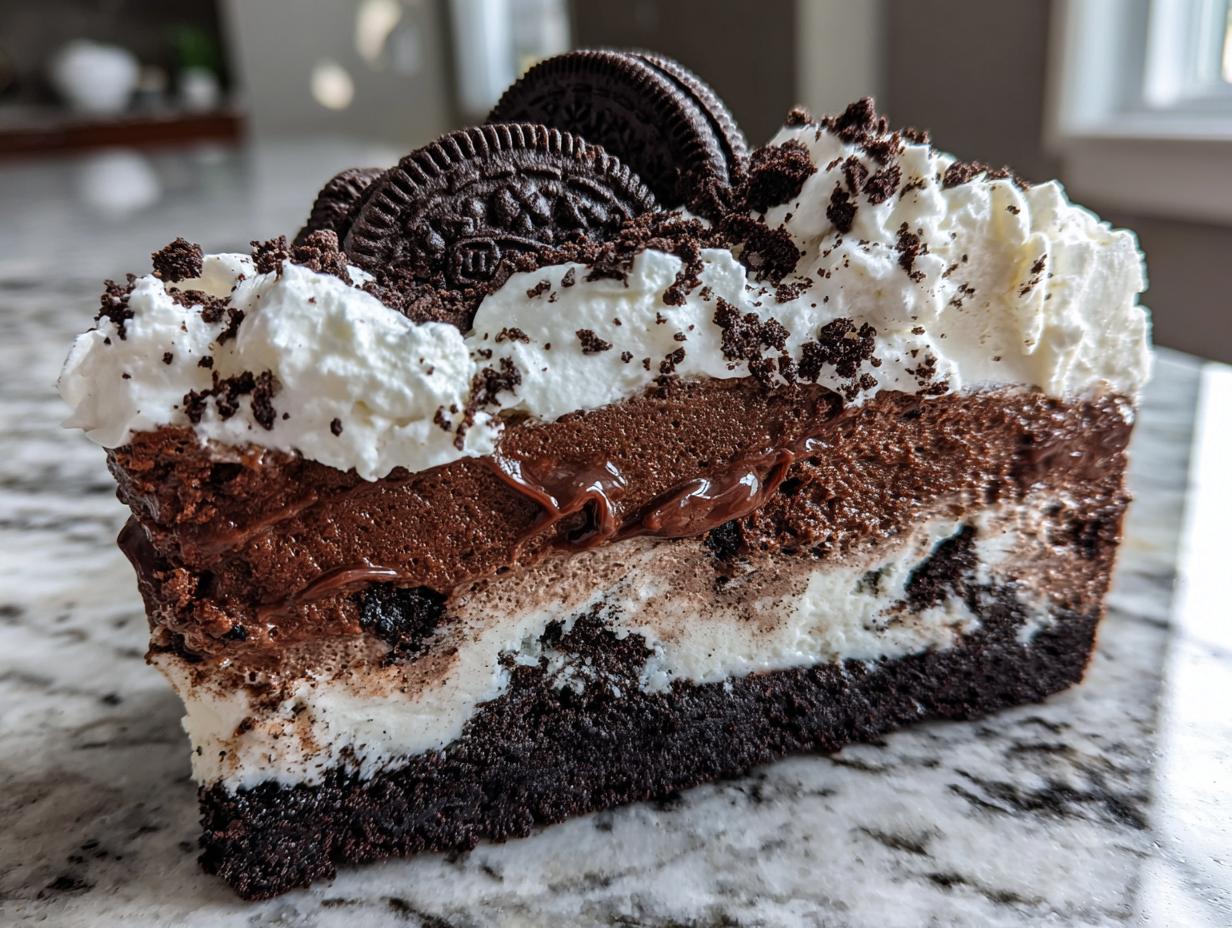
Once the vanilla is firm, repeat the process with the chocolate ice cream. Spread it smoothly right over the top of the vanilla layer. Now for the fun part: drizzle that warmed fudge topping over the chocolate. Use a knife, maybe a skewer, and gently swirl it just a little bit. Don’t go crazy mixing it; we just want streaks of warm flavor running through the cold chocolate layer.
Final Freeze and Whipped Topping Finish for Your Ice Cream Cake
This is the longest wait, but it’s essential for clean structure. Pop the whole thing back into the freezer and don’t touch it for at least 4 hours. Honestly, overnight is always better if you can manage it, ensuring the entire thing is rock solid. This keeps the layers from shifting when you finally slice into this glorious cold chocolate treat later.
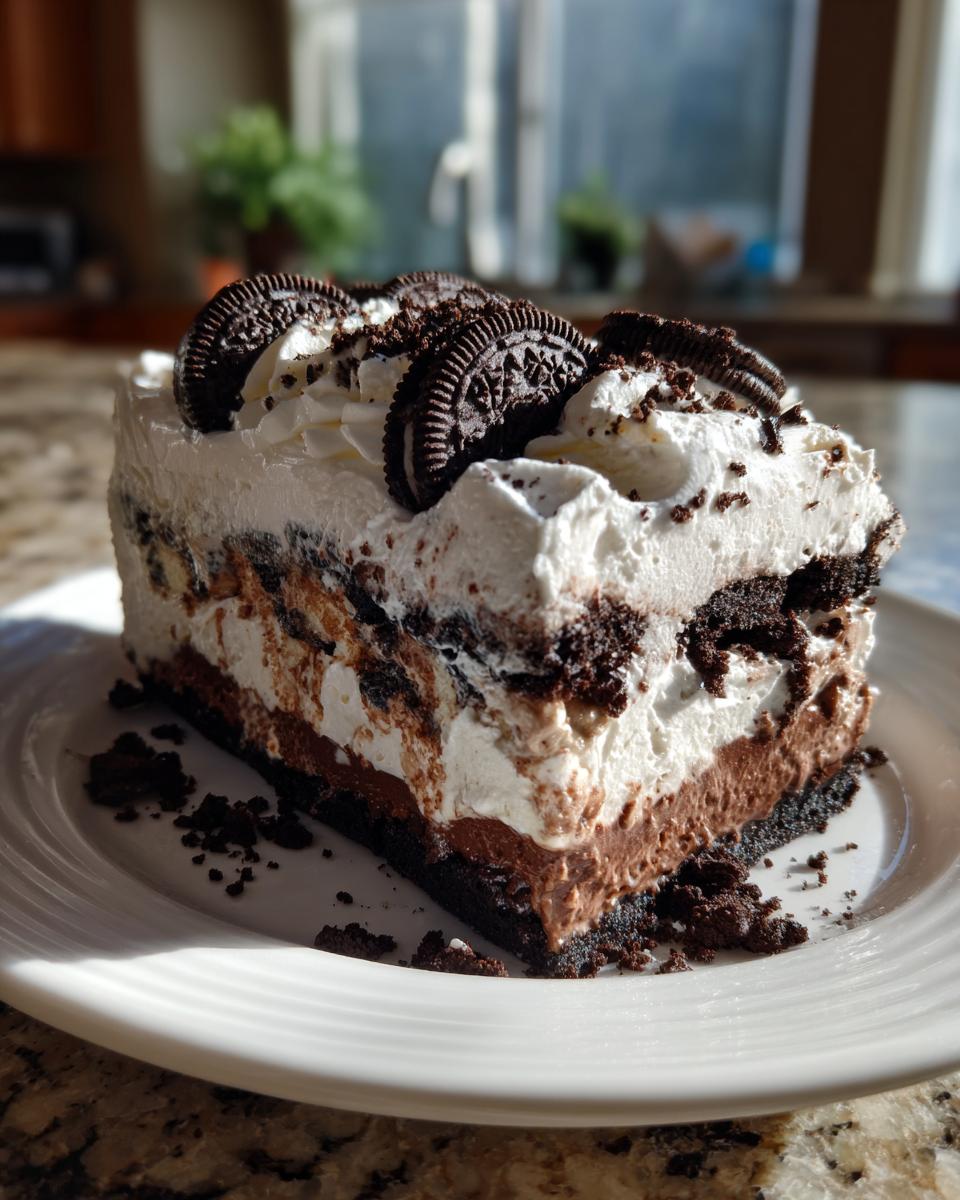
When you’re ready to serve, take the cake out about 5 to 10 minutes beforehand. We need it just soft enough to slice without shattering the crust. Carefully release that springform ring. Frost the top and sides with your thawed whipped topping—go rustic or smooth, I don’t judge! Finally, sprinkle those reserved crushed Oreos right on top. Time to slice and serve!
Pro Tips for the Best Homemade Ice Cream Cake
Look, I know we’re aiming for easy, but a slightly professional touch makes all the difference when you bring this out for company. Since we’ve skipped the oven, we need to focus on presentation and clean execution. Think of these as the little chef secrets I picked up that make serving this homemade ice cream dessert way less messy.
The biggest hurdle with any frozen cake is the actual slicing. You cut into it, and the whole thing wants to slide right off the plate, or you end up with jagged edges. Here’s the translator’s secret: the hot water trick! Before you make your first slice, dip a long, sharp knife into a tall glass of really hot water for about ten seconds. Wipe it completely dry, *then* make your cut. That little bit of heat slices right through the frozen layers like butter. Wipe the knife clean and reheat it for every single slice. It sounds fussy, but it guarantees those beautiful, clean wedges everyone wants!
Now, let’s talk about our structural insurance. I recommend the springform pan because it’s king here. But what if that dang pan is already in use or you just don’t have one? No sweat. Line a standard 9-inch round cake pan with plastic wrap instead. You need a big overhang on both sides—like a sling. Once the cake is totally frozen solid, you just grab those plastic wrap handles and *lift* the entire thing right out. Super simple adaptability; that’s what kitchen slang is all about!
And finally, don’t feel chained to vanilla and chocolate. This recipe loves variations! Want dark cold chocolate treats? Swap the chocolate ice cream for coffee or mint chip. Feeling nutty? Use peanut butter swirl ice cream instead of vanilla. The Oreo crust and fudge layer can handle almost any ice cream flavor you throw at it for a completely custom layered effect.
Ingredient Notes and Substitutions for Your Ice Cream Cake
I get asked all the time if we can substitute things in this recipe, and the short answer is mostly yes, but quality counts when you’re making something this simple! The whole point of this ice cream cake is the satisfying texture contrast between the crisp crust and the creamy filling, so try to keep that integrity.
If you’re staring at your pantry and realizing you’re out of Oreos—don’t panic! You can absolutely use other sandwich cookies. Think about those chocolate wafers or even those chocolate graham crackers if you want a slightly different crunch. Just crush them the same way and mix them with the butter; it turns the crust into a slightly different, but still totally delicious, cold chocolate treat.
For the ice cream itself, stick to the two-flavor rule just for structure, but feel free to mix and match! I’ve done mint chocolate and vanilla, or coffee and chocolate. When adding that fudge swirl, if you don’t have traditional hot fudge, a melted dark chocolate bar works perfectly well too. It’s about building recognizable, satisfying flavors across those creamy layers.
Storage and Make Ahead Tips for Your Ice Cream Cake
This is truly the ultimate make ahead dessert because once it’s frozen, it’s done! You did the work early, and now you can just pull it out when guests arrive. Once your cake is fully decorated with the whipped topping and crumbs, cover the top tightly with plastic wrap—make sure the wrap isn’t touching the topping if you can help it, or it will stick.
It holds up beautifully in the freezer for several weeks, ready for any last-minute invite. Just remember my slicing tip: always let your finished ice cream cake sit on the counter for about 5 to 10 minutes until it softens just a tiny bit. This ensures those beautiful layers you worked so hard on come out clean when you serve it!
Frequently Asked Questions About Making an Ice Cream Cake
I know sometimes the steps feel like a lot, even for a no-bake recipe! Here are the lightning-round answers to the things I hear most often when people are prepping their first batch of these amazing creamy frozen treats.
Can I use brownies instead of Oreos for the crust?
Oh, absolutely you can! If you prefer a chewy base over a crunchy one, that’s a fantastic variation for creating deeper fudgy brownie desserts. You can use leftover store-bought brownies or even a quick 8×8 pan of fudgy brownies. Just make sure they are cooled completely, press them firmly into the bottom of the springform pan, and give them that initial 15-minute freeze just like you would the crumb crust. It makes for a much more decadent base!
How long does the entire ice cream cake need to freeze?
For food safety and structure, you need a minimum of four hours after the final layer is added, but I strongly, strongly recommend overnight. When you’re making these super make ahead desserts, letting it freeze solid overnight ensures that when you go to slice it, nothing shifts or mixes. If you try to rush it, you end up with soft edges that look messy when you cut into it.
What if I only want to make a small ice cream cake?
You can totally scale this down for smaller gatherings! The flavor profile holds up great in any size. If you halve the ice cream quantities, you can easily use a standard 8-inch round pan instead of the 9-inch one. Just remember that if you use a deeper pan than intended—like a loaf pan—you *must* increase your freezing time dramatically, probably by another two hours, because the cold has to penetrate that much more dense interior.
Is there a way to get that signature Dairy Queen ripple without extra effort?
That swirl is classic! The fudge drizzle we do in the main recipe is essentially the same principle. If you want to mimic that look perfectly, warm up your fudge topping until it’s really runny, and instead of swirling it into the top chocolate layer, use a piping bag or a Ziploc bag with the corner snipped off (that’s chef slang for a makeshift pastry bag!). Pipe thin lines over the top chocolate layer, and then use a toothpick to quickly drag through the lines in alternating directions. It gives you that professional, layered look perfect for any celebration cake idea!
Serving Suggestions for Your Showstopper Ice Cream Cake
Okay, we’ve done the heavy lifting—the chilling, the layering, the freezing—and now it’s time to present this magnificent ice cream cake! Because this dessert is already rich, decadent, and packed with cookies and fudge, sometimes the best move is to balance it out with something light and bright on the side. Don’t try to overcomplicate the plate; let the cake shine!
When I serve this up, especially if I’ve made it for a big summer event—the perfect summer party dessert, by the way—I always have a bowl of fresh berries nearby. A handful of raspberries or sliced strawberries cuts right through that richness. The slight tartness of the fruit is a fantastic counterpoint to all that creamy chocolate and vanilla.
If you feel like you *must* add another sauce, keep it simple. A light drizzle of raspberry coulis looks gorgeous against the white whipped topping, or maybe a thin, dark chocolate ganache if you want to double down on the cold chocolate treats vibe. But honestly? A classic slice of this ice cream cake, served cold, needs nothing else. It’s a complete package right out of the freezer!
PrintEasy No-Bake Oreo Ice Cream Cake
Make this simple, layered ice cream cake using Oreos and your favorite ice cream. It requires no oven time and sets up perfectly in the freezer for a great celebration dessert.
- Prep Time: 25 min
- Cook Time: 0 min
- Total Time: 4 hr 25 min
- Yield: 10 servings 1x
- Category: Dessert
- Method: No Bake
- Cuisine: American
- Diet: Vegetarian
Ingredients
- 1 (14.3 ounce) package Oreo cookies
- 1/2 cup unsalted butter, melted
- 1.5 quarts vanilla ice cream, softened slightly
- 1.5 quarts chocolate ice cream, softened slightly
- 1 cup fudge topping, warmed slightly
- 1 cup whipped topping, thawed
- 1/4 cup crushed Oreo cookies for garnish
Instructions
- Prepare a 9-inch springform pan by lining the bottom with parchment paper.
- Place the entire package of Oreo cookies into a food processor and pulse until you have fine crumbs.
- Pour the melted butter over the crumbs and pulse until the mixture resembles wet sand.
- Press the Oreo crumb mixture firmly and evenly into the bottom of the prepared springform pan. Place the pan in the freezer for 15 minutes to set.
- Remove the pan from the freezer. Spread the slightly softened vanilla ice cream evenly over the crust layer. Smooth the top with an offset spatula.
- Return the pan to the freezer for at least 1 hour, or until the vanilla layer is firm.
- Once the vanilla layer is firm, spread the slightly softened chocolate ice cream evenly over the top.
- Drizzle the warmed fudge topping over the chocolate ice cream layer. Use a knife or skewer to gently swirl the fudge into the chocolate ice cream.
- Freeze the cake for at least 4 hours, or preferably overnight, until completely firm.
- Before serving, remove the cake from the freezer and let it sit at room temperature for 5 to 10 minutes to soften slightly for easier slicing.
- Carefully release the springform side. Frost the top and sides of the cake with the whipped topping.
- Sprinkle the reserved crushed Oreo cookies over the top for decoration. Slice and serve this crowd pleasing sweet immediately.
Notes
- For cleaner slices, dip your knife in hot water and wipe it dry between each cut.
- You can substitute any two ice cream flavors you prefer for a custom layered ice cream dessert.
- If you do not have a springform pan, line a standard 9-inch round cake pan with plastic wrap, leaving an overhang on the sides to lift the cake out later.
Nutrition
- Serving Size: 1 slice
- Calories: 450
- Sugar: 45g
- Sodium: 250mg
- Fat: 28g
- Saturated Fat: 15g
- Unsaturated Fat: 13g
- Trans Fat: 0.5g
- Carbohydrates: 48g
- Fiber: 2g
- Protein: 6g
- Cholesterol: 45mg