
Are you staring down the clock right now, wondering how you’ll get a genuinely flavorful dinner on the table before everyone melts down? I totally get it. That familiar weeknight panic? That’s where Kitchen Slang comes in. My whole philosophy, born from years bouncing between my family’s messy Chicago kitchen and the high-pressure line of a downtown bistro, is about translating chef lingo into real, practical shortcuts for you. We strip away the intimidation and focus on efficiency. That’s why we’re starting here: these Easy Sheet Pan shrimp fajitas deliver that sizzling, restaurant-quality taste but with almost zero cleanup. It’s about cooking smart, not hard.
- Why Sheet Pan Shrimp Fajitas Are Your New Weeknight Seafood Recipes Go-To
- Essential Components for Perfect Sheet Pan Shrimp Fajitas
- How to Prepare Easy Shrimp Fajitas Using the Sheet Pan Method
- Tips for Success with Your Shrimp Fajitas Recipe
- Serving Suggestions for Your Sizzling Shrimp Fajitas
- Storage and Reheating Instructions for Leftover Shrimp Fajitas
- Frequently Asked Questions About Easy Shrimp Fajitas
- Understanding the Nutrition in Your Shrimp Fajitas
- Share Your Sizzling Shrimp Fajitas Experience
Why Sheet Pan Shrimp Fajitas Are Your New Weeknight Seafood Recipes Go-To
Look, I respect the sizzle of a cast-iron skillet. I really do. But when you’re running on fumes after work, the skillet means constant stirring, babysitting the shrimp so they don’t turn rubbery, and then scrubbing sticky pepper residue later. That’s not efficiency, that’s stress! For true Weeknight Seafood Recipes, we need to use the oven’s flat, even heat. With this sheet pan approach, the vegetables caramelize beautifully while the shrimp cooks lightning fast. In the bistro, we always looked for ways to turn active cooking time into passive oven time—that’s the trick to becoming a faster home cook.
This method gives you that huge flavor payoff without requiring you to stand guard over the stove. You toss everything, slide it in, and walk away for ten minutes to set the table or sneak in five minutes of peace. That’s the kind of genius shortcut the pros use when things get slammed.
The Speed Factor: Achieving 30 Minute Shrimp Meal Results
That’s the promise here, folks. We are looking at a total time of about 35 minutes, and honestly, most of that is hands-off. We’re talking about a flavor-packed Quick Shrimp Dinner that tastes like you spent hours marinating and searing. Because the heat source surrounds the pan evenly, everything cooks perfectly at once. You get tender shrimp and crisp-tender veggies, hitting that sweet spot for the ultimate 30 Minute Shrimp Meal without breaking a sweat.
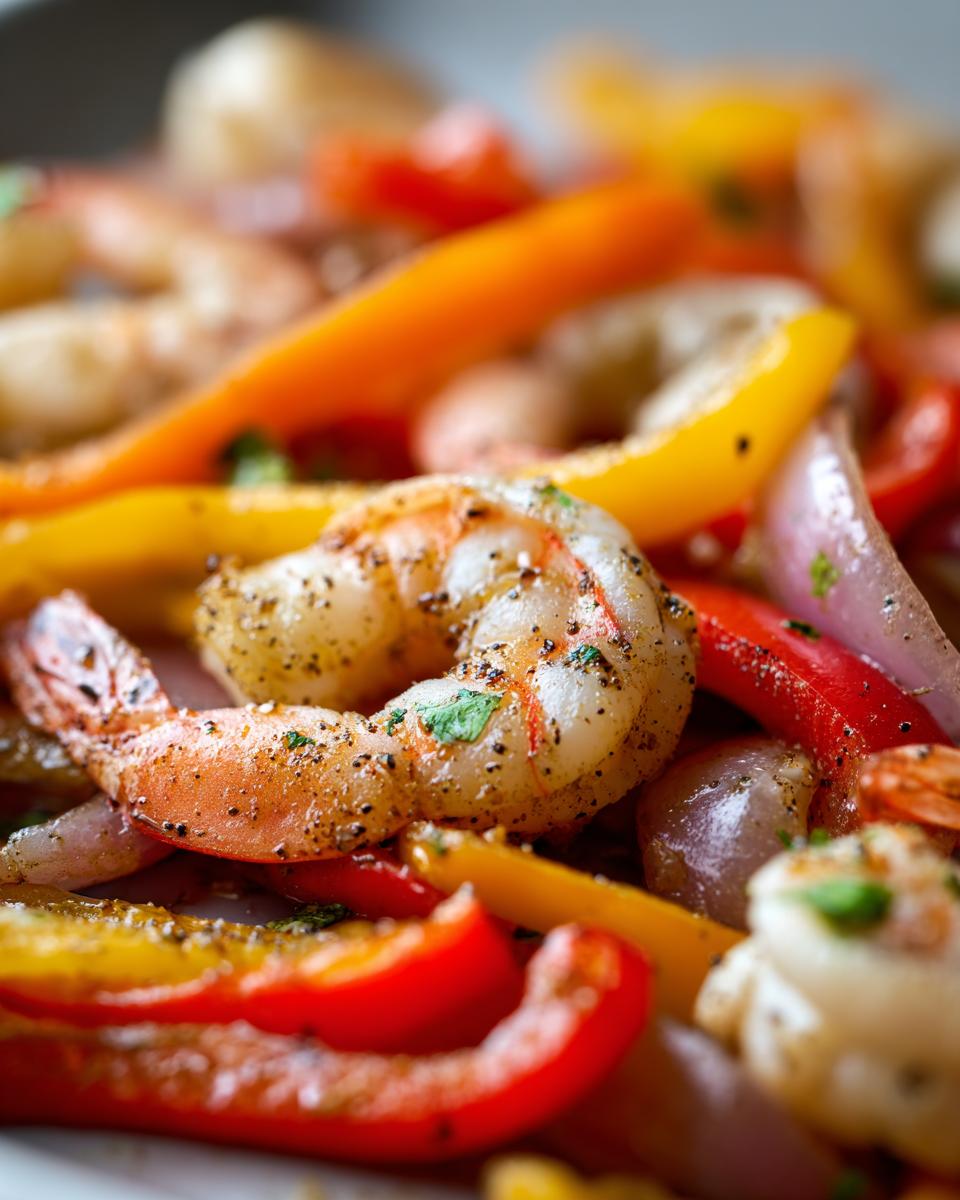
Essential Components for Perfect Sheet Pan Shrimp Fajitas
Okay, we’ve ditched the messy skillet, but now we need to talk about the actual food that goes onto that sheet pan. When you’re cooking fast, ingredient clarity is everything. A messy prep station leads to mistakes, and we cannot afford floppy shrimp or bland veggies!
Unlike those complicated recipes that ask you to finely mince three things and dice two others, this one is straightforward. It’s about knowing exactly what heavy hitters you need to bring those amazing, zesty flavors to life. If you prep your components clearly before hitting the oven button, everything else is simple.
Ingredients for Flavorful Shrimp Fajitas
I need you to grab your measuring spoons and be precise here, especially with the spices. This recipe relies on balance to get that authentic, bright flavor profile:
- 1.5 lbs large shrimp, peeled and deveined
- 2 tablespoons olive oil
- 1 red bell pepper, sliced
- 1 yellow bell pepper, sliced
- 1 large onion, sliced
- 1 tablespoon chili powder
- 1 teaspoon cumin
- 1 teaspoon smoked paprika
- 1/2 teaspoon garlic powder
- 1/2 teaspoon dried oregano
- 1/4 teaspoon cayenne pepper (optional, for heat)
- 1/2 teaspoon salt
- 1/4 teaspoon black pepper
- 1 lime, juiced
- Tortillas, for serving
- Toppings (sour cream, salsa, avocado), for serving
Building the Homemade Fajita Seasoning Recipe
This is my translator’s secret weapon. You can buy a jar off the shelf, sure, but making your own blend ensures you get the right punch for these **shrimp fajitas**. When you mix your own seasoning, you control the freshness, and trust me, the difference is huge!
We rely on a simple, smoky, earthy combination. If you’re serious about flavor, don’t skip the paprika. It brings that deep, slow-cooked flavor instantly, which is the opposite of what you expect from a quick sheet pan meal.
- Chili powder
- Cumin
- Smoked paprika
- Garlic powder
- Dried oregano
- Cayenne pepper (if you like a little fire!)
- Salt and pepper
Mix all of that together in a dry little bowl first. That prepared seasoning is the backbone of this entire dish!
How to Prepare Easy Shrimp Fajitas Using the Sheet Pan Method
Alright, let’s get this done efficiently. This is where all that prep work pays off! My goal is always to keep your hands on the food, not hovering over the stove. When you use a sheet pan like this, you’re essentially sending the meal into the oven for a quick blast, and that’s how we nail that perfect texture every time we make these **shrimp fajitas**.
Step 1: Oven Prep and Vegetable Roasting for Sizzling Shrimp Fajitas
First thing, crank that oven up! We need 400°F (or 200°C). Now, grab your largest baking sheet. Line it with parchment paper—seriously, don’t skip this. That’s your insurance policy against sticking. Toss those beautiful sliced peppers and onions with just one tablespoon of olive oil and about half of your homemade seasoning blend. Spread them out so they aren’t piled up. We’re going to roast those guys alone for 10 minutes. This gives the harder vegetables a head start so the shrimp doesn’t get overcooked waiting for them.
Step 2: Seasoning and Combining the Shrimp Fajitas Ingredients
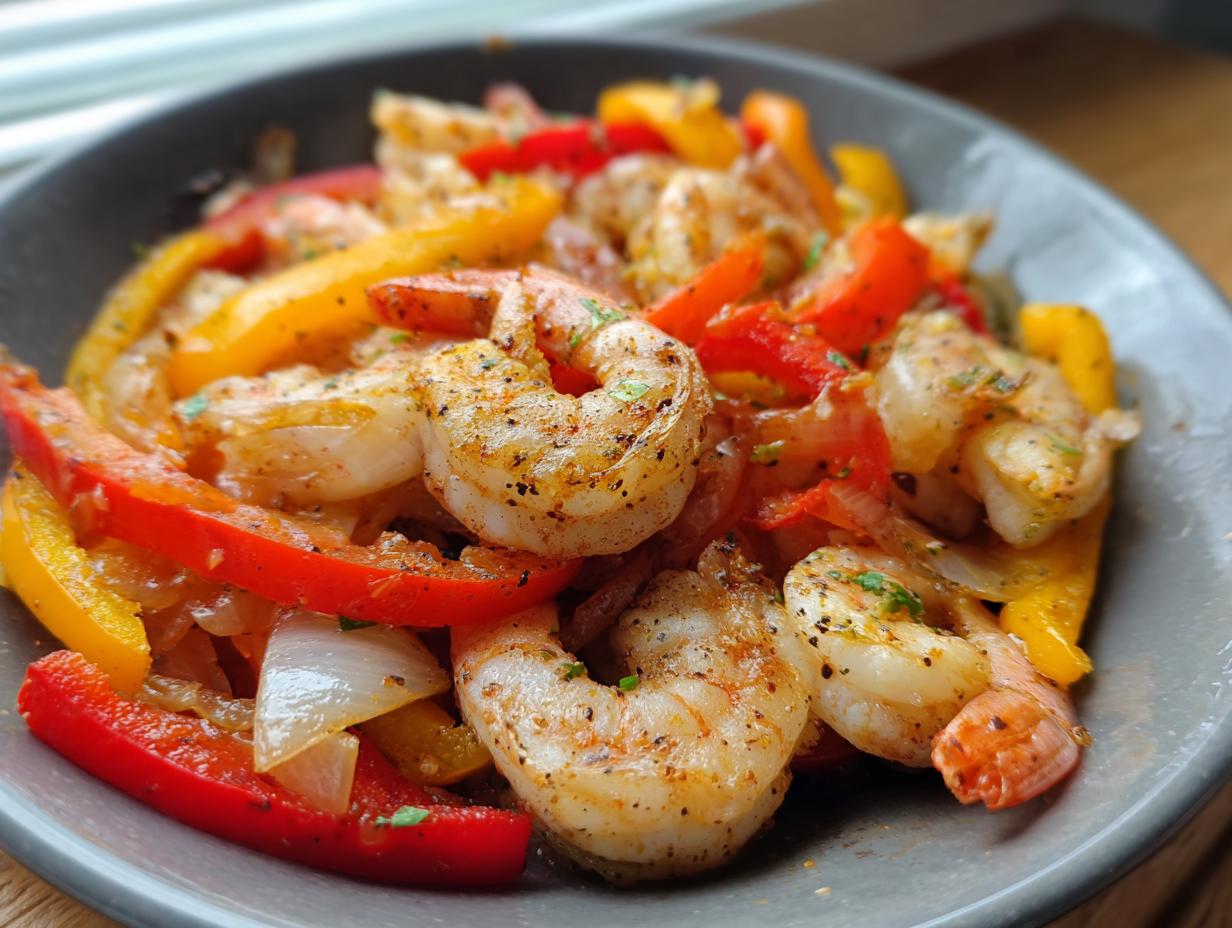
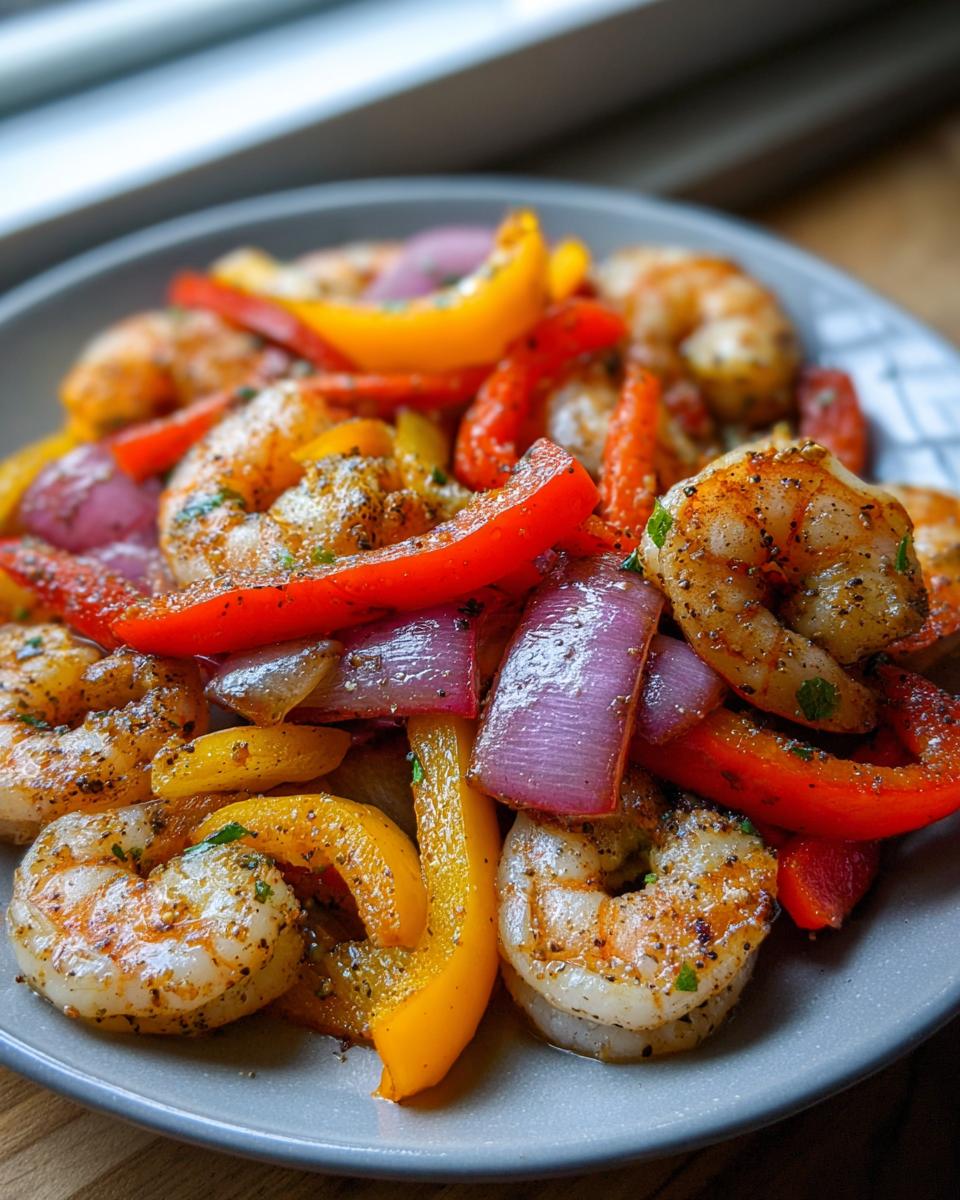
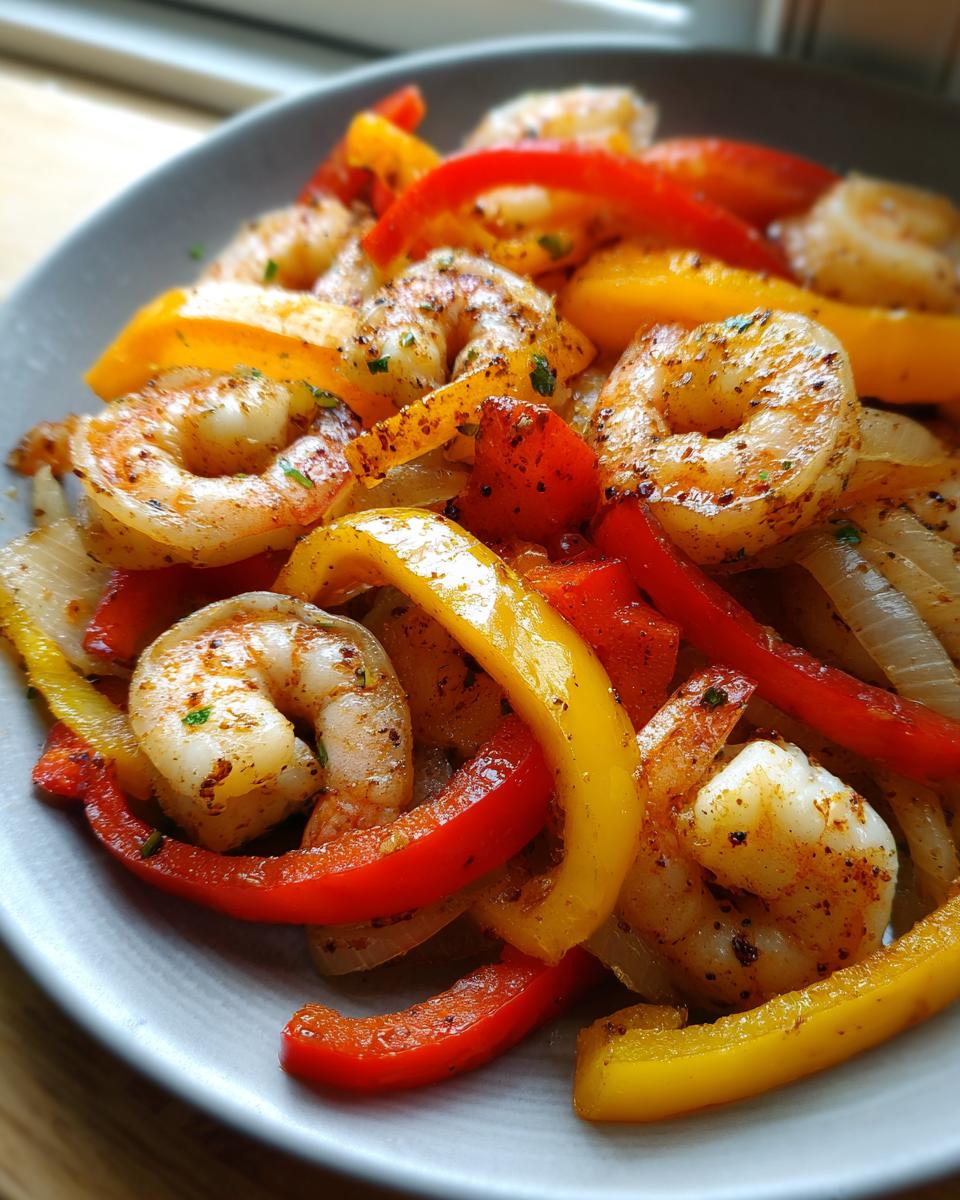
While those veggies are roasting, grab your shrimp. Toss the peeled and deveined bodies with the remaining tablespoon of oil and the rest of that amazing fajita seasoning mix. When those 10 minutes are up, pull the pan out! You’ll see the onions softening. Now, push the veggies over to one side of the sheet pan. Add your seasoned shrimp to the empty half, making sure they are in a single, uncrowded layer. Crowding is how you steam shrimp, and we want them *sizzling*, not sweating!
Step 3: Final Roast and Finishing Touches for Quick Shrimp Dinner
Slide the whole loaded sheet pan back in for another 8 to 10 minutes. That’s it for the oven time. You watch for the shrimp to turn opaque and pink. The instant they look done—pull them out! Shrimp cooks fast, so don’t walk away. Once it’s out, hit the whole thing with the fresh juice from that lime. Give it one gentle toss right there on the pan so everything gets coated in that bright, zesty finish. That final hit of acid is what makes these the best Quick Shrimp Dinner you’ll ever need.
Tips for Success with Your Shrimp Fajitas Recipe
We have the timing down and we know the seasoning is dynamite, but let’s talk about troubleshooting. In the busy kitchen, knowing how to pivot or prevent disaster is what separates a good cook from a great one. Since shrimp is so delicate, we have to treat it with respect, otherwise, your delicious fajitas turn into chewy little hockey pucks. That’s not the vibe we’re going for here!
The key to getting these **shrimp fajitas** right every single time is managing moisture and size. If you manage those two things, you’ll never have a soggy sheet pan or rubbery protein again. Think less about complicated steps and more about simple science.
Ingredient Notes and Substitutions for Shrimp Fajitas
Let’s first talk about serving style. Remember how I said this recipe is naturally accommodating? If you or someone you’re cooking for needs to skip the tortillas—maybe you’re trying to keep things lighter or stay Gluten Free Shrimp Fajitas style—serving this filling over rice or even lettuce cups is fantastic. It still eats like a bold Mexican Shrimp Recipe, just without the carb wrap.
Now, about the shrimp size. The recipe calls for large shrimp because they hold up better to the heat. If you only have smaller (medium) shrimp, that’s fine! Just pull them out of the oven about 2 minutes earlier than the recipe suggests. They cook way faster, and we don’t want them shrinking into nothing.
And please, if you are using frozen shrimp—and I know we all do it—you have to be vigilant. Thaw them completely, and then take a paper towel and press down hard. I mean *press*. You need to blot out as much surface water as possible. Any extra water on that shrimp turns directly into steam in the oven, and steam makes your beautiful sheet pan meal soggy. Pat them bone dry before they ever touch that seasoning mix!
Serving Suggestions for Your Sizzling Shrimp Fajitas
Okay, the shrimp is cooked, it’s glistening with lime juice, and your kitchen smells like the best Mexican restaurant in town. Don’t let all that amazing work fall flat because you skipped the final assembly! The presentation here is key to making these feel like a real fiesta, not just another fast dinner.
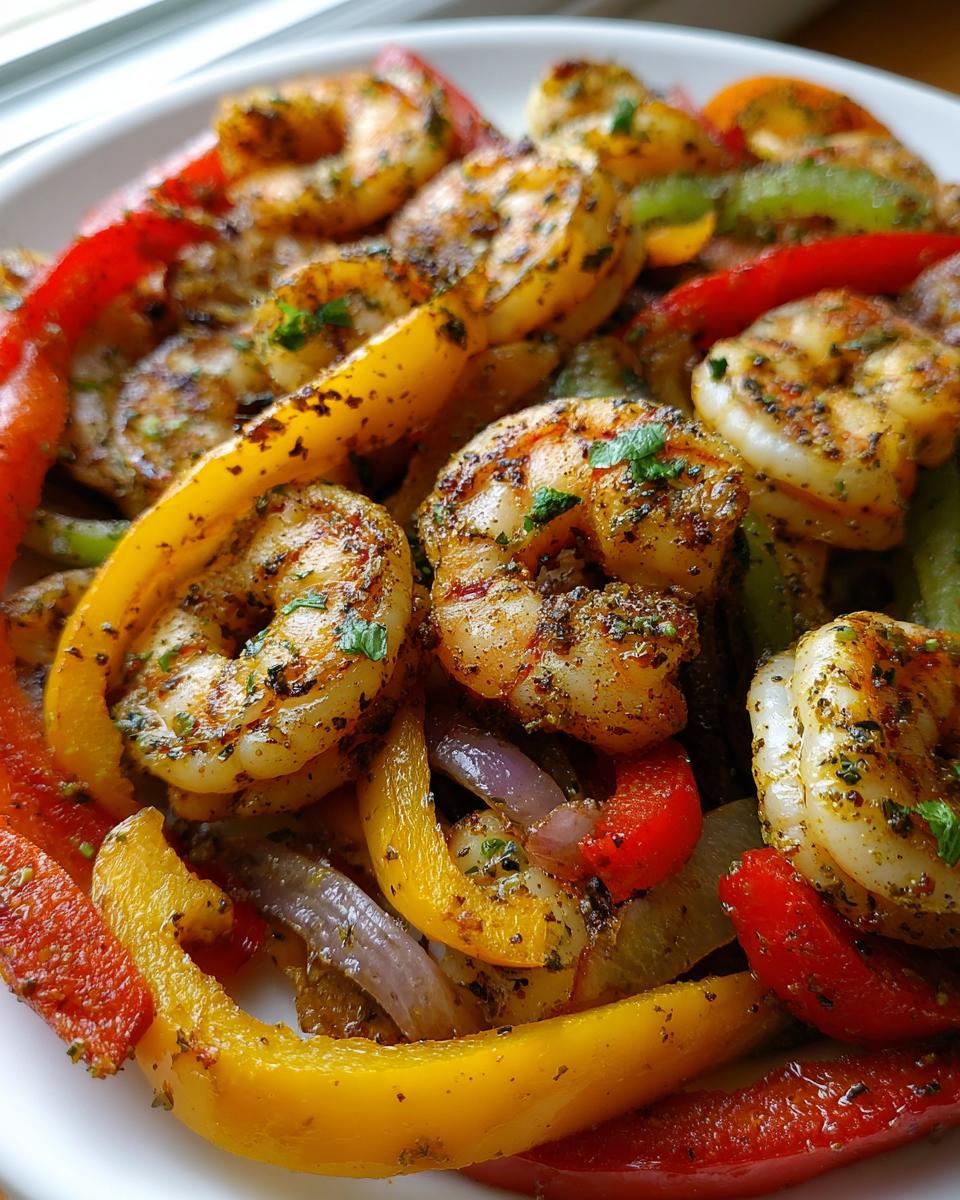
My biggest pet peeve? Serving fajitas with cold, stiff tortillas. C’mon, we deserve better than that! Heating the tortillas properly makes them pliable, almost fragrant, and allows them to hold all those gorgeous, flavorful juices without immediately cracking open. You can wrap them in a damp paper towel and microwave them for 30 seconds, or even better, warm them directly on a dry, hot skillet for about 15 seconds per side until they puff up slightly. That’s how you get that restaurant vibe.
Once your tortillas are soft and warm, it’s time to pile on the fillings. We’ve got the shrimp and veggies—all that bright, zesty heat—but a great fajita always needs cool, creamy contrast. Go beyond the basic sour cream and salsa!
- Cotija Cheese: A sprinkle of salty, crumbly Cotija cheese adds fantastic texture. It’s sharper than cheddar and just melts beautifully into the hot shrimp.
- Fresh Cilantro: If you aren’t a cilantro-hater (and I hope you’re not!), a generous shower of coarsely chopped fresh cilantro brightens up the whole mix right before serving.
- Avocado or Guac: Since we are talking about truly amazing Mexican Shrimp Recipes, you absolutely need something creamy. If you have time, whip up some quick guacamole; if not, just slice up some buttery avocado chunks.
- Pickled Onions: If you have them, the tang from quick pickled red onions cuts through the richness perfectly.
Pile everything high, hand the plate over, and listen for the happy sigh. That’s the sound of a highly efficient, incredibly delicious weeknight win!
Storage and Reheating Instructions for Leftover Shrimp Fajitas
So, you managed to have leftover fajita filling—congratulations, that means it was *really* good! The biggest mistake people make with leftovers is just throwing the whole assembled fajita into a plastic container. Nope! We can’t do that if we want the texture to be anywhere near as good as it was fresh off the pan.
When dealing with shrimp fajitas, the enemies are mushy vegetables and dry shrimp. To fight them, you need to separate your components entirely. Do not try to save the warmed tortillas; they get chewy and sad immediately. Save the filing, skip the tortillas for now, and put your toppings in their own little containers.
Storing the Shrimp and Vegetable Filling
Let the cooked shrimp and vegetable mixture cool down completely on the counter before you put it anywhere near the fridge. Trapping heat creates condensation, and condensation is moisture we don’t want sitting overnight! Once cool, scoop the filling into an airtight container. If you made a lot, you can keep this filling nicely for about three days. Honestly, shrimp flavor lasts well, but just aim for eating it within 72 hours for the absolute best taste.
Reheating for the Best Texture
When it’s time to eat leftovers, treat the filling gently. The microwave is fast, but it can be cruel to shrimp, turning it tough in seconds. My favorite trick for reheating is using the skillet again—yes, I know, more dishes—but it’s worth it! Heat a small non-stick pan over medium heat. Add a tiny splash of water or maybe just a teaspoon of oil, add your cold filling, cover it, and let it steam gently for maybe three minutes. This brings the moisture back without aggressively cooking the shrimp again.
If you absolutely must use the microwave because you’re running out the door, only zap it in 30-second bursts. Stir it well between each burst. You need to bring the temperature up slowly so the shrimp doesn’t seize up on you. Once it’s warm through, warm up fresh tortillas, and you’re good to go. It’ll be almost as good as the very first time!
Frequently Asked Questions About Easy Shrimp Fajitas
I know when you’re trying out a new recipe, especially when you are aiming for a super Healthy Shrimp Dinner Idea that still packs flavor, you’re going to have questions. That’s what I’m here for! Getting the balance right on something this quick can be tricky, but these are the common stumbling blocks I ran into when I was perfecting the sheet pan method for these **shrimp fajitas**.
Can I use frozen shrimp for these shrimp fajitas?
Absolutely, you can! We keep it real over here, and sometimes that’s what the freezer aisle has to offer. But here’s the non-negotiable rule for perfectly roasted **shrimp fajitas**: they must be completely thawed and patted bone dry before they ever see that seasoning. If they’re even a little wet, they’ll steam in the oven instead of searing, and we lose that great texture. Pat, pat, pat them dry with paper towels!
How do I make these spicy shrimp fajitas?
If you want to dial up the heat on these **spicy shrimp fajitas**, you have a few easy levers to pull in the process. The simplest way is right in the seasoning blend itself—don’t be shy with that cayenne pepper, or maybe swap in some chipotle powder for a smoky heat. If you want a fresh, raw heat, dice up half a jalapeño (seeds in!) and throw it right onto the sheet pan with the bell peppers in Step 1. That fresh spice holds up really well to the roasting.
What is the best alternative to tortillas for these shrimp fajitas?
This is a great question for anyone watching their carb intake or looking for naturally Gluten Free Shrimp Fajitas option! If you ditch the tortillas, you instantly pivot the meal style. My favorite move is serving the sizzling shrimp and veggies hot over a bed of fluffy white or brown rice—it turns it into a fantastic bowl situation. If you’re trying to keep it super low-carb, grab some crisp butter lettuce or romaine hearts and use those as the wrapper instead. Super crisp, refreshing, and it still feels like you’re eating something special!
Understanding the Nutrition in Your Shrimp Fajitas
Okay, I know some of you are cooking based purely on hunger cues, but for those of you who track macros or just like knowing what fuel you’re putting into your body—I’ve got you covered. When we talk about genuinely Healthy Shrimp Dinner Ideas, this recipe delivers big time, mostly because the bulk of the dish is lean protein and vegetables.
Now, remember, I’m Zoe Thompson, not a registered dietitian! These numbers are estimates based on dividing the filling ingredients across four servings, which is what the recipe aims for. If you load up on extra sour cream or use four jumbo tortillas per person, these stats are definitely going to change! Think of this as the baseline for the actual shrimp and veggie mix.
This is where the transparency I promised from Kitchen Slang comes into play. We talk about the real food, not the overly processed stuff. Here is the breakdown of the *filling* portion:
- Serving Size: 1 serving (approx. 1/4 of filling)
- Calories: 280
- Protein: 32g (That’s solid fuel!)
- Fat: 10g (Mostly healthy fats from the olive oil)
- Carbohydrates: 15g
- Sugar: 5g
See that protein number? That’s huge! You’re getting tons of lean energy without loading up on unnecessary saturated fats or heavy starches in the main mix. If you’re serving this over rice or with heavy sides, just factor those extras in after! This ensures you know exactly what you’re getting in every bite of those vibrant peppers and juicy shrimp.
Share Your Sizzling Shrimp Fajitas Experience
So there you have it, translation complete! You’ve taken the efficiency language of the professional kitchen and applied it right onto your own sheet pan to conquer another weeknight. I’ve given you all the insider know-how on timing, seasoning, and ensuring those **shrimp fajitas** come out sizzling, not sad.
But the real magic happens when you take this knowledge and make it your own. Did you double the cayenne? Did you swap in some grilled pineapple chunks because that’s what you had on hand? I want to hear about it! This is what Kitchen Slang is all about—community and shared wins.
Go ahead and try these out. When you do, don’t just walk away! Come back down here and drop a rating if you think this recipe earned its weeknight stripes. Telling me how many stars you gave it helps others see that sometimes the fastest way is also the most flavorful way. Let’s keep this conversation cooking in the comments below!
PrintEasy Sheet Pan Shrimp Fajitas

Make restaurant-style shrimp fajitas at home with this quick sheet pan method. This recipe delivers sizzling, flavorful results with minimal cleanup, perfect for a weeknight dinner.
- Prep Time: 15 min
- Cook Time: 20 min
- Total Time: 35 min
- Yield: 4 servings 1x
- Category: Dinner
- Method: Baking (Sheet Pan)
- Cuisine: Mexican-inspired
- Diet: Gluten Free
Ingredients
- 1.5 lbs large shrimp, peeled and deveined
- 2 tablespoons olive oil
- 1 red bell pepper, sliced
- 1 yellow bell pepper, sliced
- 1 large onion, sliced
- 1 tablespoon chili powder
- 1 teaspoon cumin
- 1 teaspoon smoked paprika
- 1/2 teaspoon garlic powder
- 1/2 teaspoon dried oregano
- 1/4 teaspoon cayenne pepper (optional, for heat)
- 1/2 teaspoon salt
- 1/4 teaspoon black pepper
- 1 lime, juiced
- Tortillas, for serving
- Toppings (sour cream, salsa, avocado), for serving
Instructions
- Preheat your oven to 400°F (200°C). Line a large baking sheet with parchment paper for easy cleanup.
- In a medium bowl, combine the chili powder, cumin, smoked paprika, garlic powder, oregano, cayenne pepper (if using), salt, and black pepper. This is your homemade fajita seasoning.
- Place the sliced bell peppers and onion on the prepared baking sheet. Drizzle with 1 tablespoon of olive oil and toss to coat. Spread them in a single layer.
- Roast the vegetables for 10 minutes while you prepare the shrimp.
- In the same bowl used for seasoning, toss the shrimp with the remaining 1 tablespoon of olive oil and half of the fajita seasoning mix.
- Remove the baking sheet from the oven. Push the vegetables to one side and add the seasoned shrimp to the other side of the pan, spreading them in a single layer.
- Return the sheet pan to the oven and roast for another 8 to 10 minutes, or until the shrimp is pink and cooked through. Do not overcook the shrimp.
- Remove the pan from the oven. Squeeze the fresh lime juice over the shrimp and vegetables. Toss everything together gently.
- Warm your tortillas according to package directions. Serve the sizzling shrimp and vegetables immediately in the warm tortillas with your preferred toppings.
Notes
- For a spicier kick, add 1/2 teaspoon of chipotle powder to your seasoning mix.
- If you prefer a skillet method, sauté the vegetables first until tender-crisp, remove them, then cook the seasoned shrimp quickly in the same pan before combining everything.
- This recipe is naturally gluten free if you serve it over rice instead of tortillas.
Nutrition
- Serving Size: 1 serving (approx. 1/4 of filling)
- Calories: 280
- Sugar: 5
- Sodium: 450
- Fat: 10
- Saturated Fat: 2
- Unsaturated Fat: 8
- Trans Fat: 0
- Carbohydrates: 15
- Fiber: 3
- Protein: 32
- Cholesterol: 210