
Oh, that smell! Seriously, nothing beats walking into the kitchen when homemade yeast is doing its happy dance in the air—it just screams comfort and Saturday afternoon. I totally get it if you’ve been nervous about working with yeast; those old recipes can sound like a foreign language filled with weird temperatures and waiting times. That’s what I’m here for! My whole goal at Kitchen Slang is to take those intimidating techniques and translate them so you can cook with instinct. Trust me on this: learning to make perfect homemade dinner rolls from scratch is a game-changer for any meal. These rolls? They are buttery, incredibly reliable, and they will make everyone at your table ask for seconds.
- Why You Will Love These Homemade Dinner Rolls
- Essential Ingredients for Soft Pull-Apart Rolls
- Step-by-Step Instructions for Perfect Homemade Dinner Rolls
- Baking Tips for Golden Homemade Dinner Rolls
- Make-Ahead Freezer Tips for Holiday Dinner Bread
- Serving Suggestions for Homemade Dinner Rolls
- Frequently Asked Questions About Yeast Dinner Rolls
- Storage and Reheating Instructions for Homemade Dinner Rolls
- Nutritional Estimate for These Rolls
- Share Your Soft Pull-Apart Rolls Experience
Why You Will Love These Homemade Dinner Rolls
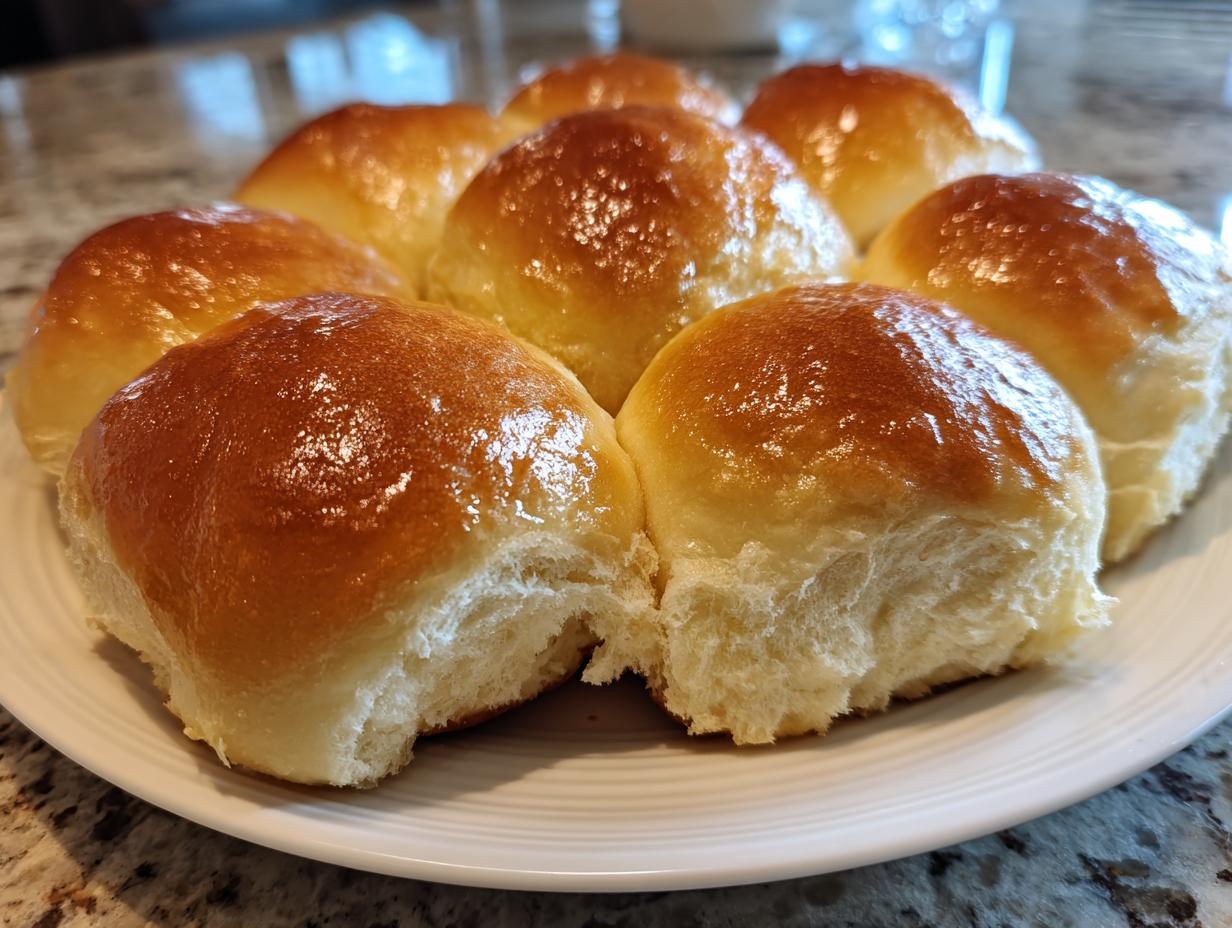
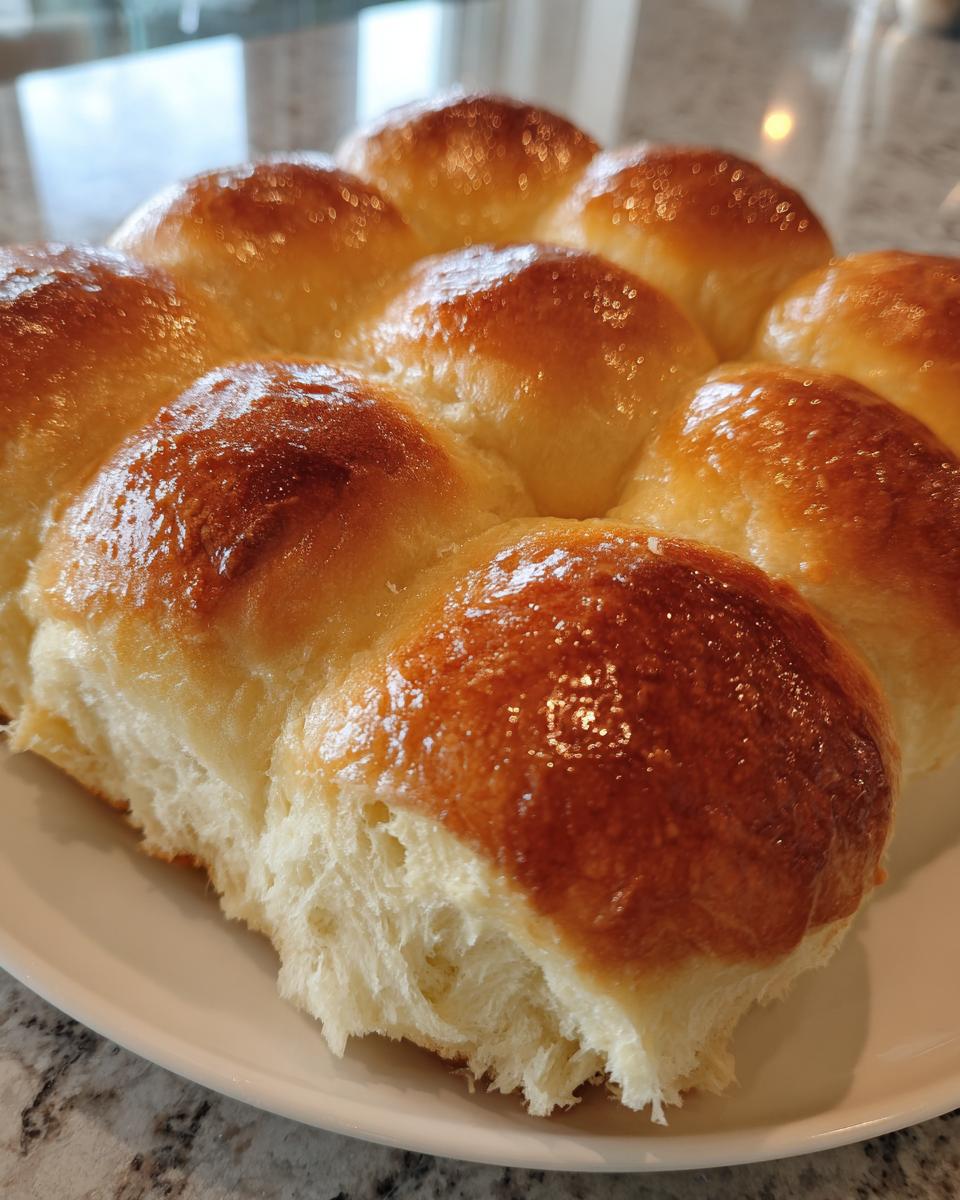
If you’ve been sticking to the grocery store stuff, get ready for a serious upgrade. These rolls hit every mark: they’re melt-in-your-mouth soft, perfectly buttery, and they pull apart like clouds. Seriously magical!

- Unbelievably soft texture that stays tender for days.
- The yeast process is straightforward—perfectly manageable even if you’re a beginner baker.
- They instantly elevate any meal, whether it’s a weeknight or a big holiday spread.
- These are the definition of fluffy rolls!
Essential Ingredients for Soft Pull-Apart Rolls
When you’re making bread, the ingredients are everything. You can’t fake quality here! For these rolls, you need precision, especially with the liquids. Don’t just guess on the milk temperature; if it’s too hot, you’ll kill your yeast before it even wakes up and your dough won’t ever rise. Aiming for 105°F to 115°F is the sweet spot—warm enough to make the yeast happy, but not so hot it shocks them!
Here is what you need to gather:
- 1 cup warm milk (make sure this is 105-115°F!)
- 2 1/4 teaspoons active dry yeast
- 1/4 cup granulated sugar
- 1 large egg, make sure it’s room temperature
- 1/4 cup unsalted butter, melted
- 1 teaspoon salt
- 3 to 3 1/2 cups all-purpose flour
- 2 tablespoons melted butter, this is for brushing on top later
Ingredient Notes and Substitutions for Homemade Dinner Rolls
We are sticking to all-purpose flour here. It gives us the perfect balance of structure and tenderness we’re looking for in a soft roll. Also, yes, use active dry yeast; it blooms so nicely and shows you immediately that it’s ready to work its magic. Don’t substitute it with bread flour unless you want a chewier texture than we’re aiming for with these pull-apart beauties.
Step-by-Step Instructions for Perfect Homemade Dinner Rolls
Okay, this is where the magic happens—don’t worry, it’s easier than it looks! The key to amazing yeast dinner rolls is respecting the two separate rising times. Rushing either one means you lose that incredible, light texture we are aiming for. This recipe takes time, but most of that time is just waiting for the dough to do its thing, which is perfect because you can tackle other meal prep while you wait!
Activating the Yeast and Mixing the Homemade Dinner Rolls Dough
First thing first, we have to wake up that yeast! Mix your warm milk, yeast, and a tiny bit of sugar, and just let it sit for about ten minutes. If you see foam—a nice, frothy layer—you’re good to go! That foam is proof that your yeast is alive and ready to work. If you see nothing after ten minutes, stop right there—your milk was likely too hot or the yeast is old, and you need to start over with fresh yeast. Once it’s foamy, whisk in the rest of the sugar, the egg, and that melted butter, followed by the salt. Then, slowly introduce the flour, cup by cup. I stop when it’s looking shaggy and messy—that’s your cue to get your hands in there!
Kneading and First Rise: Building Texture in Your Yeast Dinner Rolls
Time to turn that shaggy mess into something beautiful! Dump the dough onto a lightly floured surface. You need to knead this for about six to eight solid minutes. Keep going until the dough feels completely smooth and elastic—it shouldn’t be ripping when you pull it gently. Don’t panic if it sticks a little at first; add flour *only* if you have to, a tablespoon at a time. Once it feels right, put it into a lightly oiled bowl, cover it up, and put it somewhere warm. Maybe on top of the fridge, or near a pilot light if you have one. Just let it chill out for an hour or so until it’s doubled in size. That slow, warm rise is what builds the amazing structure for your future fluffy rolls.
Shaping and Second Proofing for Soft Pull-Apart Rolls
Once it’s puffed up, give it a gentle punch right in the center—just to deflate it a little. Now, divide that dough into 12 equal pieces. I usually weigh them out if I’m being picky, but eyeball it is usually fine! Roll each piece quickly between your palms into tight, smooth balls. You want these balls to sit close together in your greased 9×13 pan. When they are touching, they bake into those divine soft pull-apart rolls! Cover the pan again and let them proof for another 30 to 45 minutes. They should look puffy and very relaxed before they ever see the oven.

Baking Tips for Golden Homemade Dinner Rolls
Now for the grand finale! After all that waiting and kneading, we need to make sure those beautiful homemade dinner rolls come out looking exactly like something from a movie set. Crank your oven up to 375°F (that’s 190°C). Once preheated, slide that pan in carefully. Generally, they take between 15 to 20 minutes, but you are looking for that perfect golden-brown color all across the top. Don’t walk away during this part—it happens fast!
The absolute, non-negotiable, final step? As soon as you pull them out of the oven, grab those two reserved tablespoons of melted butter and brush it all over the tops right away. Seriously, don’t wait even a minute! That hot butter absorbs instantly, making the crust soft, shiny, and adding so much flavor without making them greasy. That buttery shine really seals in the moisture and gives you that irresistible, golden finish. Serve them warm with extra butter on the side—that’s always the best way!
Make-Ahead Freezer Tips for Holiday Dinner Bread
Listen, if you are planning for a big family dinner, or let’s say you’re getting ready for Christmas gatherings, you do *not* need to stress about making everything the morning of. These rolls are superstars when it comes to planning ahead! This is one of my favorite kitchen secrets: we use these rolls as some of our best make-ahead freezer rolls.
The most important thing is that you have to let the rolls cool down completely. I mean, truly room temperature—not even warm to the touch. If you bag them warm, all that steam turns into condensation, and you end up with soggy rolls, and nobody wants that, right? Once they are totally cool, toss them into a heavy-duty, freezer-safe zip-top bag. Squeeze out as much air as you can before sealing. You can actually keep these perfectly well frozen for up to three months!
When it’s time for the big meal, take them straight from the freezer and pop them onto a baking sheet cover them loosely with foil. Heat them up at 350°F for about 10 minutes. That little blast of heat brings them right back to life! They come out tasting as good as if you baked them minutes ago. Honestly, having these ready to go saves so much stress on the day.
Serving Suggestions for Homemade Dinner Rolls
These buttery beauties aren’t just for show; they are functional masterpieces on the dinner table! Obviously, serving warm rolls with a big slab of salted butter melting right into the center is non-negotiable. But they are the perfect companion for any big spread, making them essential holiday dinner bread.
They are fantastic mopping up the sauce from a hearty roast or dipping into a big, comforting bowl of chili. You can even use leftovers to make little slider sandwiches the next day. Check out my recipe for classic beef chili; these rolls are the absolute perfect partner!
Frequently Asked Questions About Yeast Dinner Rolls
I know when you start messing with yeast, you can get nervous! It’s the one ingredient that feels like it has a mind of its own. But don’t worry, you’re holding the winning recipe here, and most mishaps are super easy to fix once you know the lingo. Let’s jump into some common things that pop up when people are making their first batch of yeast dinner rolls.
Troubleshooting Common Issues with Homemade Bread Rolls
The number one issue people face isn’t actually the kneading—it’s the rise! If your dough didn’t double in size after that first hour, you have two likely culprits. Either your milk was too hot and accidentally cooked the yeast, or your yeast was old and gave up the ghost before you even started. Always check that foam test first, okay? If your dough is way too sticky during kneading (and you added barely any extra flour), that’s usually just a humidity thing. Try kneading it for a minute longer; sometimes the gluten just needs a little more work to absorb the liquid before it smooths out.
If you are aiming for those super soft pull-apart rolls, make sure you are not adding too much flour during kneading! A little stickiness is better than a dry, tough dough. If you happen to be using instant yeast instead of active dry, you can skip the foaming step entirely and just mix it right in with your dry ingredients. It’s a great shortcut, but you sacrifice that instant confirmation that your yeast is actually alive!
To get them extra soft, remember the quality of your fat matters. Use room temperature eggs and melted butter—not scorching hot butter—and always brush them right when they come out of the oven. That steamy, buttery coating keeps the crust tender! These little touches make all the difference in quality for your homemade bread rolls.

Storage and Reheating Instructions for Homemade Dinner Rolls
You just pulled a tray of these beauties out of the oven, and they are glorious, but what happens on Day Two? Nobody wants a hard, sad roll for breakfast the next morning! The main thing to remember is that these homemade dinner rolls hate the refrigerator. Cold air dries out bread fast, so please, resist the urge to stash them in the cold box!
For short-term storage—say, the next two days—keep them right on the counter. Put them in an airtight container or even a large zip-top bag, but make sure you squeeze out all the excess air before sealing it up. They should stay incredibly soft and pillowy this way. I try not to keep them much longer than that, though, because fresh bread is simply best enjoyed quickly!
If you didn’t freeze the extras like I suggested earlier, here is how you bring the soft magic back to leftover rolls. Don’t just microwave them—microwaving heats them unevenly and makes them tough later. Instead, wrap the individual rolls in a small piece of damp paper towel and zap them for about 10 to 15 seconds. That little bit of steam from the towel helps soften them right back up.
For a whole batch, the oven is definitely the way to go. Wrap the whole stack loosely in aluminum foil—this traps the heat but allows enough air so they don’t get soggy. Pop them into a 350°F oven for about 5 to 7 minutes. You want them just steaming hot when they come out! Trust me, that little reheat makes them taste like they just finished baking, and they are ready for another slathering of butter!
Nutritional Estimate for These Rolls
Now, I know some of you are tracking macros or maybe just curious about what’s happening in that buttery goodness. I did run the numbers so you have a general idea, but I have to give you the standard disclaimer that all home bakers know: this is just an estimate!
Since we all use different brands of flour, different sizes of eggs, and how much butter we brush on top varies wildly (for me, it’s a lot!), your numbers will shift a bit. This estimate is based on 12 rolls using the ingredients listed above.
Here’s the general breakdown per roll:
- Calories: 180
- Fat: 5g (with 3g being saturated fat)
- Carbohydrates: 29g
- Protein: 5g
- Sugar: 6g
- Sodium: 250mg
If you’re watching your oil intake, remember that the quality of the butter and the amount you brush on at the end really changes the fat content! But honestly, are you making these incredible rolls to count the fat? I didn’t think so. Enjoy them—that’s the most important nutritional factor here!
Share Your Soft Pull-Apart Rolls Experience
Whew! You did it! You wrestled that yeast into submission, you kneaded that dough until it felt right, and now you have a basket of the best homemade dinner rolls anyone has ever tasted. I truly hope you’ve got that wonderful, buttery bread smell still clinging to your kitchen!
Now that you’ve mastered these seriously soft pull-apart rolls, I need to hear all about it! Did they come out perfectly puffy? Did your family fight over the last one? Don’t just leave here quietly—I want to know your baking story!
Please, take a moment and drop a rating below. If you had a success, or maybe even a funny little kitchen mishap (we all have them!), leave me a comment. Your feedback helps me know which of these kitchen translations are working best for you. You can always reach out directly through my contact page too, but the comments section is where the community really builds!
Thank you for letting me share my secrets for making delicious, trustworthy homemade bread rolls. Keep that yeast vocabulary growing!
PrintSoft Homemade Yeast Dinner Rolls

Make soft, pull-apart yeast dinner rolls from scratch for your next meal. This straightforward recipe gives you fluffy, buttery rolls that beat store-bought options.
- Prep Time: 25 min
- Cook Time: 20 min
- Total Time: 2 hr 5 min
- Yield: 12 rolls 1x
- Category: Side Dish
- Method: Baking
- Cuisine: American
- Diet: Vegetarian
Ingredients
- 1 cup warm milk (105-115°F)
- 2 1/4 teaspoons active dry yeast
- 1/4 cup granulated sugar
- 1 large egg, room temperature
- 1/4 cup unsalted butter, melted
- 1 teaspoon salt
- 3 to 3 1/2 cups all-purpose flour
- 2 tablespoons melted butter, for brushing
Instructions
- Combine the warm milk, yeast, and 1 teaspoon of the sugar in a large bowl. Let this stand for 5 to 10 minutes until foamy. This shows your yeast is active.
- Add the remaining sugar, the egg, and the 1/4 cup of melted butter to the yeast mixture. Whisk until combined.
- Stir in the salt. Gradually add the flour, 1 cup at a time, mixing until a shaggy dough forms.
- Turn the dough out onto a lightly floured surface. Knead for 6 to 8 minutes until the dough is smooth and elastic. Add only enough flour to keep it from sticking.
- Place the dough in a lightly oiled bowl, turning to coat. Cover the bowl with plastic wrap or a clean towel. Let the dough rise in a warm place for 1 to 1 1/2 hours, or until doubled in size.
- Gently punch down the risen dough. Divide the dough into 12 equal pieces. Roll each piece into a smooth ball.
- Arrange the dough balls close together in a greased 9×13 inch baking pan. Cover the pan loosely. Let the rolls rise again in a warm spot for 30 to 45 minutes, or until puffy.
- Preheat your oven to 375°F (190°C).
- Bake the rolls for 15 to 20 minutes, or until they are golden brown on top.
- Immediately brush the tops of the hot rolls with the 2 tablespoons of melted butter. Serve warm.
Notes
- Make extra and freeze for later: Cool the baked rolls completely, place them in a freezer-safe bag, and freeze for up to three months. Reheat from frozen at 350°F for about 10 minutes.
- For the best texture, use milk that is warm but not hot, as high heat kills the yeast.
Nutrition
- Serving Size: 1 roll
- Calories: 180
- Sugar: 6
- Sodium: 250
- Fat: 5
- Saturated Fat: 3
- Unsaturated Fat: 2
- Trans Fat: 0
- Carbohydrates: 29
- Fiber: 1
- Protein: 5
- Cholesterol: 25