
We’ve all been there, right? Standing on a street corner in your mind, desperately craving that bite of authentic Thai street food magic—the kind where the rice is unbelievably tender and the sauce just melts into everything. If you think making killer mango sticky rice at home is some big, scary process only mastered by Bangkok vendors, you’d be wrong. That wall between professional flavor and home cooking? I tear that down in my kitchen. This recipe is the translation, the lingo, you need to make true restaurant-quality Khao Niao Mamuang. Forget fussy steps; we’re focusing on two things that matter most: getting that dreamy, creamy texture and keeping the method dead simple. You can even check out how I handle other Thai flavors, like my easy 5-minute creamy Thai peanut sauce, to see how we simplify things here. Trust me, you’re about to nail this legendary tropical sweet treat.
- Why This Easy Mango Sticky Rice Recipe Works for Home Cooks
- Gather Your Ingredients for Mango Sticky Rice
- Step-by-Step Instructions for Authentic Khao Niao Mamuang
- Tips for Success Making Mango Sticky Rice
- Dietary Notes: Is Mango Sticky Rice Vegan and Gluten-Free?
- Variations on This Thai Dessert Recipe
- Storage and Reheating Instructions for Leftover Mango Sticky Rice
- Frequently Asked Questions About Making Mango Sticky Rice
- Share Your Homemade Mango Dessert Success
Why This Easy Mango Sticky Rice Recipe Works for Home Cooks
Look, I know you want that exact flavor you get from the best street stalls—that perfect harmony of textures that feels luxurious but doesn’t require you to stand over a steamer for an hour. That’s the ‘translation’ I bring to you. We cut the noise and focus only on the techniques that actually matter for that restaurant-quality dessert. If you ever tackle a classic like chicken pad thai, you know technique is everything, and it’s the same here!
- It’s genuinely beginner friendly; we use simple measurements and even give you a rice cooker option.
- We nail the two fundamental textures that make or break this dessert.
- It’s quick! You might be surprised how fast this works up as an easy asian dessert when you follow the timing right.
Achieving Silky, Creamy Coconut Rice Texture
The trick to that incredible, silky texture isn’t cooking time—it’s soaking time! You absolutely must soak your glutinous rice for hours. When you drain that hot, cooked rice, you immediately hit it with the warm coconut sauce. This technique forces the grains to drink up that liquid while they are still piping hot, turning simple rice into a sweet, creamy coconut rice base. Don’t skip the resting period after mixing!
Authentic Flavor Profile: Sweet and Salty Balance
Authenticity in Thai desserts often comes down to salt. I’m serious! If you just use sugar and coconut milk, it tastes flat, like overly sweet pudding. But that little bit of salt we add into the coconut milk sauce recipe? That elevates the sweetness of the mango and cuts the richness of the coconut fat. It’s that sweet and savory flavor combination that screams ‘Thailand’ in your mouth.
Gather Your Ingredients for Mango Sticky Rice
Alright, let’s talk gear. Getting the right ingredients in the first place is half the battle won, especially when we’re chasing that authentic street food vibe. This recipe comes together in about 50 minutes total, which is amazing for a dessert this impressive, and it serves up two perfect portions. If you’re wondering about your pantry status, remember this is naturally one of those stellar gluten free desserts that everyone can enjoy!
For the Sweet Sticky Rice
This is the non-negotiable part! You have to find the right grain. Forget jasmine rice or any long-grain stuff you usually use; that won’t work here. We need the real deal:
- 1 cup sweet (glutinous) rice – look for this label!
- 1 cup fresh water for cooking.
For the Creamy Coconut Sauce and Garnish
Everything here should be full-fat and fresh to get that opulent mouthfeel the pros use. Don’t try to thin out the coconut milk; the fat content is key to the sauce texture.
- 1 cup full-fat coconut milk (the thick canned stuff)
- 1/4 cup granulated sugar
- 1/2 teaspoon salt (don’t skip this, remember the flavor balance!)
- 1 tablespoon coconut oil or a neutral oil (this helps the drizzle stay silky)
- 2 fresh ripe mangoes – seriously, use the best ones you can find!
- 1 tablespoon toasted sesame seeds for sprinkling on top
Step-by-Step Instructions for Authentic Khao Niao Mamuang
Okay, this is where the magic happens, and I promise, it’s less complicated than it seems. We’re translating those pro moves into something you can handle easily while watching TV. The key here, like in my easy dumpling sauce, is getting the textures right before we put everything together. We need that slightly firm but fully tender rice that soaks up flavor like a sponge.
Prep and Cooking the Sweet Sticky Rice
First up, we prep the rice. You have to rinse that sweet sticky rice under cold water until it actually runs clear—no cloudiness left! That means the excess starch is gone. Then, you need to soak it. I know, I know, waiting sucks, but soaking for a minimum of two hours, or even better, overnight, is crucial for that soft interior. Once soaked, drain it really well. Now, we cook: Use your rice cooker on the standard white rice setting with just 1 cup of water. If you’re steaming? Line a steamer basket with cheesecloth and steam for about 25 to 30 minutes until it’s soft all the way through. Feel free to check out how others use the rice cooker method for a foolproof result!

Making the Warm Coconut Milk Sauce Recipe
While that rice is cooking, get your sauce ready. In a small saucepan, combine the full-fat coconut milk, sugar, and salt. Put it over medium-low heat. Your goal here is just to dissolve everything—I mean it: Do not let this boil. Boiling thickens the milk too fast and ruins the texture we’re aiming for. Once it’s smooth (you can’t feel any grit when you swirl it), pull it right off the heat. Now, here’s the split: Take about two-thirds of that warm sauce and pour it immediately over your hot, freshly cooked sticky rice. Give it a gentle stir, cover it tight, and let it chill out for about 15 to 20 minutes. This soaking time is what guarantees that restaurant quality dessert flavor.
Assembling Your Mango Sticky Rice
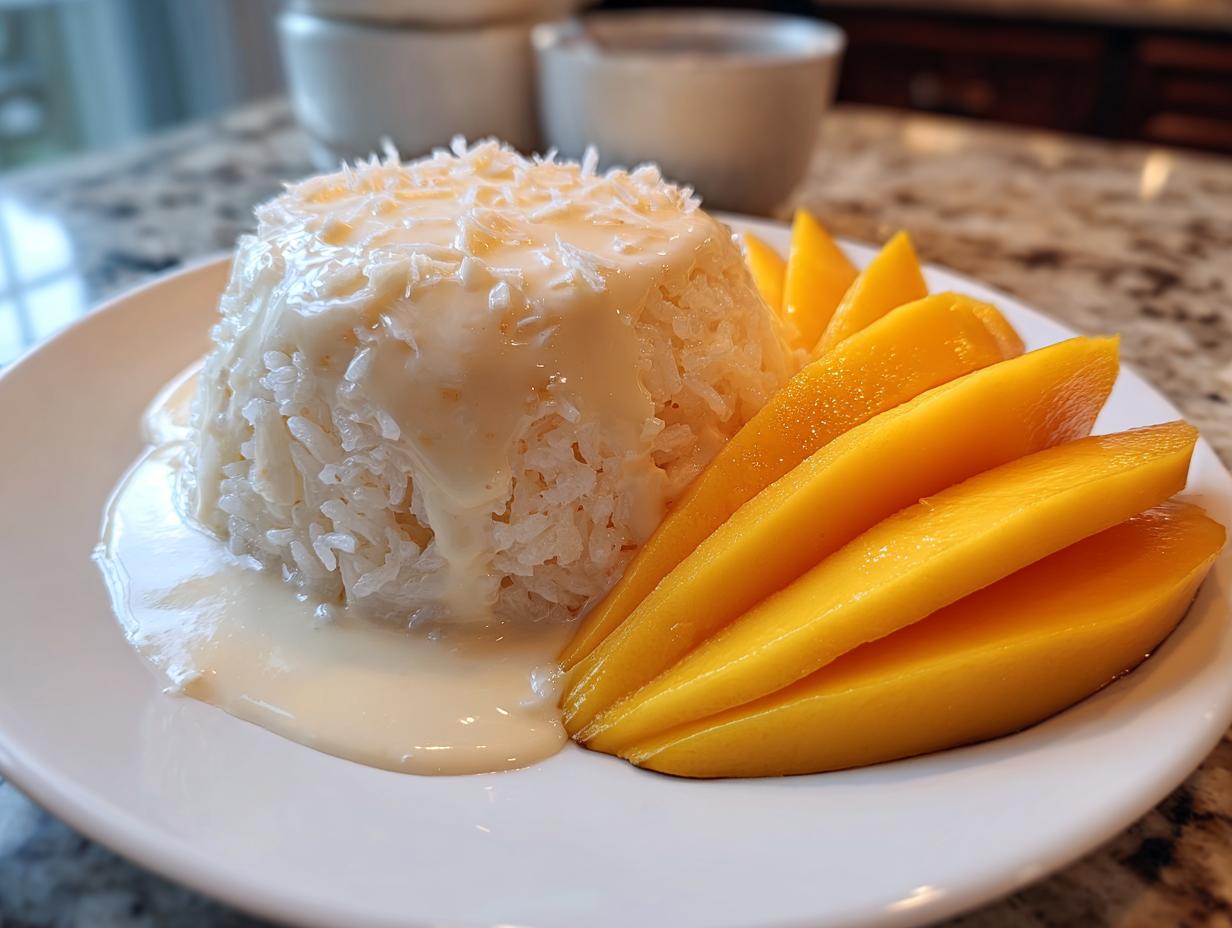
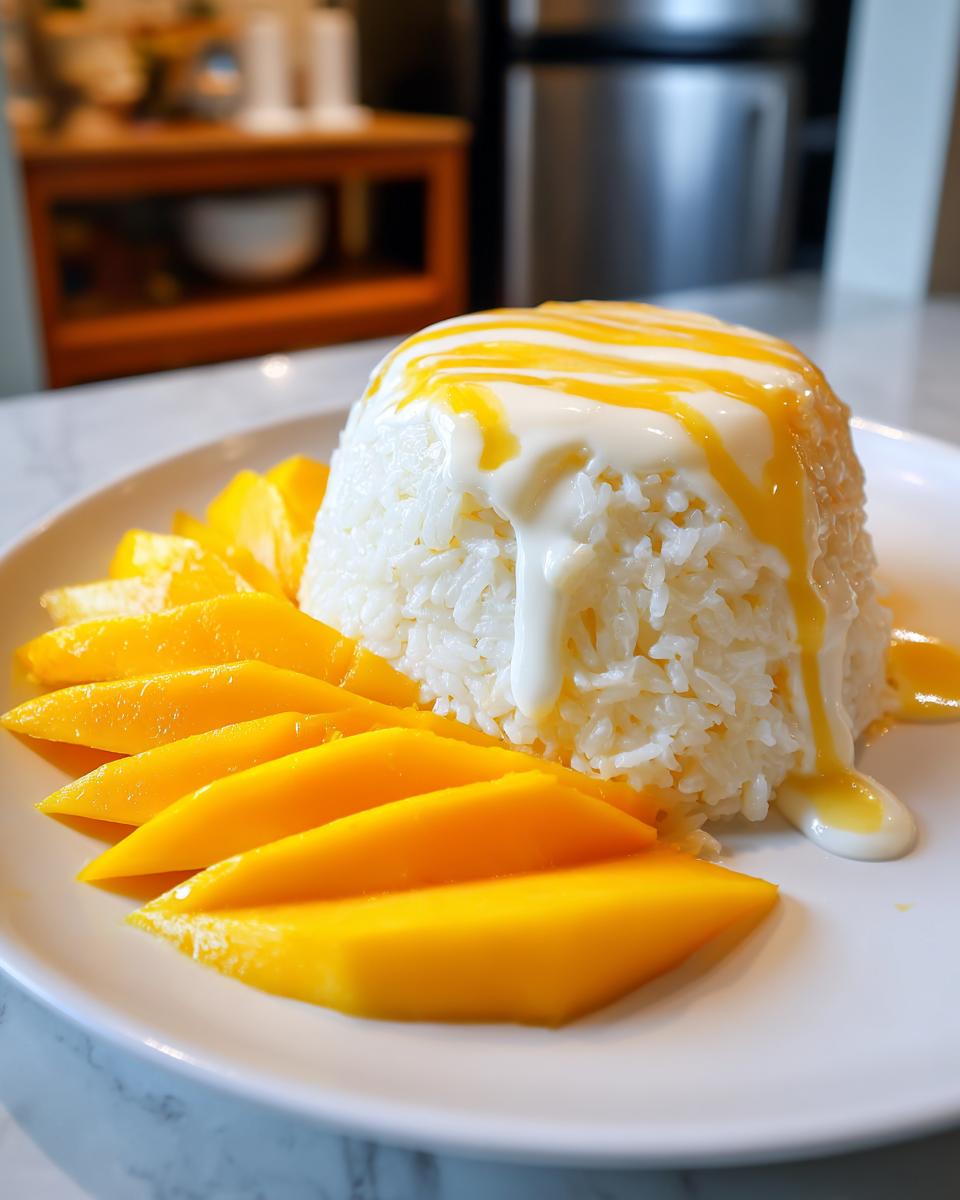
While the rice is absorbing the goodness for its final transformation, take that remaining one-third of the sauce and just stir in that tablespoon of oil. Keep it warm, but not hot. Once the rice has rested that full 20 minutes, it should look plump and glossy. Peel and slice your fresh ripe mangoes—make them look pretty because we eat with our eyes first! Plating is simple: spoon that creamy coconut rice onto your dish, arrange the mango slices right next to it, and finally, drizzle that reserved warm sauce right over the top. Don’t forget the toasted sesame seeds for a little crunch. That’s it—you’ve made authentic Khao Niao Mamuang!
Tips for Success Making Mango Sticky Rice
Listen, even the best recipes can go sideways if you cut corners on a key ingredient. Because we want this tropical sweet treat tasting like it came fresh from a vendor in Thailand, we need to be smart about product selection and technique. I’ve seen people mess up the rice texture even when they soaked it correctly, so I’m giving you the insider chatter on the two biggest potential pitfalls here. If you’re ever looking for dips to serve alongside your dessert, I talk about my favorite easy apple dip recipe, but for Khao Niao Mamuang, focus on the rice!
Selecting the Best Fresh Ripe Mango
This dessert fails if your mangoes are rock hard or stringy. You need to use your nose and your hands! A great, fresh ripe mango should smell sweet and earthy where the stem was, and it should give just a little when you press gently near the widest part—not mushy, just yielding. If you’re struggling to find good mangoes, hold off on making this. It’s worth waiting for the right fruit!

Rice Cooker Shortcut for Easy Asian Dessert
If you are nervous about steaming the rice or you don’t want to deal with a pot, lean into the rice cooker. I usually prefer steaming because I feel I get a little more control, but the rice cooker method is completely foolproof for cooking the sweet sticky rice perfectly every time. Just stick to the 1:1 water ratio we discussed. It’s the ultimate cheat code for a quick tropical recipe without sacrificing the gooey outcome.
Dietary Notes: Is Mango Sticky Rice Vegan and Gluten-Free?
This is one of my favorite things to talk about because nobody should miss out on mango sticky rice, especially if they have dietary restrictions! The beautiful simplicity of this Thai dessert recipe means that, in its classic form, it clears several hurdles right out of the gate. It’s definitely not an *imitation* recipe; it’s the real deal that happens to fit modern needs.
Yes, this recipe is completely vegan. We are using no dairy, no eggs, nothing funny sneaking in there. The fat comes entirely from the heavenly coconut milk, which coats the rice so beautifully. If you’re ever looking for other plant-based treats, check out my recipe for vegan brownies!
It is also naturally 100% gluten free desserts friendly. Since we are using glutinous rice (which, silly name aside, does not contain gluten), and our sauce relies on sugar, salt, and coconut milk, you don’t need to worry about wheat, barley, or rye showing up anywhere. It’s a relief, right? You can confidently serve this incredible homemade mango dessert to almost anyone wanting authentic vegan Thai sweets.
If you want to see how other trusted sources handle the ingredients, I always love checking out what great bakers like the folks at Omnivore’s Kitchen are doing with their Mango Sticky Rice. It reinforces that the traditional path is often the easiest!
Variations on This Thai Dessert Recipe
The core recipe for mango sticky rice is perfect as written, but when you want to really impress guests with dessert, a little personalization goes a long way. Since this base is so balanced, you have room to play with textures on top without messing up that beautiful marriage of creamy coconut rice and sweet mango. You don’t need a complete overhaul to make it feel special.
Adding Sweet and Savory Flavors with Toppings
Everyone loves toasted sesame seeds, but let’s step it up. For a richer texture, try swapping the sesame seeds for toasted mung beans. They are crunchy and nutty, adding a wonderful contrast. Another professional touch? A *tiny* sprinkle of flaky sea salt right over the drizzled coconut sauce—just before serving! It amps up the sweet and savory flavors beautifully, making people stop and wonder how you made such a simple fruit dessert taste so complex.

Storage and Reheating Instructions for Leftover Mango Sticky Rice
Okay, so you actually managed to have leftovers? I’m impressed, because this stuff usually disappears instantly. Listen up, this is critical information for maintaining the integrity of your amazing mango sticky rice. While this is best eaten right away, sometimes life happens.
If you have leftover sweet sticky rice that’s been soaked in sauce, store it in an airtight container in the fridge for up to three days. Just know this: the rice will firm up a lot once it gets cold. It’s going to feel dense, kind of like a block of dough. That’s normal!
Never store the fresh mango slices with the rice. The mango will oxidize, get slimy, and ruin the whole batch. Keep those slices separate in their own container until you’re ready to eat.
Reheating is where we bring it back to life. You need steam, not direct heat! I usually use a tiny bit of water in a saucepan, cover it tight, and warm the rice on very low heat for a few minutes until it loosens up and softens again. You can also microwave it briefly, but place a damp paper towel over the rice before you heat it up; this adds that needed moisture back in. If you’re looking for a great base for breakfast later, check out my tips for homemade granola recipe—but for this rice, steam is your best friend.
For the leftover coconut sauce drizzle? Keep that in a tiny jar in the fridge. When you reheat the rice, gently warm the small amount of sauce you plan to use and pour it over immediately before topping with new, fresh mango slices. That way, you get that warm, luscious flavor all over again!
Frequently Asked Questions About Making Mango Sticky Rice
I get so many questions when people try this for the first time, which is totally normal when you’re first learning the lingo! It’s all about nailing those specifics that separate a good attempt from something that tastes exactly like the best version of this Thai dessert recipe you’ve ever had. Here are the common things people ask me about getting that perfect result.
Can I use regular white rice instead of sweet rice for this mango sticky rice?
Oh, honey, please don’t try it! You simply have to use the sweet rice, also called glutinous rice. Regular long-grain white rice or even Basmati—they all cook up fluffy and separate. They won’t release the starch needed to become that cohesive, smooth blanket for the sauce. Glutinous rice gets sticky and almost chewy in that perfect way. If you use regular rice, you’ll end up with sweet, soupy rice, not that authentic, luxurious creamy coconut rice texture we’re aiming for.
How do I make this a quick tropical recipe if I don’t have time to soak the rice?
I totally get it; sometimes you decide only an hour before dessert time that you need this! If you absolutely cannot soak it overnight, you can speed it up, but the texture will suffer *a tiny bit*. Instead of the overnight soak, put the rinsed rice in a bowl and cover it with very hot (but not boiling) tap water. Let it sit for one full hour. Drain it super well after that hour and then move straight to steaming or your rice cooker. You’ll need to steam it about 5-10 minutes longer than the recipe suggests because it hasn’t had the full hydration time yet. It won’t be *quite* as pudding-like, but it can work in a pinch for a foodie favorite asian recipe.
What is the best way to impress guests with dessert using this recipe?
Presentation is everything when you’re trying to impress guests with dessert! First, always take the time to use really vibrant, beautiful slices of fresh ripe mango—no bruised edges allowed. Next, instead of just plopping the rice in a mound, use a perfectly round cookie cutter or even a lightly oiled ring mold to plate the rice into a neat disc. Then, fan the mango slices elegantly around it. Finally, drizzle the remaining coconut sauce in a confident, neat zigzag pattern, not just dumped over the top. Serving it slightly warm—not hot, not cold—hits that sweet spot every time.
Share Your Homemade Mango Dessert Success
Seriously, I’ve given you all the secrets to taking this authentic mango sticky rice from my kitchen to yours. Now it’s your turn to brag a little! I want to know how your **homemade mango dessert** came out. Did the soak time work perfectly for you? Did those mangoes sing?
Drop a rating below—give this recipe the star review it deserves if you nailed that restaurant-quality flavor! And please, tell me about your experience in the comments. I absolutely love hearing how you manage to whip up this easy Asian dessert for your own family or friends. If you snap a photo while you’re making it, or once you’ve plated it up beautifully, tag me on social media. I love seeing these stunning results. Maybe you even tried a twist on the garnishes I mentioned, like sprinkling it with something fun! I’m always looking for new ways to enjoy this perfect summer fruit recipe idea. If you’re already thinking about what to bake next, maybe check out my tips for making coffee cake muffins, but for now, let’s celebrate this successful batch of Khao Niao Mamuang!
If you want another highly-rated recipe inspiration, you should definitely look at how the folks at Savory Sweet Spoon put together their Thai Mango Sticky Rice. Happy cooking, friends!
PrintAuthentic & Easy Mango Sticky Rice (Khao Niao Mamuang)
You can make this classic Thai dessert at home. This recipe gives you perfectly cooked, soft sticky rice and a creamy coconut milk sauce for restaurant-quality Khao Niao Mamuang.
- Prep Time: 20 min
- Cook Time: 30 min
- Total Time: 50 min
- Yield: 2 servings 1x
- Category: Dessert
- Method: Steaming/Stovetop
- Cuisine: Thai
- Diet: Vegan
Ingredients
- 1 cup sweet (glutinous) rice
- 1 cup water (for cooking rice)
- 1 cup full-fat coconut milk
- 1/4 cup granulated sugar
- 1/2 teaspoon salt
- 1 tablespoon coconut oil or neutral oil
- 2 fresh ripe mangoes
- 1 tablespoon toasted sesame seeds (for garnish)
Instructions
- Rinse the sweet rice under cold water until the water runs clear. Soak the rice in fresh water for at least 2 hours, or preferably overnight. Drain the soaked rice well.
- Cook the sticky rice. If using a rice cooker, combine the drained rice with 1 cup of fresh water and cook using the standard white rice setting. If steaming, place the rice in a steamer basket lined with cheesecloth and steam for 25 to 30 minutes until soft and translucent.
- While the rice cooks, prepare the coconut sauce. In a small saucepan, combine the coconut milk, sugar, and salt. Heat over medium-low heat, stirring until the sugar and salt dissolve completely. Do not boil. Remove from heat.
- Once the rice is cooked, transfer it immediately to a bowl. Pour about 2/3 of the warm coconut sauce over the hot rice. Stir gently to combine, then cover the bowl tightly with plastic wrap or a lid. Let the rice sit for 15 to 20 minutes to absorb the liquid completely.
- For the final sauce drizzle, mix the remaining 1/3 of the coconut sauce with the coconut oil. Heat this mixture briefly until warm.
- Peel and slice the fresh ripe mangoes.
- To serve this tropical sweet treat, spoon the creamy coconut rice onto a plate. Arrange the fresh mango slices next to the rice. Drizzle the reserved warm coconut sauce over the rice and mango. Sprinkle with toasted sesame seeds.
Notes
- For the best texture, use true glutinous rice (also labeled as sweet rice), not regular long-grain white rice.
- If you want a quicker method, you can cook the sticky rice in a rice cooker as directed in step 2.
- This naturally gluten free dessert is also vegan.
Nutrition
- Serving Size: 1 serving
- Calories: 550
- Sugar: 35
- Sodium: 300
- Fat: 25
- Saturated Fat: 20
- Unsaturated Fat: 5
- Trans Fat: 0
- Carbohydrates: 75
- Fiber: 3
- Protein: 7
- Cholesterol: 0