
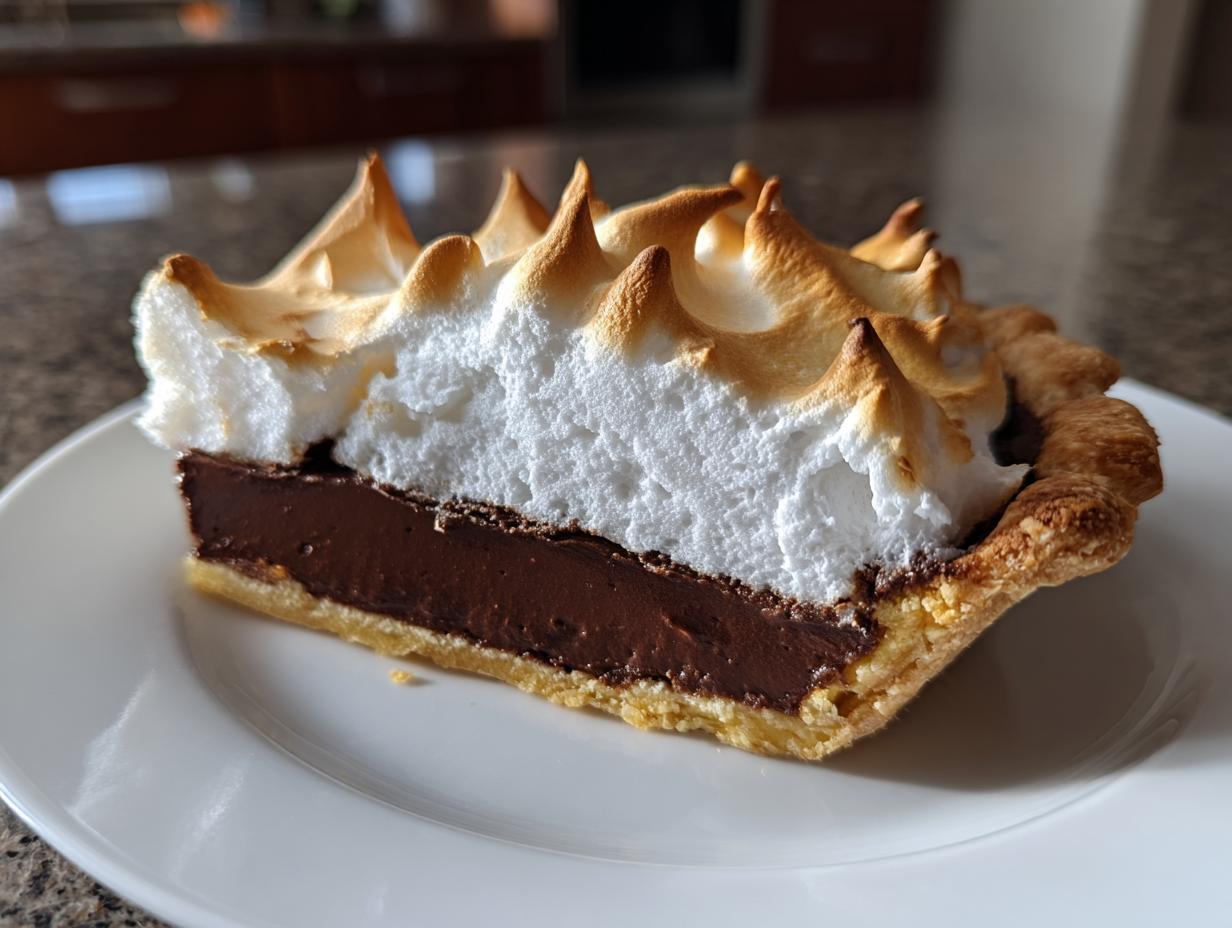
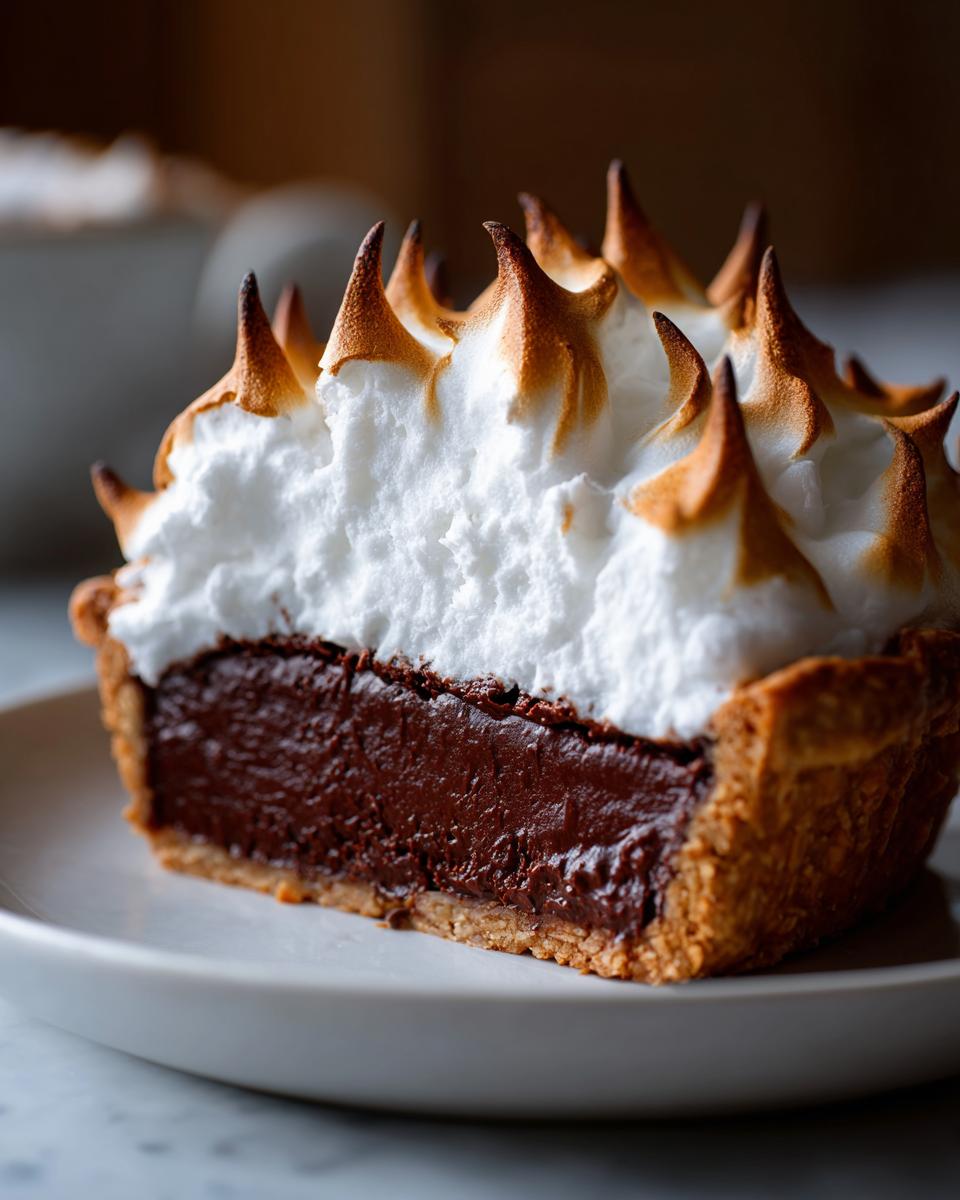
Some desserts just feel like they belong on a pedestal, right? They’re the showstoppers, the ones you reserve for birthdays or when you really, really want to impress someone. For me, that’s the classic chocolate meringue pie. It looks impossible—that towering, fluffy cloud of meringue sitting atop that rich, dark chocolate, sitting snugly in a crisp crust. But here’s the secret language chefs speak: what looks complex is often just a few smart steps executed correctly. Learning how to make perfect, stable toppings, like the ones in my easy homemade marshmallows recipe, is key!
When I learned in restaurant kitchens, I absorbed all those little tricks that stop things from collapsing or weeping. Now, my mission here at Kitchen Slang is translating that pro knowledge so you don’t break a sweat. We’re taking the classic recipe, but we’re applying proven methods so you get that dreamy, decadent filling and, most importantly, a stable, non-weeping, fluffy meringue topping every single time. Trust me, this is the no-fail version you’ve been waiting for.
- Why This No-Fail chocolate meringue pie Recipe Works
- Gathering Ingredients for Your chocolate meringue pie
- The Step-by-Step Guide to Our Classic Chocolate Pie Recipe
- Tips for Success with Your Homemade Meringue Pie
- Making the Creamy Chocolate Meringue Dessert Ahead of Time
- Serving Suggestions for This Decadent Chocolate Dessert
- Storage and Reheating Instructions for chocolate meringue pie
- Frequently Asked Questions About Perfect Meringue Secrets
- Sharing Your Sweet Endings Desserts Success
Why This No-Fail chocolate meringue pie Recipe Works
Look, the reason most people run screaming from this dessert is simple: the chemistry! Either the filling turns into chocolate soup, or that gorgeous meringue slides right off the top like a sad, sugary avalanche. We’re kicking those amateur jitters to the curb. I learned in the line kitchen that every disaster has a fix built right in. My version, which I detailed further in my best chocolate pudding from scratch guide, is all about locking everything into place chemically.
- We treat the starch in the filling exactly right so it sets up like a dream.
- We use stabilizers in the meringue to keep those peaks standing proud, even after baking.
- We seal the deal so you get that decadent dessert without any scary liquid pooling underneath!
Achieving the Best Chocolate Custard Filling Structure
The secret to beating a runny filling is patience with the cornstarch. You have to boil that cornstarch and sugar mixture for a solid minute *after* it thickens! That boils off the starchy taste and really sets the structure. Then, when you temper those egg yolks—slowly adding the hot liquid bit by bit—you’re gently coaxing them into the mix, not shocking them into scrambled bits. That controlled process creates that ultimate Rich Chocolate Custard Pie texture.
Secrets to a Fluffy Meringue Topping That Will Not Weep
Meringue weeping happens when the sugar hasn’t fully dissolved or the egg whites weren’t prepped right. First, use room temperature egg whites—they whip up way bigger! Second, that tiny bit of cream of tartar? That’s our insurance policy; it locks in the protein structure. Finally, when you put the meringue on the filling, you MUST make sure it touches the crust all the way around. That seal stops steam from building up beneath the topping, which is the #1 cause of weeping. You want a perfectly Fluffy Meringue Topping, and that’s exactly what you’ll get.
Gathering Ingredients for Your chocolate meringue pie
Okay, let’s talk tools for a moment. Before you even think about turning on the stove, we need to make sure our lineup is gorgeous. With a Classic Chocolate Pie Recipe like this, the structure and flavor depend entirely on what you bring to the party. You want that crust to be completely cooled—and I mean dead cold—before that hot filling goes in. Don’t even look at me sideways if you try to put hot filling in a warm crust; we’re avoiding sogginess at all costs, just like we do with my buttermilk biscuits!
We’re building this gorgeous dessert in three main parts: the base, the decadent filling, and that cloud of meringue. Make sure your egg whites are sitting on the counter right now warming up; cold whites just won’t whip up right. I’ve laid out exactly what you need below to make sure that Homemade Meringue Pie experience is seamless for you.
For the Rich Chocolate Custard Filling
This is where the deep chocolate flavor comes in, not the sugary stuff. You absolutely need 4 ounces of actual unsweetened chocolate, and make sure it’s nicely chopped up so it melts smoothly without burning. We’re using a healthy amount of sugar, of course, but the real powerhouse here is the cornstarch—that’s our structural engineer for setting up that Velvety Chocolate Pie Filling. Don’t skimp on the whole milk either; it gives the custard just the right body when we cook it down with the egg yolks. And always—always—use real unsalted butter right at the end for that final silkiness.
For the Perfect Meringue Topping
This part is all about finesse. You need 4 large egg whites, and again, they have to be at room temperature. The magic stabilizers are the cream of tartar—just a quarter teaspoon—and the rest of that sugar we’ve reserved. The cream of tartar is how we guarantee those stiff, glossy peaks that look ready for their close-up. I leave the vanilla until the *very* end, or put it in the filling, because sometimes too much liquid or extract on the whites early on can deflate them before they even start working!
The Step-by-Step Guide to Our Classic Chocolate Pie Recipe
Alright, this is where we quit talking and start making! I promise you, reading these steps makes building this Creamy Chocolate Meringue dessert seem way less scary than that intimidating look it gives you. Remember, we’re translating chef moves here—it’s all about control and rhythm. First things first: your crust, whether you used a great no-bake pumpkin cheesecake shell or a fully baked pastry, must be completely cool. I mean stone cold. Hot filling + cool crust = a sad, soggy explosion, and we aren’t having that. Keep it off to the side; it’s waiting its turn.
Preparing the Foundation and Thickening the Base
Grab a medium saucepan. We’re whisking together 1 cup of sugar, the cornstarch, and that little pinch of salt. Now, slowly stream in the 1 1/2 cups of cold water, whisking until it looks totally smooth—no lumps allowed! Put that over medium heat. You watch this bubble—and I mean watch it! Once it thickens up and starts bubbling hard, you have to let it boil for a full minute, stirring constantly. This is your insurance policy for No-Fail Pie Baking. That minute cooks out the starch so your filling doesn’t taste chalky later.
Tempering Eggs for a Velvety Chocolate Pie Filling
While the base is simmering, whisk your three egg yolks with the whole milk in a separate bowl. Now for the important part: tempering! This stops you from ending up with sweet chocolate scrambled eggs. Pull about a cup of that hot cornstarch mixture and stream it *very* slowly into your egg/milk bowl while you whisk like crazy. Once that’s blended, pour that warm-ish yolk bowl right back into the saucepan with the rest of the thick mixture. Return it to the heat, and cook it down again until it bubbles again for a full minute. Kill the heat, stir in your chopped chocolate, the butter, and that vanilla. Stir until it’s unbelievably glossy. Pour this hot, Velvety Chocolate Pie Filling right into that waiting, cool crust.
Whipping the Showstopper Meringue
Time for the cloud! Make sure your mixing bowl is spotless—no grease, seriously. Whisk those room temperature egg whites until they look foamy, like seafoam. Now, slowly ease in that remaining half-cup of sugar, waiting about 30 seconds between each spoonful. When you add the very last bit of sugar, throw in your cream of tartar. Crank that mixer up, and beat until you have stiff, sharp peaks. If you lift the mixer, the peaks should hold their shape stiffly—that’s how you know it’s ready to be the star of your classic chocolate pie recipe.
Assembling and Baking the Ultimate chocolate meringue pie
Spread that glorious, fluffy meringue right over the hot filling immediately. And this is non-negotiable: make sure that meringue reaches the very edge of the crust all the way around. Press it gently so it seals against the pastry lip—that’s the barrier that keeps the weep juice in check. Use the back of a spoon to make dramatic swirls; this is your canvas for a true Showstopper Dessert! Bake it at 350°F for about 12 to 15 minutes, just until those peaks get that lovely, light golden-brown kiss. Then, let it cool slowly on a rack, completely ignoring it for at least four hours before anyone dares slice into it.
Tips for Success with Your Homemade Meringue Pie
Okay, we’ve done the heavy lifting—the cooking, the tempering, the whipping—but the final success of this chocolate meringue pie actually comes down to what you do *after* it comes out of the oven. This is where I apply the lessons learned from watching bakers chase down sad, weeping pies day after day. These aren’t just random rules; they are the translation of professional experience meant to keep your dessert looking stunning.
If you remember nothing else from this whole guide, remember the cooling process. Rapid cooling is the literal enemy of meringue stability! When the hot pie goes straight into the cold fridge, the sudden temperature shock pushes excess moisture out of the sugar/egg mixture, causing beads of syrup to form on top. That’s the weep! So, you need to let it sit on the counter, completely untouched, for a minimum of four hours until it’s fully cooled before you even think about covering it or chilling it. This slow transition is crucial for that perfect finish.
Another thing that saves your custard? Making sure you hit that boil time hard on the cornstarch mixture. I know it feels weird to boil a pudding for a minute, but that’s what cooks the starch professionally, thickening it properly for the Best Chocolate Custard Filling. If you’re worried about it sliding off later, check out this easy dumpling sauce tip—it’s about controlled layers, just like keeping your meringue sealed tight to the crust to prevent trapped steam.
And here’s another pro tip from the back of the line: If you want that extra guarantee that your meringue stays put, brush a thin layer of that hot chocolate filling over the whole top surface of the meringue on the baked pie, right before you pop it into the oven. It’s messy, but it seals everything up wonderfully, giving you truly superior results every time you make this Old Fashioned Chocolate Pie. You can read more about preserving your creations over at Freddy’s Recipes, too!
Making the Creamy Chocolate Meringue Dessert Ahead of Time
I get asked this all the time, especially when folks are planning big holiday spreads: “Zoe, can I cheat and prep this chocolate meringue pie early?” That’s fair game! We’re aiming for gorgeous desserts without spending the whole party tethered to the stove. The great news is that you can absolutely do most of the heavy lifting ahead of time, but you have to treat that filling and meringue like two separate, sensitive entities.
The Rich Chocolate Custard Pie filling is your best friend for prepping early. You can cook that custard completely—chocolate, butter, the works—and pour it into your perfectly blind-baked crust. Seal that hot filling with plastic wrap, pressing the wrap right onto the surface so you don’t get a skin. Then, stick it in the fridge. It’s solid as a rock the next day. I love having my overnight oats ready the night before, and this pie fits that make-ahead vibe perfectly!
Now, here’s the big rule for the Fluffy Meringue Topping: Do not make the meringue until you are ready to bake it. Meringue is just waiting for its chance to deflate or start sweating. Once those egg whites are whipped to stiff, glossy peaks, they need to go directly onto the hot filling and into the oven for browning immediately. Trying to store pre-whipped meringue is asking for trouble, trust me.
So, your timeline should look like this: Day One, make and cool the crust, then cook and chill the chocolate filling inside it. Day Two (or a few hours before serving), pull that chilled pie out, whip up your meringue, top it, bake it, and let it cool slowly on the counter. That way, you get that Creamy Chocolate Meringue texture looking pristine when it hits the table, and you didn’t spend your whole day stressing!
Serving Suggestions for This Decadent Chocolate Dessert
You’ve made it! You tackled the cooking, you tempered the eggs, and you held your breath while that meringue browned. Now comes the fun part: presenting this absolute showstopper! This Decadent Chocolate Dessert is so rich and satisfying, you don’t need much to go alongside it, but a little something can perfectly balance that intense chocolate and sweet meringue.
When I was staging those pies back in the day, we always focused on temperature and texture contrast. You have dense, rich, creamy, and light/airy (the meringue). So, what pairs well? Something cool, slightly tart, or maybe just a simple textural element.
Here are my favorite ways to dress up a slice of this pie:
- A dollop of unsweetened whipped cream: Don’t use the sugary stuff—the meringue already brings the sweetness. Unsweetened cream cuts through the richness beautifully and adds a cool, ethereal lightness to contrast the heavy chocolate custard. It’s a classic for a reason.
- A light dusting of high-quality cocoa powder: If you want to skip the cream, just sift a tiny bit of unsweetened cocoa powder over the top right before serving. It deepens the chocolate color and adds a sophisticated, slightly bitter note.
- Fresh raspberries or sliced strawberries: The tartness of fresh berries is incredible against thick chocolate. They look gorgeous nestled next to the slice, and the burst of fresh fruit flavor wakes up your palate.
- A little something hot: Since the pie needs to cool completely, sometimes a warm accompaniment is nice. Try a tiny side swirl of homemade warmth, like a drizzle of my whipped hot chocolate sauce—just a little river of dark chocolate syrup on the plate, not over the meringue!
Honestly, a true slice of this pie stands alone wonderfully, but these simple additions turn it into a truly complete dessert experience! Just be ready for everyone to ask for your recipe after they take that first bite.
Storage and Reheating Instructions for chocolate meringue pie
Okay, you did the hard part, and now you have this perfect, tall, beautiful chocolate meringue pie sitting on the counter. Congrats! But we can’t just toss it in the fridge right away, or all that hard work on the meringue goes out the window. Remember that weeping we fought so hard to avoid? Rapid cooling is how it comes back to haunt you! This is where a little chef knowledge keeps your Showstopper Dessert looking pristine for days.
The rule here is patience. The pie absolutely must cool completely at room temperature first—at least four hours, maybe more if your kitchen is warm. This allows the cornstarch in the custard to fully lock down and keeps the sugar in the meringue stable as it sets. Don’t cover it while it’s cooling, not even loosely. You want that air circulating so moisture can escape naturally.
Once it is completely cool (you can gently nudge the meringue now without it wobbling too much), then, *and only then*, can it venture into the fridge. Cover it loosely with something that won’t press down on the meringue—a giant cake dome or just letting it sit uncovered on a high shelf works wonders. If you’re storing it, think about how you store refrigerator pickles; it needs cool, consistent environment after that initial setting period.
As for reheating? Don’t even think about it! Meringue is an egg-white foam held together by sugar, and heat just melts that structure down into a sticky, sad mess. If your pie is stored correctly in the fridge, it slices beautifully cold or after sitting on the counter for about 30 minutes to take the deep chill off. We aim for creamy, not soupy! This beautiful Homemade Meringue Pie is best served cool, not warm, if you want that towering meringue to behave.
Frequently Asked Questions About Perfect Meringue Secrets
I totally get it—when you’re reading through a recipe, those little “what if” questions pop up. Usually, they boil down to avoiding disaster, right? Since we spent so much time dissecting the structure of this chocolate meringue pie, let’s clear up the last few tricky bits so you feel 100% confident walking into your kitchen. It’s all about knowing the ‘why’ behind the technique, just like learning the lingo in my easy chili recipe!
What causes meringue on a chocolate meringue pie to weep?
This is the biggest heartbreak in baking, bar none! Meringue weeps for two main reasons, and we’ve built our entire recipe to fight both of them. Reason one is that the filling underneath wasn’t cooked enough—if that cornstarch isn’t fully activated by boiling, it releases moisture while the pie sits, and that moisture has nowhere to go but up and out, causing those sad little sugar beads. Reason two is rapid cooling, which we covered, but basically, shocking the pie makes the egg foam squeeze out water. If you boil that custard properly and cool the pie slowly at room temperature, you are pretty much guaranteed a dry meringue top!
Can I use instant pudding instead of making the Best Chocolate Custard Filling from scratch?
Look, I know convenience is tempting, but if you want that truly deep, luxurious flavor that makes people ask if you bought this at a fancy bakery, you need the scratch filling. Instant pudding is basically a shortcut for texture, but it often lacks the depth you get from melting real unsweetened chocolate and using egg yolks. This recipe is all about building flavor layers, which is the whole point of doing a From Scratch Pie. Stick with the tempering—it’s worth the five extra minutes for that unbeatable Best Chocolate Custard Filling flavor!
Do I need to use a blind-baked crust for this chocolate meringue pie?
Yes, absolutely, 100% yes! This is crucial for any pie that involves pouring a hot, wet filling into a crust that isn’t going to be baked again for very long. If you don’t blind-bake that pastry crust until it’s golden brown and let it cool down, the moisture from the hot chocolate custard will turn your pretty pastry into gummy wallpaper by the time the pie sets. We want crisp, buttery layers; we don’t want a soggy bottom! Make sure that shell is cooled completely before that hot custard touches it.
Sharing Your Sweet Endings Desserts Success
So, there you have it! We’ve navigated the chemistry of the cornstarch, we’ve tempered the yolks like pros, and we’ve taught that meringue how to stay put. Making a showstopper like this chocolate meringue pie feels like mastering a culinary magic trick, doesn’t it? But honestly, the real magic happens when you stop reading my instructions and start trusting your own hands. That’s what Kitchen Slang is all about—giving you the translation so you can cook with your instinct.
I truly hope you give this recipe a whirl. Whether you are whipping this up for a weekend treat or planning your next big holiday spread, I want to see it! Head over to my delicious dessert recipes page for more inspiration once you’re done baking. If you nail that towering meringue, snap a picture and tag me. Knowing that this knowledge helped you pull off a perfect slice of this Decadent Chocolate Dessert is what gets me excited to keep translating. Let me know in the comments how it went down for you!
PrintThe Ultimate No-Fail Chocolate Meringue Pie
This recipe translates the secrets of professional baking into a straightforward guide for making a classic chocolate meringue pie with a rich custard filling and a stable, fluffy meringue topping. You will learn how to avoid common issues like weeping meringue and runny filling.
- Prep Time: 25 min
- Cook Time: 40 min
- Total Time: 4 hours 5 minutes
- Yield: 8 servings 1x
- Category: Dessert
- Method: Baking
- Cuisine: American
- Diet: Vegetarian
Ingredients
- 1 (9-inch) unbaked, fully baked, or graham cracker pie crust
- 1 1/2 cups granulated sugar, divided
- 1/3 cup cornstarch
- 1/4 teaspoon salt
- 1 1/2 cups cold water
- 3 large egg yolks, lightly beaten
- 1 1/2 cups whole milk
- 4 ounces unsweetened chocolate, chopped
- 2 tablespoons unsalted butter
- 1 teaspoon vanilla extract
- 4 large egg whites, at room temperature
- 1/4 teaspoon cream of tartar
Instructions
- Prepare your pie crust according to your preferred method. If using a standard pastry crust, blind bake it until golden brown and let it cool completely.
- In a medium saucepan, whisk together 1 cup of the sugar, cornstarch, and salt. Gradually whisk in the cold water until smooth.
- Place the saucepan over medium heat. Cook, stirring constantly, until the mixture thickens significantly and boils. Let it boil for 1 minute, stirring. Remove from heat.
- In a separate bowl, whisk the egg yolks and milk together. Slowly pour about 1 cup of the hot cornstarch mixture into the yolk mixture while whisking constantly to temper the eggs.
- Pour the tempered egg mixture back into the saucepan with the remaining hot mixture. Return to medium heat. Cook, stirring constantly, until the filling thickens again and comes to a gentle boil. Boil for 1 minute. Remove from heat.
- Stir in the chopped chocolate, butter, and vanilla extract until smooth. Pour the hot chocolate filling immediately into the cooled, pre-baked pie crust.
- To make the meringue, place the egg whites in a clean, grease-free bowl of a stand mixer fitted with the whisk attachment. Beat on medium speed until soft peaks form.
- Gradually add the remaining 1/2 cup of sugar, 1 tablespoon at a time, while beating. Add the cream of tartar with the last addition of sugar. Increase speed to high and beat until stiff, glossy peaks form. The meringue should hold its shape when the whisk is lifted.
- Spread the meringue over the hot chocolate filling, making sure the meringue touches the inner edge of the crust all the way around. This seals the filling and prevents weeping. Create decorative swirls with the back of a spoon.
- Bake the pie in a preheated 350°F oven for 12 to 15 minutes, or until the meringue is lightly golden brown.
- Cool the pie completely on a wire rack at room temperature for at least 4 hours before slicing. Do not refrigerate immediately, as rapid cooling can cause the meringue to weep.
Notes
- To prevent weeping, make sure the meringue touches the crust edge completely to seal the filling. Also, cool the pie slowly at room temperature before chilling.
- For a stable filling, ensure you boil the cornstarch mixture for the full minute after it thickens. This cooks out the starch flavor and sets the structure.
- Use room temperature egg whites for the best volume when making the meringue.
Nutrition
- Serving Size: 1 slice
- Calories: 410
- Sugar: 45g
- Sodium: 210mg
- Fat: 20g
- Saturated Fat: 10g
- Unsaturated Fat: 10g
- Trans Fat: 0g
- Carbohydrates: 55g
- Fiber: 2g
- Protein: 7g
- Cholesterol: 110mg