

Sometimes you just need that ‘Wow!’ factor without spending an hour wrestling with an oven; that’s where I live in the kitchen. If you want an impressive treat that truly screams ‘quick result,’ you absolutely must make these avalanche cookies. Now, these aren’t just any cereal clusters; they’re the ultimate in no-bake magic, and honestly, they might be my favorite way to cheat the system. Here at Kitchen Slang, my whole goal is translating that professional efficiency—the speed and polish you see on a restaurant line—right onto your countertop. These cookies prove you don’t need complicated techniques to pull off something crowd-pleasing. Believe me, these are coming together before your timer even thinks about buzzing.
If you need something that sets fast and travels well for a potluck or holiday tray, check out my guide for no-bake pumpkin cheesecake too—it’s another great shortcut!
- Why These are the Best No Bake Avalanche Cookies
- Gathering Ingredients for Your Avalanche Cookies
- Step-by-Step Instructions for Perfect Avalanche Cookies
- Tips for Success with Avalanche Cookies
- Making Avalanche Cookies for Holidays and Gifting
- Storage and Keeping Your Peanut Butter Treats Fresh
- Frequently Asked Questions About Avalanche Cookies
- Estimated Nutritional Snapshot for Avalanche Cookies
- Share Your Kitchen Slang Successes
Why These are the Best No Bake Avalanche Cookies
I stand by this statement: these cookies are champions in the category of easy dessert recipes. Why are they the best? Because they deliver maximum payoff for minimal kitchen fuss. Forget the heat of the oven; this is pure, glorious assembly.

- They set up incredibly fast, making them perfect for last-minute needs.
- They hit that amazing spot between fudgy no bake sweets and a crunchy cluster.
- They’re fantastic for gifting or filling up large holiday cookie plates.
If you are looking for more quick fixes, dive into my general guide on no bake cookies after you finish this batch!
Zero Oven Time: The Ultimate No Oven Recipes Perk
Seriously, turn the oven off. This recipe is all about controlled melting and mixing. If it’s a scorcher outside, or if you’re just starting out in the kitchen, these are your new best friends. It’s the definition of no oven recipes—no preheating, no timing anxiety, just smooth sailing.
Perfect Texture: Crunchy, Chewy, and Sweet
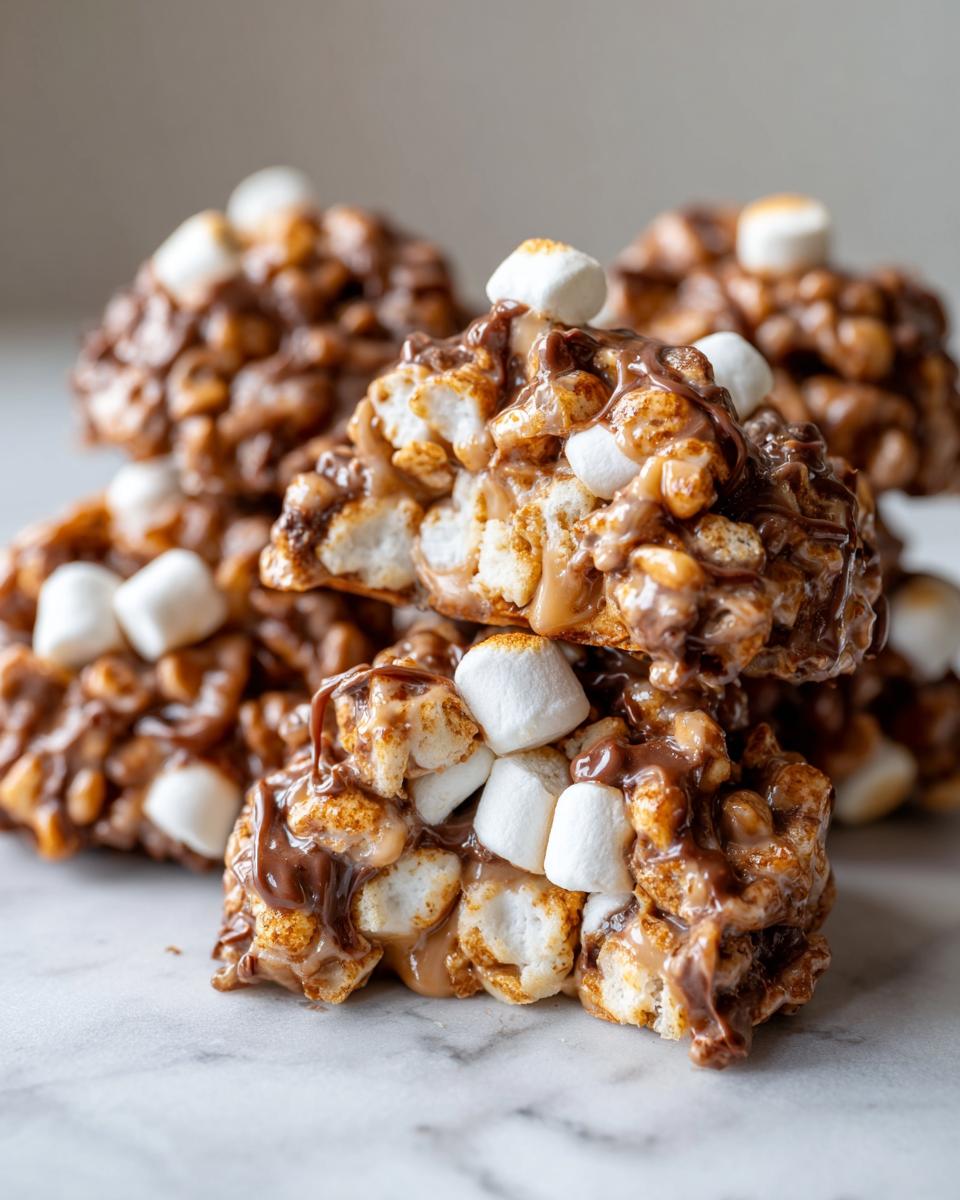
When you bite into one of these, you get everything good. You have that satisfying snap from the crispy rice cereal—that’s the ‘avalanche’ crunch!—but it’s immediately cushioned by the gooey marshmallow and that rich, smooth white chocolate coating. That contrast is exactly what keeps everyone coming back for a second one.
Gathering Ingredients for Your Avalanche Cookies
Okay, time to get our supplies gathered. For stellar avalanche cookies, precision matters, even in a no-bake dump-and-stir situation. Remember what I always say: your base needs to be smooth so the crunch doesn’t get lost. You’ll need creamy peanut butter, both types of chocolate chips, cereal, marshmallows, and maybe some peanuts if you’re feeling extra nutty. Don’t worry about a complicated pantry run; these are simple, reliable players.
If you want to see how these ingredients stack up in a different format, check out my guide for easy peanut butter cookies!
Ingredient Notes and Smart Substitutions
Listen up, because this is where we translate the recipe for your specific kitchen. The main goal is getting that gooey, perfect coating.
- You *must* use creamy peanut butter here; crunchy will throw off the balance completely and leave gaps where the chocolate should hug everything.
- If you have a lot of these to make, or if you’re nervous about microwaving chocolate (which can scorch fast!), you can melt the base mixture in a slow cooker set to low. Just stir it every few minutes until it’s perfectly silky.
- If you’re fresh out of crispy rice cereal, don’t panic! You can grab crushed pretzels or plain rolled oats instead for a totally different texture swing. These make fantastic easy candy clusters that way.
Step-by-Step Instructions for Perfect Avalanche Cookies
Alright, we’re past the theory and straight into the action—this is where the real magic happens for these avalanche cookies. Because we aren’t baking, timing is everything when it comes to melting the base so it coats perfectly but doesn’t seize up. Line up that baking sheet first; that’s Rule Number One for efficiency!
Melting the Chocolate Base (The Fudgy Foundation)
Grab a big, microwave-safe bowl. You’re combining the peanut butter and the chunks of white chocolate (or almond bark). Pop this in the microwave, but don’t just walk away! Do 30 seconds, stir until the butter starts giving, then another 30 seconds. You need to stir vigorously between those intervals. We are aiming for totally smooth, not sad, scorched clumps. Total time should be right around 90 seconds, maybe a minute and a half max. Once it’s glossy, stir in those semi-sweet chips until they just melt right into the warmth. That foundation needs to be flawless.
Folding in the Crunch and Marshmallows
This is the crucial point where you switch from “melting mode” to “gentle assembly.” Toss in your cereal, your mini marshmallows, and any nuts you decided to use. Now, ditch the whisk or the spatula if you’re whipping it around. We are folding here. Use a rubber spatula and cut down the middle, scoop up the bottom, and fold it over. If you get aggressive, you crush the cereal, and suddenly your perfect cookie turns into a dense, sticky paste. We want distinct crunch spots! Just coat everything evenly, stop mixing the second you lose sight of any dry bits.
Setting and Cooling Your Quick Snack Ideas
Once everything is coated, you move fast. Grab a rounded tablespoon—really, just use two spoons—and drop little mounds onto your lined sheet. That’s it. You can let them sit on the counter for about 30 minutes, and they’ll firm up nicely. If you’re impatient like me, throw the whole sheet into the fridge for about 15 minutes. They firm up super quick! These are such fantastic rice krispie treats variations, and they’re ready to go faster than almost any other treat.

Tips for Success with Avalanche Cookies
Even though these are no-bake, the chef in me has a few lines of advice to stop you from running into trouble with your avalanche cookies. The main thing I see people mess up is the temperature of their mix-ins. If your marshmallows are ice-cold straight from storage, they won’t want to integrate into that warm chocolate coating. Pull them out while you’re melting the base so they get a little soft!
Also, remember that white chocolate can be finicky—it seizes up faster than the semi-sweet stuff. That’s why we stir constantly during the microwave step; we want it liquid and glossy inside that peanut butter. For longevity, these babies last great at room temperature, but if your kitchen is super warm, a quick flip in the fridge helps them stay perfectly firm. If you love making easy clusters, you’ll appreciate how stable these are. Check out my guide on easy candy clusters for more simple setups like this!
Making Avalanche Cookies for Holidays and Gifting
This is honestly where these avalanche cookies really shine, especially as we approach gifting season. Because they don’t rely on delicate baking, they are incredibly sturdy. That means they survive the journey to the office party or the trip over to your neighbor’s house without turning into a sad, sticky puddle. That stability is a huge perk when you’re making trays! They’re one of those perfect quick holiday cookies that look fancy but take zero oven sweat.
When you’re packaging them up, keep it simple. Since they are naturally individual mounds, they look great just piled loosely into clear cellophane bags tied with a festive ribbon. You don’t even need liners. For something a bit more polished that keeps them safe, a simple tin works perfectly. Since they are so rich and sweet, small portions look gorgeous. They don’t need any extra drizzle or fancy toppings, which saves you even more time!

If you’re looking for another set of no-bake treats that dress up beautifully for the holidays, you definitely need to look at my guide on chocolate rum balls. They use a similar set-and-go method!
Storage and Keeping Your Peanut Butter Treats Fresh
So, you’ve made a massive batch of these glorious avalanche cookies—which, let’s be honest, is the only way to make them—now we need to talk longevity. Since these are basically a firm, chocolate-coated cluster, they are fairly stable, but we don’t want them getting sticky or losing that wonderful inner crunch. That means storage is key!
For day-to-day snacking, I keep mine right on the counter in a truly airtight container. Just make sure the container has a good snap to it. At room temperature, they easily last for about a week. They hold their shape beautifully, which is why they are such great peanut butter treats for packing in lunches or leaving out for guests.
Now, here’s the temperature check: If your kitchen gets warm, or if you live in a high-humidity area, you might want to use the fridge. Putting them on a cool shelf will keep the chocolate coating super snappy and prevent any slight softening of the peanut butter layer. If you chill them, though, remember to pull them onto the counter about 15 minutes before serving. That slightly softer texture makes the whole eating experience better!
If you’re looking for more simple ways to keep your homemade snacks ready to go, you should check out my post on storing peanut butter energy bites. That advice applies here, too!
Frequently Asked Questions About Avalanche Cookies
Even though these are simple, I totally get that you might have a few curveballs come up in your kitchen. That’s okay! Learning the *why* behind the step is what turns you into a cook, not just a recipe-follower. Here are the few questions I get asked most often when people try these no bake cookies for the first time.
Can I use crunchy peanut butter in these avalanche cookies?
You absolutely *can*, but I’m going to give you the real talk here. If you use crunchy peanut butter, you’re going to increase the crunch factor significantly. That’s not a bad thing if you love texture! However, the crunchy bits mean the peanut butter has a harder time fully coating every single stray marshmallow or piece of cereal. You might end up with a slightly less uniform, less fudgy coating overall. Creamy just gives you that smoother, melt-in-your-mouth experience that really contrasts better with the crisp cereal.
What is the best way to melt almond bark for these no bake cookies?
For speed and ease, the microwave is my go-to method, like I detailed above. You just need to be patient, stopping every 30 seconds to stir. But if you’ve ever had chocolate seize up on you and you’re nervous about nuking your white chocolate or almond bark, there’s a classic chef trick: the double boiler. You just set a heat-safe bowl on top of a saucepan that has an inch or two of simmering water—make sure the bottom of the bowl doesn’t actually touch the water! The gentle, indirect steam melts the chocolate beautifully smooth. It takes longer, but it’s fail-proof. It’s a great technique to know for all your easy dessert recipes!
If you’re after more straightforward tips for cooking success, check out my main page on easy dessert recipes for more shortcuts just like this!
Estimated Nutritional Snapshot for Avalanche Cookies
So, you’ve made these amazing, quick-to-assemble clusters, and now you’re curious about what’s in them. Since these avalanche cookies are packed with peanut butter, chocolate, and cereal, they are certainly a treat, not a health food! But it’s good to know the breakdown when you are filling up those holiday plates.
Here is a general estimate based on the standard recipe measurements. Remember, this is straight kitchen math, not a lab analysis! If you swapped out white chocolate for semi-sweet, or used honey instead of a pure sugar coating, your numbers are going to jump around a little. Always treat these as guides, not gospel.
Based on a serving size of one cookie, here’s what you’re looking at:
- Calories: Around 220 per cookie
- Fat: About 13 grams (Keep in mind this includes that good peanut butter fat!)
- Carbohydrates: Roughly 24 grams
- Protein: You get a nice little boost here, about 4 grams
- Sugar: This one runs high, usually around 18 grams, which isn’t surprising given the marshmallow and chocolate content.
Share Your Kitchen Slang Successes
Alright, now that you’ve mastered the lingo and successfully kept your kitchen clean while melting chocolate—that’s a win right there—I want to hear about it! You just made some show-stopping avalanche cookies without even touching your oven. That deserves a shout-out in my book.
Did you top them with extra nuts? Did you try substituting the cereal we talked about? Don’t be shy! Drop a star rating down below—I want to know you hit that perfect 5-star experience. And if you snap a picture while you’re breaking them apart, tag us on social media. Seeing your creations is seriously the best part of translating these recipes for you.
If you have any lingering questions after making this batch—maybe about wrapping them up for a neighbor or an idea for a new mix-in—hit the contact page, and let’s keep the conversation going. I love hearing how you’re confidently owning your kitchen now!
If you need another super-fast, no-fuss recipe for your next gathering, check out my post on making chocolate rum balls. See you in the comments!
PrintEasy No-Bake Avalanche Cookies

Make these quick, no-bake avalanche cookies using peanut butter, crispy rice cereal, marshmallows, and white chocolate. They set fast and are perfect for gifting or potlucks.
- Prep Time: 15 min
- Cook Time: 0 min
- Total Time: 45 min
- Yield: About 24 cookies 1x
- Category: Dessert
- Method: No-Bake
- Cuisine: American
- Diet: Vegetarian
Ingredients
- 1 cup creamy peanut butter
- 1 cup semi-sweet chocolate chips
- 1 cup white chocolate chips or almond bark, broken into pieces
- 6 cups crispy rice cereal
- 3 cups miniature marshmallows
- 1 cup chopped peanuts (optional)
Instructions
- Line a baking sheet with parchment paper.
- In a large microwave-safe bowl, combine the peanut butter and white chocolate chips (or almond bark). Microwave in 30-second intervals, stirring well after each, until completely smooth and melted. This takes about 1 to 1.5 minutes total.
- Stir in the semi-sweet chocolate chips until they are melted into the mixture.
- Add the crispy rice cereal, miniature marshmallows, and optional chopped peanuts to the melted mixture. Fold gently until all dry ingredients are evenly coated. Do not overmix, or the cereal will break down.
- Drop rounded tablespoons of the mixture onto the prepared baking sheet, forming cookie mounds.
- Let the cookies set at room temperature for about 30 minutes, or place them in the refrigerator for 15 minutes to speed up the process.
- Store the finished cookies in an airtight container.
Notes
- For a smoother melt, you can melt the chocolate and peanut butter mixture in a slow cooker on low heat, stirring occasionally.
- If you do not have crispy rice cereal, you can substitute with an equal amount of crushed pretzels or oats for a different texture.
- This recipe makes a great base for other mix-ins like mini peanut butter cups or M&Ms.
Nutrition
- Serving Size: 1 cookie
- Calories: 220
- Sugar: 18
- Sodium: 110
- Fat: 13
- Saturated Fat: 6
- Unsaturated Fat: 7
- Trans Fat: 0
- Carbohydrates: 24
- Fiber: 1
- Protein: 4
- Cholesterol: 10