

Look, I get it. You want that beautiful, tangy flavor only natural leaven can give you, but you’re staring at loaves that are dense, tight-crumbed, and basically impossible to slice without tearing them to shreds. If you’ve been dreaming about the ultimate sourdough sandwich bread that actually works for PB&J and toast, you’ve come to the right place. Here at Kitchen Slang, we translate the chef secrets so they work right on your home counter. This isn’t just sourdough; this is The Best Effortless Soft & Fluffy Sourdough Sandwich Bread for Beginners. I take the tough parts the pros do and show you the shortcut so you can have a soft loaf without all the fuss.
- Why This is the Best Sourdough Sandwich Bread for Beginners
- Gathering Your Ingredients for Sourdough Sandwich Bread
- Step-by-Step Guide to Making the Perfect Sourdough Sandwich Loaf
- Tips for a No Fuss Sourdough Bread Experience
- Storage and Keeping Your Sourdough Sandwich Loaf Fresh
- Frequently Asked Questions About Naturally Leavened Sandwich Bread
- Estimated Nutritional Snapshot
- Share Your Soft Sourdough Sandwich Loaf Creations
Why This is the Best Sourdough Sandwich Bread for Beginners
If you’ve ever been scared off by sourdough because it looked too much like an artisanal brick, forget all that. This recipe is different. We cut the intimidation factor way down while specifically tuning the dough for softness. It’s truly the soft sourdough bread recipe you’ve been waiting for. If you’re new to this whole wild sourdough journey, check out my guide on easy yeast bread for a no-fuss warm-up.
- It’s incredibly beginner-friendly—we rely on time, not complicated shaping moves.
- The texture is consistently light and fluffy, perfect for school lunches.
- It bakes up beautifully into that classic sliceable sourdough bread square shape.
This is the easy sourdough recipe for beginners that finally delivers that versatile, family-friendly loaf. Toss those heavy boules out the window for now; we are making sandwich perfection.
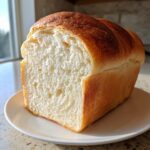
Achieving That Fluffy Sourdough Loaf Texture
Most classic sourdough loaves focus on big, open holes, which makes them hard to use for sandwiches, right? Not here. We introduce avocado oil and honey into the mix, which sounds weird for sourdough, but trust me, it’s the trick! The fat and sugar keep the crumb incredibly tender and prevent that heavy, dense chew you find in many rustic loaves. It keeps the entire thing wonderfully soft long after it’s cooled.

Gathering Your Ingredients for Sourdough Sandwich Bread
Okay, let’s get down to brass tacks. To make this sourdough sandwich bread work its magic, you need real, honest ingredients. No fancy equipment is necessary here, just focus on what you’re mixing. I’ve laid out the exact list for one perfect 9×5 inch loaf below. Use accurate measuring tools, because in bread, a few grams can change everything!
- 150g active sourdough starter
- 325g warm filtered water
- 20g avocado oil
- 25g honey
- 500g unbleached bread flour
- 10g salt
Ingredient Notes and Substitutions for Your Sourdough Sandwich Bread
Before you start dumping things in a bowl, let’s talk about quality control. Your starter is the backbone here, so make sure it’s active and bubbly—you want it doubled, maybe even tripled, right before you mix it up. That ensures you get that beautiful, fluffy sourdough loaf rise. Use proper bread flour; the higher protein content really helps create the structure we need for those perfect sandwich slices. If you don’t have honey lying around, maple syrup works as a wonderful 1:1 swap for that touch of sweetness. Trust me, these little details make a huge difference in your sourdough sandwich bread results.
Step-by-Step Guide to Making the Perfect Sourdough Sandwich Loaf
This is where the magic turns into bread. Don’t rush these steps, okay? Even though we call this an easy sourdough recipe for beginners, the timing here is the professional secret. We are building structure gently so that when it comes out of the oven, you get that beautiful, soft interior instead of a tight, gummy mess. If you’ve been dreaming about the ultimate sourdough sandwich bread that actually works for PB&J and toast, you’ve come to the right place. I actually saw a fantastic recipe variation that uses some similar techniques over at Muscle Momma Sourdough—always good to see what others are doing!
I take the tough parts the pros do and show you the shortcut so you can have a soft loaf without all the fuss. Also, if you’re looking for good guidance on dough handling in general, take a look at my deep dive on easy crusty Italian bread recipe for a little extra practice before you tackle this loaf.
Mixing and Initial Rest for Sourdough Sandwich Bread
First things first: in a big bowl, mix up your active starter, the warm water, the avocado oil, and that little bit of honey until it looks milky and combined. Next, dump in all your bread flour and the salt. You are going to mix this by hand until you can’t see any dry flour spots left. It will look messy and shaggy—that’s exactly what you want! Cover it up tightly and walk away for a full hour. This initial rest is crucial; it lets the flour soak up all the liquid without us even touching it yet.
Developing Strength: Stretch and Folds
Now we build strength without beating up the dough the way traditional kneading does. You need to perform four sets of stretch and folds, and you must space them exactly 30 minutes apart. Grab your dough; make sure your hands are slightly wet—this stops the dough from sticking to you like glue! Gently reach under one side of the dough, pull it up high until you feel resistance, and then flop it over the center. Spin the bowl about 90 degrees and do that again. Repeat until you’ve folded all four sides. After the fourth set, you’re done folding!

Shaping and Proofing Your Square Loaf Sourdough
Once the bulk fermentation is done—and remember, this happens after the last fold and can take 4 to 8 hours depending on your kitchen heat—gently coax the dough out onto a lightly floured counter. You need to shape this into a tight log or rectangle that perfectly fits your 9×5 inch loaf pan. Grease that pan well! Once tucked in seam-side down, cover it loosely. The final proof is key for that beautiful height. You want the dough to rise about one full inch over the rim of the pan. If you under-proof it, you won’t get that perfect sliceable sourdough bread for your sandwiches.
Baking and Cooling for Optimal Sourdough Sandwich Bread
Preheat your oven to 375°F (190°C) about 30 minutes before you think the dough will be ready to go in. Bake it for 35 to 45 minutes until that crust is a lovely golden brown. Here’s a pro move to make sure it’s done: stick a thermometer in the center; you’re aiming for 200–210°F. The absolute hardest part is this last instruction for truly great sourdough sandwich bread: get it out of the pan immediately and cool it completely on a wire rack—I mean at least two full hours. Seriously, don’t touch it! If you slice it warm, you’ll smash that beautiful soft structure you worked so hard to create, resulting in a gummy texture.

Tips for a No Fuss Sourdough Bread Experience
Look, I know baking can sometimes feel like a high-stakes operation, but this recipe is designed to be forgiving. The real key to making this a “no fuss” loaf is respecting the resting periods. If your kitchen is super cold, your bulk fermentation time is going to stretch out longer than you expect, and that’s okay! Don’t just stare at the clock; watch the dough. Are there small bubbles on the surface? Does it jiggle a bit when you nudge the bowl? That’s your visual cue, not the timer.
I learned the hard way that you can’t rush cooling. After I first developed this recipe, I was so excited to slice into the perfect loaf that I maybe waited 45 minutes instead of the full two hours. Oh, what a mess! It looked gorgeous on the outside, but when I cut it, the whole interior sagged and stuck to the knife—it was gummy bread, and I almost cried! I ended up toasting the entire thing just to save it. Since then, I treat that cooling rack like a sacred space. If you want the inside scoop on shaping things like dinner rolls (which use similar dough handling concepts), check out my guide on homemade dinner rolls recipe for more gentle dough love.
Storage and Keeping Your Sourdough Sandwich Loaf Fresh
After that two-hour cooling period—which, trust me, is totally worth the wait—you need to wrap this loaf up tight. Sourdough, especially this softer version, dries out fast just sitting exposed on the counter. I use a big linen bag or wrap it tightly in aluminum foil. Keep it in a cool, dry place; a bread box is perfect.
If you’re planning on making toast or grilled cheese later in the week, this loaf is fantastic! When it’s a day or two old, just slice what you need and pop it in the toaster or pan-fry it lightly. That method makes every slice perfect for taking your easy garlic naan bread skills to the next level of toast mastery. If you won’t eat the whole loaf within three days tops, freezing the remainder is your best bet!
Frequently Asked Questions About Naturally Leavened Sandwich Bread
Baking sourdough always brings up questions, especially when you’re aiming for something as specific as a soft loaf. People often ask me about the texture first. I get it; we don’t want a dense brick! If you follow this recipe, you’ll see how easy it is to get a great result, even if you’re a total novice baker. If you’ve made a great loaf, you should absolutely share it in the comments below, or check out my thoughts over at easy chili recipe for a non-baking suggestion!
Can I make this sourdough sandwich bread using only whole wheat flour?
Yes, you can swap in whole wheat, but here’s the catch: you won’t get that signature fluffy texture or the ultimate sliceable sourdough bread slice. Whole wheat absorbs more water and has tougher bran, leading to a denser, more rustic crumb. For this specific recipe, I pushed the ratios toward bread flour to keep it soft and light—perfect for families who need healthy sourdough for family lunches. If you swap too much of the bread flour out, you lose the softness we worked so hard for!
What temperature should my active starter be for this recipe?
This step really impacts your rise time, so pay attention here! You want your active starter to be happy, which means it should ideally be between 70°F and 78°F when you mix it in. If it’s too cold, your bulk fermentation slows down way too much, and you might end up with a loaf that doesn’t rise well off the rim of the pan. If it’s too warm, say over 85°F, you risk over-proofing before you even get to the shaping stage. A reliable starter temperature is the secret weapon for making sourdough sandwich bread fuss-free.

I actually read a really great article about mastering wild yeast over at The Duvall Homestead that you might find useful if your starter is being fussy. Happy baking!
Estimated Nutritional Snapshot
Now, I’m not a nutritionist—I’m just someone who loves to feed people delicious things—but I know knowing what’s in your bread matters! Here is a rough guide to one slice of this amazing loaf, based on my ingredient list. Remember, this is an estimate, so if you use a fancy heirloom flour or a different brand of oil, things might shift a little. Enjoy knowing that this homemade deliciousness is still way better and easier to digest than anything store-bought!
- Serving Size: 1 slice
- Calories: 250
- Fat: 3g
- Carbohydrates: 48g
- Protein: 8g
- Sugar: 1g
- Sodium: 230mg
Share Your Soft Sourdough Sandwich Loaf Creations
Alright, that’s the whole recipe! I hope this finally unlocks delicious, stackable, perfect-for-kids sourdough sandwich bread for you. Please let me know how it turned out! Head over to the comments section below to drop your rating—five stars if it made your lunch routine better! I always love seeing your beautiful square loaves, so tag me in your photos. If you want to learn more about the philosophy behind Kitchen Slang and why we translate these pro techniques, check out our About Page. Happy baking, everyone!
PrintThe Best Effortless Soft & Fluffy Sourdough Sandwich Bread for Beginners
This recipe translates professional bread techniques into a simple guide for making a soft, sliceable sourdough sandwich loaf that is perfect for daily use and toasting.
- Prep Time: 20 min
- Cook Time: 45 min
- Total Time: 8 hr 40 min
- Yield: 1 loaf 1x
- Category: Baking
- Method: Baking
- Cuisine: American
- Diet: Vegetarian
Ingredients
- 150g active sourdough starter
- 325g warm filtered water
- 20g avocado oil
- 25g honey
- 500g unbleached bread flour
- 10g salt
Instructions
- Combine Starter Mix: In a large bowl, mix the active sourdough starter, warm filtered water, avocado oil, and honey until the mixture looks milky.
- Add Dry Ingredients: Add the bread flour and salt to the wet mixture. Mix by hand until a shaggy dough forms and no dry flour remains. Cover the bowl.
- Rest: Let the dough rest for 1 hour. This is the initial autolyse period.
- Stretch and Folds: Perform four sets of stretch and folds, spaced 30 minutes apart. To perform a stretch and fold, gently wet your hands, grab one side of the dough, stretch it upward, and fold it over the center. Rotate the bowl 90 degrees and repeat until you have folded all four sides.
- Bulk Fermentation: After the final set of folds, cover the dough and allow it to bulk ferment for 4 to 8 hours at room temperature, or until it has increased in volume by about 30-50% and shows signs of activity. The exact time depends on your kitchen temperature.
- Shape: Gently turn the dough out onto a lightly floured surface. Shape the dough into a tight log or rectangle that fits your 9×5 inch loaf pan.
- Pan Preparation: Lightly grease a 9×5 inch loaf pan. Place the shaped dough seam-side down into the prepared pan.
- Final Proof: Cover the loaf pan loosely with plastic wrap or a damp towel. Let the dough proof at room temperature for 1 to 3 hours, or until the dough has risen about 1 inch above the rim of the pan.
- Preheat Oven: About 30 minutes before baking, preheat your oven to 375 degrees Fahrenheit (190 degrees Celsius).
- Bake: Place the loaf pan in the preheated oven. Bake for 35 to 45 minutes, or until the crust is golden brown and the internal temperature reaches 200-210 degrees Fahrenheit (93-99 degrees Celsius).
- Cool: Remove the bread from the oven and immediately turn it out onto a wire rack. Let the loaf cool completely, at least 2 hours, before slicing. This step is crucial for a sliceable sourdough sandwich loaf.
Notes
- Use an active, bubbly sourdough starter for the best rise and flavor development.
- For a softer crust, you can brush the top of the loaf with a little melted butter immediately after removing it from the oven.
- This long-fermented bread is easier to digest than standard white bread.
Nutrition
- Serving Size: 1 slice
- Calories: 250
- Sugar: 1
- Sodium: 230
- Fat: 3
- Saturated Fat: 0.5
- Unsaturated Fat: 2.5
- Trans Fat: 0
- Carbohydrates: 48
- Fiber: 2
- Protein: 8
- Cholesterol: 0