
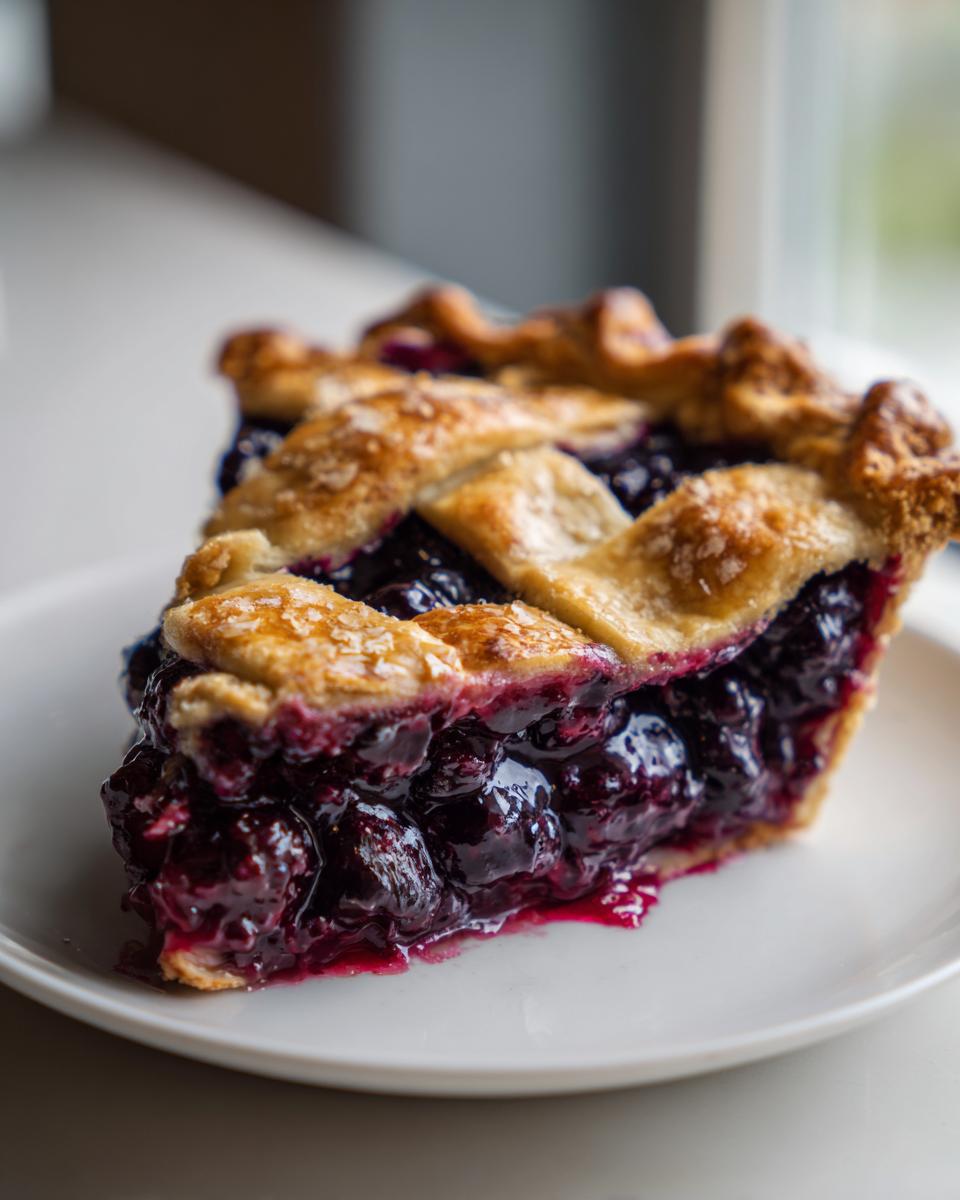
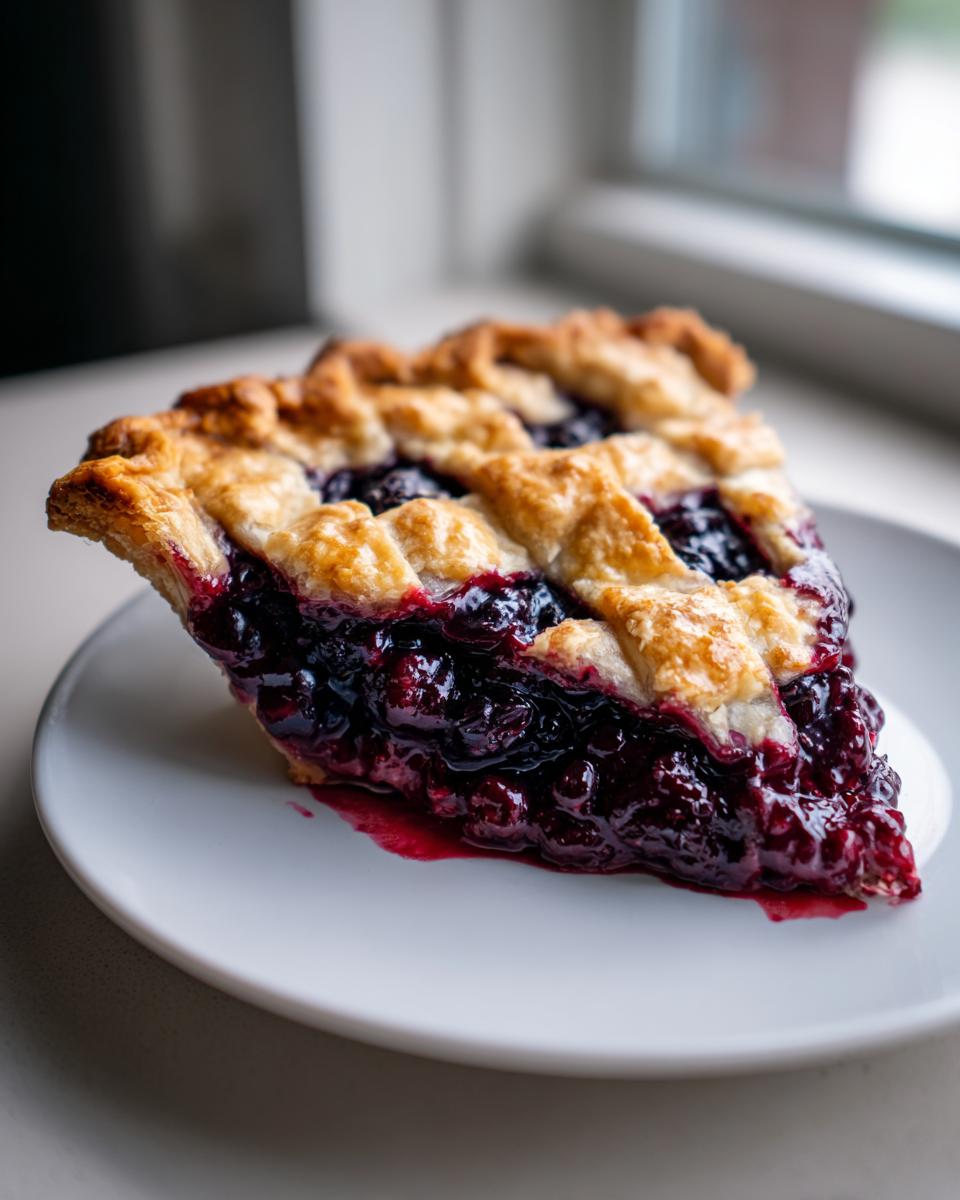
If you ask me what the ultimate taste of late summer is, I’ll immediately tell you it’s a slice of deep purple, bubbling blackberry pie. Forget intimidating pastry lessons! Making the perfect blackberry pie is simpler than you think, especially when you know the insider secrets. This Old-Fashioned Blackberry Pie with Flaky Lattice Crust is my absolute favorite because it guarantees that buttery, flaky crust and a filling that sets up beautifully—no more soupy messes on your plate, promise! Here at Kitchen Slang, we translate the professional lingo Zoe Thompson picked up in those hectic bistro kitchens into real talk for your home countertop. Get ready to make a classic dessert that tastes like pure memory.
- Why This Old-Fashioned Blackberry Pie Recipe Works (Expert Tips)
- Ingredients for Your Homemade Blackberry Pie
- Step-by-Step Instructions for Your Blackberry Pie
- Tips for the Best Blackberry Pie Experience
- Serving Suggestions for Your Blackberry Pie
- Storing and Reheating Your Homemade Blackberry Pie
- Frequently Asked Questions About Blackberry Pie
- Estimated Nutritional Information for Blackberry Pie
- Share Your Perfect Blackberry Pie Creation
Why This Old-Fashioned Blackberry Pie Recipe Works (Expert Tips)
We aren’t just throwing things in a pan here; we’re using kitchen slang secrets to build supreme structure! The reason this homemade blackberry pie tastes so much better than those shaky imposters comes down to two major things: the crust and the set. Get these two locked down, and you’re baking like a pro. Forget the fear of a pie no soggy bottom; knowing *why* certain steps matter is the key to success, just like when I deal with filling thickness in my cherry pie recipe.
Achieving that perfect flaky pie crust is 90% temperature control, not complicated folding techniques. We also tackle the cardinal sin head-on: preventing that dreaded wet mess at the bottom. If you want a slice that stands proud, you need to know how that filling thickens up correctly.
Achieving the Flakiest Pie Crust Every Time
When prepping for your crust, remember: cold equals flaky! I mean seriously cold. Your butter needs to be straight from the freezer, cubed small. As you mix it into the flour, you are aiming for those little butter chunks—some pea-sized, some a tiny bit bigger—to remain intact. Those chunks are pockets of pure steam waiting to happen in the oven. That steam pushes apart the dough layers, which gives you that beautiful, show-stopping flakiness. If your butter melts even a little bit, your crust gets tough instead of flaky. That ice water is just there to barely glue the flour together; don’t let it warm up the dough!
The Secret to a Perfectly Set Blackberry Filling Recipe
Blackberries are super juicy, which is why they taste amazing, but that juice needs management! Our recipe uses cornstarch, and the trick is to mix it *before* it hits the berries. Toss that cornstarch, sugar, and cinnamon together first, then gently fold in your berries. This ensures the thickening agent coats everything evenly, so you don’t end up with gooey clumps of starch next to runny, watery pockets. Also, always grab a taste of your berries before you start measuring sugar. If your summer berry desserts happen to be naturally sweet, back off the sugar a bit! Less sugar also helps the filling set cleaner, ensuring you present a beautiful, juicy fruit pie.
Ingredients for Your Homemade Blackberry Pie
Okay, here are the stars of the show! Remember, for this Old-Fashioned Blackberry Pie, the quality of your ingredients shines through, especially if you’re baking from scratch. Keep everything for the crust icy cold, I mean it! No narrative here, just gather your supplies, and let’s get baking.
For the Perfectly Flaky Pie Dough
This is the structure that holds all that juicy goodness. You’ll need plenty of butter—real butter!—to make that crust sing.
- All-purpose flour: Two and a half cups
- Salt: Just one simple teaspoon
- Unsalted Butter: One full cup, which is two sticks. Make sure it’s very cold and cubed!
- Ice Water: Half a cup to start, but have a tiny bit more ready just in case your dough asks for a sip.
For the Juicy Blackberry Filling Recipe
This is where the color and the sweet-tart flavor come from. We’re using cornstarch to make sure this filling looks gorgeous when you cut into it!
- Blackberries: Six cups total. This works beautifully whether you use fresh off the vine or straight from the freezer (but don’t thaw the frozen ones!).
- Granulated Sugar: About a cup and a half. Taste those berries first, though, because you might need a little less if they’re already sweet!
- Cornstarch: A quarter cup. This is key for a thick filling!
- Ground Cinnamon: One teaspoon—it adds that cozy, old-fashioned warmth.
- Lemon Juice: One tablespoon to brighten everything up.
For Finishing and Glazing the Lattice Top
We want that top to look golden and professional, almost like something you’d see on a baking showstopper pie!
- Large Egg: One, beaten up nicely with one tablespoon of milk to make a quick egg wash.
- Coarse Sugar: One tablespoon for sprinkling on top to give it that sweet crunch and sparkle.
Step-by-Step Instructions for Your Blackberry Pie
Alright, let’s get down to the real work of this from scratch baking project! This is where we turn those beautiful ingredients into an easy pie making masterpiece. I lay out all my tools before I even touch the flour because timing matters, especially for that dough. If you want that truly flaky, buttery result, you have to follow the chilling schedule—it’s non-negotiable for the best homemade blackberry pie! When you master this, you’ll see why learning these techniques is just like the insider tips I share for my classic apple pie recipe.
Making the Flaky Pie Crust Dough
First, whisk your flour and salt in a big bowl. Now comes the fun, messy part: cutting in the butter. You need to work fast so the butter stays cold. Use a pastry blender or just your fingertips to squish the butter into the flour until you see those lovely little pieces, some the size of peas. Gradually splash in that ice water while you mix ever so lightly with a fork. Stop mixing the instant it starts holding hands! Seriously, do not overmix. Divide that tender dough in half, flatten each piece into a disk, wrap ’em up tight, and get them into the fridge for at least an hour. They need that nap!
Assembling the Blackberry Filling Recipe
While the dough chills, let’s tackle the filling. In a separate bowl, mix your dry stuff first—the sugar, cornstarch, and cinnamon. Then, add the blackberries and the lemon juice. Here’s the key for a perfect blackberry filling recipe: be gentle! You want to coat those berries without crushing them into jam right away. Just toss lightly until every berry looks dusted. Set this off to the side while you roll out that first chilled disk for the bottom crust.
Building the Lattice Pie Top and Sealing
Once your bottom crust is settled in the plate and trimmed, roll out your second chilled piece of dough. I cut my strips about 3/4 of an inch wide—it gives the lattice a chunkier, more rustic look we love in an old fashioned pie. Start weaving! Over one strip, under the next. It feels complicated the first time, but once you get the rhythm, you’ll be flying through it.
Pour in all that gorgeous, coated blackberry filling. Then, take your top strips and weave them over the filling. Once the whole top is done, trim the extra overhang on both the top and bottom doughs. Pinch them together firmly all the way around the edge, crimping with your fingers or a fork. This seals in all the juice! When you’re done assembling, stick the whole thing back in the fridge for 15 quick minutes. Time for another chill!
Baking and Cooling the Blackberry Pie
We start hot and finish cooler. Preheat your oven to 400°F. Brush that beautiful lattice top with your egg wash and give it a nice sprinkle of coarse sugar. Bake it hard for 20 minutes at 400°F. This blast of heat sets the bottom crust quickly. Then, drop the temp down to 375°F and keep baking for another 35 to 45 minutes. If you see those edges getting too dark before the filling is bubbling thick, pop a ring of foil around it—it’s our little shield! But listen, the most important step for setting that juicy filling is after it comes out: let your blackberry pie cool completely, which means at least four full hours on a wire rack. No peaking! If you slice it early, it’ll run everywhere. Patience earns you that perfect slice.

Tips for the Best Blackberry Pie Experience
I’m telling you, once you’ve made this blackberry pie, you’ll want to keep these little tricks in your back pocket for next time. They are what separates a good pie from a truly show-stopping one!
Remember that tip about berries? If you use frozen ones—which works perfectly fine for a homemade blackberry pie, by the way—you absolutely cannot thaw them first. Toss them in frozen! If you thaw them, you just create a watery mess right away, and we don’t want that. Just add about five or ten extra minutes to the total bake time to make sure they heat through properly.
Also, if your kitchen is hot, your dough will fight you every step of the way. If you feel the cold butter starting to get soft while you’re trying to weave that lattice, just stop! Stick the whole assembly—dough and all—back in the fridge for ten minutes. Those extra chilling stops help me keep that crust insanely flaky. If you ever want a simpler, slightly different fruit dessert, check out my easy apple crumble recipe, but for pie, cold is king!
Serving Suggestions for Your Blackberry Pie
You have done the hard work! You’ve managed the flaky crust, you’ve waited the four agonizing hours, and now you have the most beautiful, deep purple blackberry pie sitting on your counter. Don’t ruin the moment by serving it plain! While this pie is utterly fantastic all by itself, we call those little extras our essential pie toppings ideas.
My favorite way to serve it, especially when it’s still slightly warm (but not hot enough to melt everything instantly!), is with a big, generous scoop of vanilla bean ice cream. The contrast between the warm, tart berries and the cold, sweet cream is heaven. If you’re looking for something lighter, some freshly whipped cream is perfect. I actually use a technique from my whipped shortbread recipe to keep my cream light but stable!

A drizzle of lightly sweetened thick dairy cream also feels wonderfully old-fashioned and pairs so well with the fruit. Honestly, sometimes I just slice it up and admire how well that filling set—that alone is satisfying! But if you want to see what other folks are doing to finish their showstoppers, check out how they dress up their pies over at Our Zesty Life. Go ahead, treat yourself!
Storing and Reheating Your Homemade Blackberry Pie
Okay, you’ve got this incredible, perfectly set blackberry pie, and now you have to figure out how to make it last past the first day—which is tough, trust me, I know! Dealing with fruit pies requires a little finesse so you don’t ruin that beautiful crust or make the bottom mushy.
Since we actually managed to get that filling to set nicely (thanks to the cornstarch!), you don’t have to panic about it immediately going into the fridge. Fully cooled, uncut pie can generally sit on your counter at room temperature for about a full day. Just keep it covered loosely with foil or in a cool, dry spot away from direct sunlight. You want to avoid the fridge initially because the cold air can cause condensation, and condensation is the number one enemy of a crisp bottom crust.
When to Move it to the Fridge
Once it’s been a full 24 hours, or if your kitchen is really warm, it’s time for safe storage. After cooling completely, wrap your pie tightly—plastic wrap works great for this—and pop it into the refrigerator. It should easily keep for another three to four days. If you only have half a pie left, transferring those remaining slices to an airtight container works like a charm too.
Reheating Slices for Maximum Flakiness
If you’re reheating just a slice, skip the microwave unless you absolutely must have it hot fast (the crust will get chewy, but hey, sometimes you just need pie!). For the best texture that brings back that just-baked magic, use the oven. Set your oven to about 350°F. Place the slice directly on a small baking sheet or wrap it loosely in foil, and warm it up for about 10 to 15 minutes. That low heat gently warms the berries back up and crisps the crust edges right back up. If you want to get fancy, right after reheating, give the crust edge a tiny spritz of water and stick it back in the hot oven for two minutes to rev up the crispness!

Frequently Asked Questions About Blackberry Pie
I get so many messages once folks try this blackberry pie recipe! It’s awesome that we’re all making beautiful summer berry desserts together. Here are the questions I hear most often about getting that perfect, old-fashioned result. I hope these little bits of kitchen slang help you out!
Can I use frozen blackberries in this blackberry pie recipe?
Absolutely you can! Honestly, sometimes frozen berries are even better because they are picked at peak ripeness. The big secret here, though, is that you must use them straight from the freezer. Do not thaw them ahead of time! Thawing them releases all their juice prematurely, and that’s how you end up fighting sogginess. Just toss the frozen berries right into your sugar and cornstarch mixture. You might need to add about five to ten extra minutes to your bake time since the berries start out colder than fresh ones.
What is the best way to prevent a soggy bottom on my blackberry pie?
This is the number one fear for any baker, right? For me, the trick isn’t totally about baking, it’s about cooling. Seriously, you have to let that pie sit out for a minimum of four hours after it comes out of the oven. The filling needs time to firm up and pull away from the bottom crust. If you slice it hot, it runs out like soup! To help the crust itself, always place the pie on the lowest rack during the second part of the bake—the heat rising from the bottom element gives that bottom dough an extra blast to crisp up. That long cooling time, though, is the real hero for avoiding the infamous soggy bottom!
How much sugar should I use for the blackberry filling recipe?
This is where instinct comes in handy! The recipe says 1 1/2 cups of sugar, but that’s just a starting point for your blackberry filling recipe. Berries vary wildly from year to year! Before you add the cornstarch, grab a single, washed berry and taste it. If it’s already super sweet, pull back on the sugar by a quarter cup or so. Remember, too much sugar keeps the filling from setting properly, so if your berries are sweet already, less sugar helps everything thicken up nicely. You can always add sweetness later, but you can’t take it out once it’s baked! If you want to explore other fruit flavors after mastering this, check out my thoughts on fall sangria recipes for a different vibe.
Estimated Nutritional Information for Blackberry Pie
Okay, now that we’ve covered dough chemistry and berry ratios, let’s talk numbers. Because this is an old-fashioned, from-scratch pie with plenty of butter, it’s definitely a treat! I always say this is a baking showstopper pie, meant for when you want to indulge, not for everyday snacking. The figures below are rough estimates, calculated per slice based on yield of 8 servings. Don’t sweat the exact numbers too much—just know that the reward is huge!
Nutritional Estimates Per Slice (Based on 8 Servings)
Keep in mind these numbers are estimates for one slice of this incredible homemade blackberry pie:
- Calories: Around 450—that’s that buttery crust talking!
- Fat: About 25g, with 15g coming from saturated fat, mostly from the cold butter we used for flakiness.
- Carbohydrates: Roughly 58g, which comes from those natural berry sugars and the added granulated sugar.
- Sugar: Expect about 35g. Remember, much of this comes from the fruit!
- Protein: A modest 5g.
- Sodium: Approximately 250mg.
- Cholesterol: Around 60mg.
So yes, it’s rich, it’s decadent, and it is absolutely worth every single ingredient to get that perfect, flaky, non-soggy result. Enjoy it alongside your favorite pie toppings ideas!
Share Your Perfect Blackberry Pie Creation
Well, folks, that’s it! You’ve officially conquered the Old-Fashioned Blackberry Pie with Flaky Lattice Crust. You know the secrets now: cold butter is your best friend, cornstarch is your setting hero, and patience during the cooling process is mandatory if you ever want to see a clean slice!
I truly hope your kitchen smelled amazing while this was baking. That deep, sweet-tart aroma is seriously my favorite part of any pie project. Now, I want to hear all about it!
Did your lattice turn out beautifully woven for your homemade blackberry pie? Did you manage to resist slicing into it for the full agonizing four hours? Don’t keep that success to yourself! Head down to the comments right now and tell me how it went. I want to see pictures of your gorgeous, non-soggy creations.
Here at Kitchen Slang, we believe sharing these hard-won kitchen victories is what cooking is all about, just like Zoe always says—it’s about translating that professional knowledge into shared wins at home. If you have a tweak that made this blackberry pie recipe even better for you, drop that tip below so the whole community can learn! And if you’re feeling like you need to share a direct note with me, you can always send a message through the contact page.
Happy baking, and enjoy every perfect, juicy slice!
PrintOld-Fashioned Blackberry Pie with Flaky Lattice Crust

Make a classic American dessert featuring a sweet-tart blackberry filling and a buttery, flaky double crust. This recipe focuses on simple techniques for a perfect, non-soggy pie.
- Prep Time: 45 min
- Cook Time: 65 min
- Total Time: 110 min
- Yield: 8 servings 1x
- Category: Dessert
- Method: Baking
- Cuisine: American
- Diet: Vegetarian
Ingredients
- 2 1/2 cups all-purpose flour
- 1 teaspoon salt
- 1 cup (2 sticks) unsalted butter, very cold and cubed
- 1/2 cup ice water, plus more if needed
- 6 cups fresh or frozen blackberries (do not thaw if frozen)
- 1 1/2 cups granulated sugar (adjust based on berry sweetness)
- 1/4 cup cornstarch
- 1 teaspoon ground cinnamon
- 1 tablespoon lemon juice
- 1 large egg, beaten with 1 tablespoon milk (for egg wash)
- 1 tablespoon coarse sugar for sprinkling
Instructions
- Prepare the Pie Dough: In a large bowl, whisk together the flour and salt. Cut in the cold butter using a pastry blender or your fingers until the mixture resembles coarse crumbs with some pea-sized pieces of butter remaining. Gradually add the ice water, one tablespoon at a time, mixing until the dough just comes together. Do not overmix. Divide the dough in half, flatten each half into a disk, wrap in plastic, and chill for at least 1 hour.
- Prepare the Filling: In a separate bowl, gently combine the blackberries, granulated sugar, cornstarch, cinnamon, and lemon juice. Toss until the berries are evenly coated. Set aside while you roll out the bottom crust.
- Assemble the Bottom Crust: On a lightly floured surface, roll out one disk of dough into a 12-inch circle. Carefully transfer the dough to a 9-inch pie plate. Trim the edges, leaving a 1-inch overhang. Place the pie plate in the refrigerator.
- Create the Lattice Top: Roll out the second disk of dough. Cut the dough into even strips (about 3/4 inch wide) for the lattice.
- Fill and Top the Pie: Pour the blackberry filling into the chilled bottom crust. Arrange the dough strips over the filling in a lattice pattern, weaving them over and under each other. Trim the overhang and crimp the top and bottom crust edges together to seal. Chill the assembled pie for 15 minutes.
- Bake the Pie: Preheat your oven to 400°F (200°C). Brush the lattice top with the egg wash and sprinkle evenly with coarse sugar. Place the pie on a baking sheet (to catch drips).
- Bake for 20 minutes at 400°F. Reduce the oven temperature to 375°F (190°C) and continue baking for another 35 to 45 minutes, or until the crust is golden brown and the filling is bubbling thickly. If the edges brown too quickly, cover them loosely with foil.
- Cool Completely: Remove the pie from the oven and let it cool on a wire rack for at least 4 hours before slicing. This cooling time allows the filling to set properly and prevents a soggy bottom.
Notes
- For the flakiest crust, keep all dough ingredients cold. If your kitchen is warm, chill the flour and butter before starting.
- If you use frozen berries, do not thaw them first; use them straight from the freezer, but you may need to add 5-10 minutes to the total bake time.
- Serve this homemade blackberry pie warm or at room temperature with a scoop of vanilla ice cream or fresh whipped cream.
Nutrition
- Serving Size: 1 slice
- Calories: 450
- Sugar: 35g
- Sodium: 250mg
- Fat: 25g
- Saturated Fat: 15g
- Unsaturated Fat: 10g
- Trans Fat: 0g
- Carbohydrates: 58g
- Fiber: 5g
- Protein: 5g
- Cholesterol: 60mg