

Listen, I know we all crave those desserts that look like you spent eight hours fussing over them, but secretly took about twenty minutes of actual work. If you need something incredibly impressive for your next potluck—seriously, watch people gather around the table—you absolutely need my No-Bake Creamy Peanut Butter Butterfinger Pie with Oreo Crust. This recipe is my secret weapon. It’s that perfect mix of salty, sweet, crunchy, and creamy. Hands down, this butterfinger pie hides how unbelievably fast it comes together!
- Why This No-Bake Butterfinger Pie is Your New Favorite Easy Butterfinger Dessert
- Gathering Ingredients for Your Butterfinger Pie
- Step-by-Step Instructions for the Best Butterfinger Pie Recipe
- Tips for Success Making Your Butterfinger Pie
- Serving Suggestions for This Simple Candy Desserts Masterpiece
- Storage and Make Ahead Tips for Your Butterfinger Pie
- Frequently Asked Questions About Making a Butterfinger Pie
- Estimated Nutritional Data for This Indulgent Candy Desserts Slice
- Share Your Thoughts on This Butterfinger Pie
Why This No-Bake Butterfinger Pie is Your New Favorite Easy Butterfinger Dessert
Trust me when I say this recipe is pure magic for anyone who hates turning on the oven when it’s hot outside. Seriously, the fact that we don’t have to bake anything is the first huge win here! It makes this the ultimate Easy Butterfinger Dessert for spur-of-the-moment cravings or when you need something great fast.
The Appeal of a No Bake Butterfinger Pie
We’re talking maybe 20 minutes of active mixing time, tops. That means this pie is perfect for summer holidays or those nights when you just don’t want dinner to end too late. You whip it up, stick it in the fridge, and presto—you have a showstopper. It travels beautifully too, which makes it one of my go-to potluck dessert ideas.

Building the Perfect Creamy Filling Pies Texture
Wow, that texture! That’s where the real bragging rights come in. We use cream cheese and whipped topping to create this light, airy base, but the peanut butter gives us that awesome, familiar, rich note we all know and love. When you combine those elements, you get this unbelievably smooth, almost mousse-like interior. It’s why I call this my signature Creamy Peanut Butter Pie—it just melts in your mouth before you even hit that crunchy Butterfinger layer.
Gathering Ingredients for Your Butterfinger Pie
Okay, so gathering the items for this gorgeous Butterfinger Pie is seriously half the fun. Because this is no-bake, we want to be precise about making sure everything is ready to go. I swear, having everything measured out beforehand means you don’t have to rush the folding process later, which is key!
Oreo Crust Pie Components
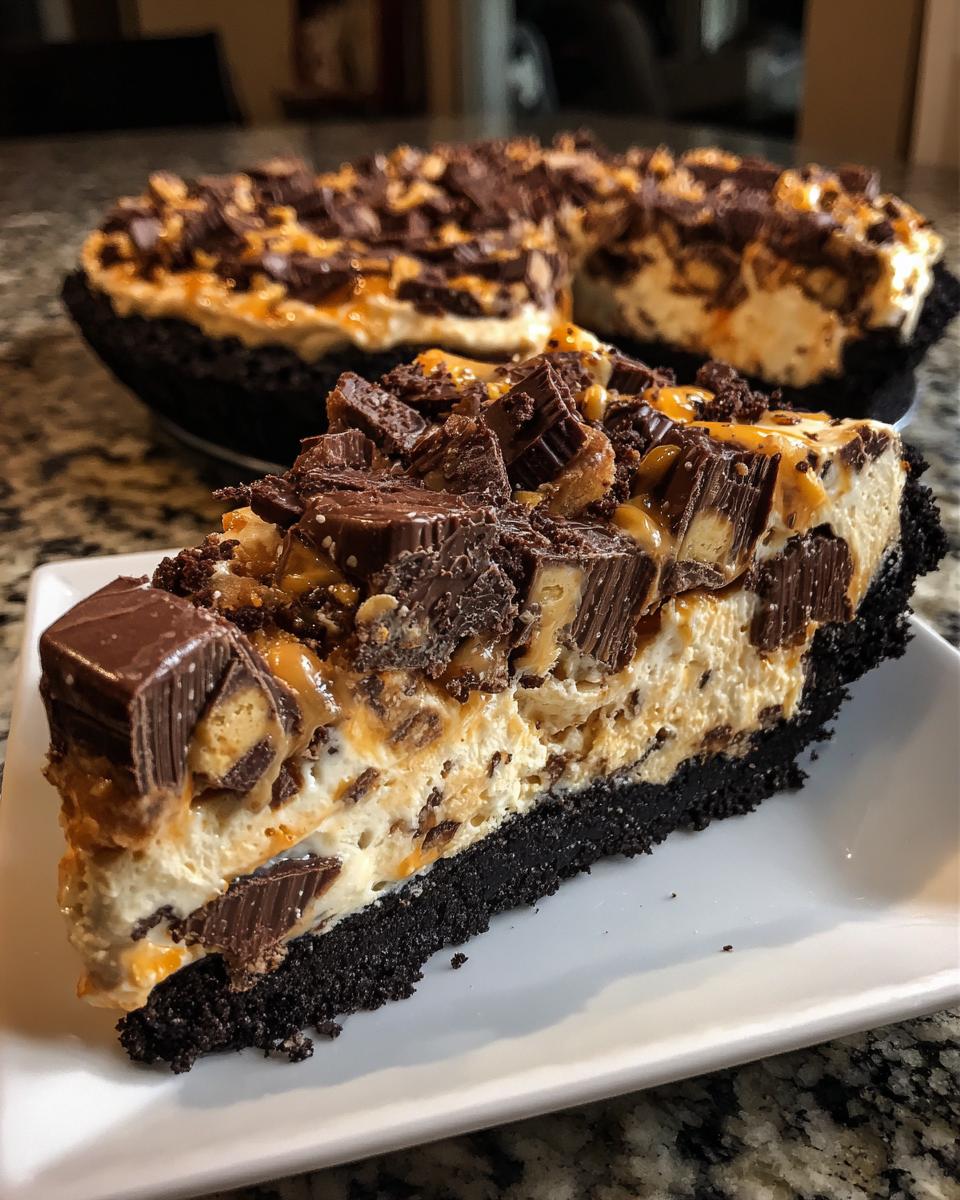
For that perfect chocolate base, we need just three things. Make sure you have your chocolate sandwich cookies—the ones with the filling intact!—a little bit of melted butter, and that’s it for the crust. Don’t skip the melting step; it binds everything tight for a fantastic Oreo Crust Pie.
- 1 (14.3 ounce) package chocolate sandwich cookies (like Oreos)
- 6 tablespoons unsalted butter, melted
Ingredients for the Creamy Peanut Butter Pie Filling
This is where the texture starts to come together. Remember, we absolutely need that cream cheese to be fully softened, or you’ll end up with little lumps, and nobody wants that in their Creamy Peanut Butter Pie. I always use creamy peanut butter here because it blends so much smoother than the crunchy kind for the base layer!
- 1 (8 ounce) package cream cheese, softened
- 1 cup creamy peanut butter
- 1 cup powdered sugar
- 1 teaspoon vanilla extract
- 1 (12 ounce) container frozen whipped topping, thawed
- 1 cup Butterfinger candy bars, chopped (about 6-8 bars)
- 1/2 cup Butterfinger candy bars, chopped (for topping)
Step-by-Step Instructions for the Best Butterfinger Pie Recipe
Alright, let’s get down to business and make the Best Butterfinger Pie Recipe you’ll ever try! Since this is a no-bake situation, timing is everything so the crust sets up nice and firm while you concentrate on the creamy filling. Grab your mixing bowls! I always check out other great butterfinger pie versions quick before I start, just for inspiration!
Creating and Chilling the Oreo Crust Pie Base
First up, the foundation! You need those chocolate cookies crushed down until they look like fine sand. If you don’t have a food processor, don’t sweat it—toss them in a sturdy Ziploc bag. Grab a rolling pin or the bottom of a heavy mug and just go to town until they’re crumbs. Mix those crumbs up really well with your melted butter until it’s all uniform and looks like wet sand. Now, press that mixture firmly into your 9-inch pie plate. I use the bottom of a glass to really pack it down across the bottom and slightly up the sides. Pop that whole plate into the freezer right now while you work on the filling. That chilling time is crucial!
Mixing the Creamy Filling and Folding in the Butterfinger Candy Bar Recipe Pieces
Time for the creamy part! In a big bowl—make sure that cream cheese is actually soft, please—beat that cream cheese until it’s totally smooth. No lumps allowed! Then, beat in your peanut butter, powdered sugar, and vanilla until it’s lightened up a bit. Next, take half of your thawed whipped topping and gently, I mean *gently*, fold it in so you don’t deflate all that air. Now, fold in that first cup of chopped Butterfinger candy bars. You want those crunchy bits dotted throughout, not beaten into oblivion!

Assembling and Setting the No Bake Candy Pie
Take your chilled crust out of the freezer. Spread that gorgeous peanut butter mixture evenly into the crust—smooth it out nicely. Now, take the remaining whipped topping and delicately spread it over the top for a fluffy cloud layer. You need that final 1/2 cup of chopped Butterfingers sprinkled liberally over that top layer. This is how you get that beautiful crunch on every slice of your No Bake Candy Pie. Cover it loosely and move it back to the fridge for a minimum of four hours. Overnight is truly better to make sure this filling sets up perfectly firm!
Tips for Success Making Your Butterfinger Pie
Okay, look, this Butterfinger Pie is simple, but if you want it to be the *best* it can possibly be—the kind that gets asked for every single holiday—a couple of things need your attention. Don’t worry, these aren’t scary steps; they’re just little chef secrets that make all the difference when you’re combining cream cheese and whipped topping in those Creamy Filling Pies.
Ingredient Temperature Matters for Smooth Butterfinger Pie Filling
This is non-negotiable, friends! Your cream cheese absolutely has to be fully softened. I mean room temperature soft. If it’s even a little firm, you’re going to end up beating against hard chunks instead of getting that smooth, velvety base. Take it out early! Seriously, cold cream cheese ruins the dream of a perfect Butterfinger Pie filling fast.
Achieving Maximum Crunch in Your Butterfinger Pie
If you want that awesome, surprising crunch, you have to chop your Butterfingers right before you fold them in. Don’t chop them in the morning and leave them on the counter. Why? Because those crispy peanut butter centers start absorbing moisture from the air and the filling. You want that crispity, crunchety texture when you bite in, right? So, wait ’til the very last minute to chop and toss them in!
Serving Suggestions for This Simple Candy Desserts Masterpiece
Now everyone loves this Simple Candy Desserts as is, right out of the fridge, but presentation is what turns a great dessert into an *unforgettable* one! Since this butterfinger pie is already so rich and decadent, sometimes keeping the additions simple is the way to go, especially when you’re taking it to a big party. This is truly one of the best potluck dessert ideas because it looks good without any extra fuss!
For a beautiful finish, skip the extra whipped cream that might melt too fast. Instead, focus on texture contrasts. You already have those gorgeous chopped Butterfingers on top, but you can elevate it with a very light drizzle of hot fudge sauce right before serving. Just melt a little chocolate hugging it with a tiny bit of neutral oil creates a perfect, shiny sauce that sets up ever so slightly.
If you’re using a chocolate crust, sometimes a little color contrast is nice. Think about dusting the edges of the plate—not the pie itself—with a very fine powder of extra crushed Oreos. It makes the white topping pop! Another trick that my Aunt Carol swore by for family gatherings was adding a few chocolate shavings right over the top layer of candy. It just screams ‘indulgent’! Honestly though, even served plain, this pie is a monster hit.
Storage and Make Ahead Tips for Your Butterfinger Pie
One of the absolute best things about this Butterfinger Pie? It loves a good chill session! If you need a dependable Simple Make Ahead Dessert, this is it. Because it has no crust that might get soggy from baking, or gelatin that needs to set perfectly, we just need to focus on firming up that creamy filling.
You absolutely must chill this pie for at least four hours, as I mentioned. That gives the cream cheese and whipped topping time to really firm up around those crushed Butterfinger pieces. But honestly, and this is my personal trick for when I’m serving it at a family cookout, chilling it overnight is just better. It firms up like a dream and the crust stays perfectly crisp.
When you store leftovers—if you even get any, which is doubtful—you need to cover it loosely with plastic wrap. Don’t press the plastic right onto the whipped topping, or you’ll smash it flat! I usually stick a few toothpicks around the edge of the pie plate before draping the plastic over, just to create some tent space. It stays wonderful in the fridge for about three to four days. If you want to freeze it, you can, but I always warn people that the texture of the whipped topping gets a bit weepier when thawed, so fresh is always best!
Frequently Asked Questions About Making a Butterfinger Pie
I always get the same questions when I bring this Butterfinger Pie to parties, so let’s dive into the common troubleshooting issues right here. Don’t let little uncertainties stop you from making this amazing Easy Butterfinger Dessert; it’s so forgiving!
Can I use a pre-made frozen pie crust for this butterfinger pie?
Oh, absolutely! If you are looking to save even more time, going to the store and grabbing one of those frozen, pre-made chocolate crusts is totally fine. I talk about it in the notes because sometimes we just don’t have time to crush cookies. But listen, just because the crust is ready doesn’t change the chilling time! You still have to chill the filling completely until it’s firm, or you’ll end up with a mess!
Can this Easy Butterfinger Dessert be frozen?
Yes, you certainly can freeze it! I’ve done it when I needed to make one way ahead of time. The trick is to cover it up super well and pop it in the freezer for up to a month. The downside, and this is important, is what happens when it thaws. The whipped topping tends to get a little watery or weep slightly. It still tastes amazing, maybe even better because everything is super cold, but the texture isn’t quite as pristine as when it’s first chilled.
What if I want a Crunchy Peanut Butter Pie instead?
That’s a great question! If you love texture—and who doesn’t with all those Butterfingers floating around—you might think, “Why stop now? Let’s use crunchy peanut butter?” You can definitely do that for the filling base. However, it will make the actual peanut butter part of the filling a bit chunkier instead of perfectly smooth. If you are aiming for that super silky filling, stick to creamy for the base, and let the chopped Butterfingers do all the heavy lifting for the crunch. It keeps that nice contrast for a true Crunchy Peanut Butter Pie feel without compromising the filling’s smoothness!

Estimated Nutritional Data for This Indulgent Candy Desserts Slice
Now, let’s talk fuel. Because truthfully, this Indulgent Candy Desserts slice is worth every single calorie, but you want the facts, right? So, here is the estimated breakdown per slice. Remember, this is just a guide for your **Butterfinger Pie**; if you use a different brand of cookies or peanut butter, your numbers will shift a bit. This is based on cutting the pie into 8 decent-sized wedges!
- Calories: 450
- Sugar: 35g
- Fat: 28g
- Protein: 7g
Share Your Thoughts on This Butterfinger Pie
Okay, I’ve spilled all my best secrets for making this ultra-creamy, crunchy Butterfinger pie! Now it’s your turn. If you whip this up for your family gathering or just because you needed an amazing Easy Butterfinger Dessert this week, I really, really want to hear about it!
Did you stick to the Oreo crust? Did you add a drizzle of caramel like I forgot to mention? Did it disappear instantly? Don’t keep that success quiet!
Please leave a comment below with your rating and any little tweaks you made. Honestly, seeing your pictures of this No Bake Butterfinger Pie makes my day, so tag me if you post one! Happy baking—or, well, happy *no-baking*!
PrintNo-Bake Creamy Butterfinger Pie with Oreo Crust

Make this easy, no-bake Butterfinger Pie featuring a creamy peanut butter filling, crushed Butterfinger candy bars, and a chocolate cookie crust. It is a simple, indulgent dessert perfect for gatherings.
- Prep Time: 20 min
- Cook Time: 0 min
- Total Time: 4 hr 20 min
- Yield: 8 servings 1x
- Category: Dessert
- Method: No-Bake
- Cuisine: American
- Diet: Vegetarian
Ingredients
- 1 (14.3 ounce) package chocolate sandwich cookies (like Oreos)
- 6 tablespoons unsalted butter, melted
- 1 (8 ounce) package cream cheese, softened
- 1 cup creamy peanut butter
- 1 cup powdered sugar
- 1 teaspoon vanilla extract
- 1 (12 ounce) container frozen whipped topping, thawed
- 1 cup Butterfinger candy bars, chopped (about 6–8 bars)
- 1/2 cup Butterfinger candy bars, chopped (for topping)
Instructions
- Prepare the crust: Place the chocolate sandwich cookies in a food processor and pulse until fine crumbs form. Mix the cookie crumbs with the melted butter until fully combined. Press the mixture firmly into the bottom and up the sides of a 9-inch pie plate. Place the crust in the freezer while you prepare the filling.
- Make the filling base: In a large bowl, beat the softened cream cheese until smooth. Add the creamy peanut butter, powdered sugar, and vanilla extract. Beat until the mixture is light and creamy.
- Fold in whipped topping and candy: Gently fold in half of the thawed whipped topping until just combined. Fold in 1 cup of the chopped Butterfinger candy bars.
- Assemble the pie: Spread the filling evenly into the chilled cookie crust. Top the pie with the remaining whipped topping. Sprinkle the remaining 1/2 cup of chopped Butterfinger candy bars over the top layer.
- Chill: Cover the pie loosely with plastic wrap and refrigerate for at least 4 hours, or until firm. For best results, chill overnight.
- Serve: Slice and serve cold.
Notes
- If you do not have a food processor, place the cookies in a zip-top bag and crush them using a rolling pin.
- For a richer chocolate flavor, use a chocolate graham cracker crust instead of the Oreo crust.
- You can use a frozen, pre-made pie crust to save time, but you must still chill the filling completely before serving.
- Chop the Butterfinger bars right before using them to keep them crunchy.
Nutrition
- Serving Size: 1 slice
- Calories: 450
- Sugar: 35g
- Sodium: 300mg
- Fat: 28g
- Saturated Fat: 12g
- Unsaturated Fat: 16g
- Trans Fat: 0.5g
- Carbohydrates: 45g
- Fiber: 1g
- Protein: 7g
- Cholesterol: 40mg