
Are you tired of the chicken thigh struggle? You know the one—trying to get that gorgeous, shatteringly crisp skin only to find the meat underneath is somehow dry or rubbery? Ugh, I hate that. Most home cooks don’t realize that achieving restaurant-quality results with chicken thighs isn’t about luck; it’s about language. I learned the real secrets watching chefs work in crazy-busy bistro kitchens. Now, I translate that insider knowledge just for you. We are diving into Bobby Flay’s Creamy Garlic chicken thighs, a skillet-to-oven masterpiece that guarantees that crispy skin plus a luscious, velvety sauce. Trust me, this method changes everything.
- Why This Creamy Garlic Chicken Thighs Recipe is Your New Weeknight Secret
- Gathering the Goods: Ingredients for Creamy Garlic Chicken Thighs
- The Translation: How to Cook Perfect Chicken Thighs
- Expert Tips for Next-Level Chicken Thighs
- Serving Suggestions for Your Chicken Thighs with Sauce
- Storing Leftover Chicken Thighs
- Frequently Asked Questions About Cooking Chicken Thighs
- Understanding the Nutrition in Your Chicken Thighs
- Share Your Kitchen Slang Success
Why This Creamy Garlic Chicken Thighs Recipe is Your New Weeknight Secret
Look, I know weeknights are crazy. You want that gourmet feel, but you don’t want to spend an hour scrubbing pans afterward. That’s why this recipe works so well—it’s about efficiency, not complication. When we combine professional scorching techniques with a super simple sauce, the resulting chicken thighs are just unbeatable.
This method is robust, too. Once you master it here, you can easily swap out the cream and Parmesan for a spicy chili-lime glaze or use it as a base for a simple chicken cobbler! It’s all about learning the lingo of the sear.
Crispy Skin, Juicy Meat: The Chicken Thighs Guarantee
Here’s the secret sauce speak for amazing skin: You have to start skin-side down in a screaming hot skillet. Don’t touch it for a solid six or seven minutes! That initial contact builds that golden, crackly layer while the fat slowly renders out. We are essentially rendering the fat before we even hit the oven. It’s the non-negotiable first step for perfect chicken thighs.

One-Pan Efficiency for Quick Chicken Dinner Ideas
Because we sear in an oven-safe skillet, we are creating a true one pan chicken thighs situation. Once the skin is set, we pull it out, whip up that quick sauce right in the pan drippings—hello, flavor!—and then pop the whole thing in the oven. Less dishes means more time for eating and less time dreading cleanup. That’s my kind of quick chicken dinner idea!
Gathering the Goods: Ingredients for Creamy Garlic Chicken Thighs
Okay, now that you know *why* this recipe is your new favorite, let’s get organized. In the kitchen, we call starting organized “mise en place,” but you just call it gathering everything before your pan gets hot! For this Bobby Flay-inspired dish, the quality of the chicken matters a lot because we are aiming for crispy skin perfection, so please don’t skip patting them dry later.
Here is what you need to pull together for four amazing servings:
- 6 bone-in, skin-on chicken thighs. Yes, we are using bone-in here; they handle the heat better and keep that meat juicy!
- 1 tablespoon olive oil—just enough to get the searing started.
- Salt and black pepper, to taste. Be generous with the salt, that helps that skin crisp!
- 1 teaspoon dried thyme.
- 1/2 teaspoon paprika. This is for color, mostly, unless you use smoked paprika for a deeper layer of flavor.
- 4 cloves garlic, minced. Don’t use the jarred stuff if you can help it; the fresh bite is key before we bake them.
- 1 cup chicken broth. Low sodium is usually best so we can control the salt level in the sauce.
- 1/2 cup heavy cream. This is what brings in that velvety gorgeousness!
- 1/4 cup grated Parmesan cheese. Make sure it’s the real stuff, grated right off the wedge if you can manage it!
- 1 tablespoon fresh parsley, chopped (for garnish). That pop of green is non-negotiable for presentation!
Make sure your chicken thighs are resting out on the counter getting cozy for about 20 minutes before you start seasoning them too. Cold meat hitting a hot pan is just asking for trouble!
The Translation: How to Cook Perfect Chicken Thighs
Alright, let’s talk action. This is where we take those beautiful, fatty, bone-in pieces of chicken and turn them into something legendary. I’m breaking down the steps like a chef would explain them on the line—it’s all about rhythm and timing. Pay close attention to that initial sear; it’s the whole game changer here.
Prep and Searing: Building Flavor on Chicken Thighs
First things first: moisture is the enemy of crispiness. Grab your paper towels and seriously pat those chicken thighs dry. I mean bone dry, especially the skin side. I learned this trick years ago; if the skin is wet, it steams instead of searing, and then you just get sad, pale skin. After they are dry, season them hard on both sides with salt, pepper, thyme, and paprika.
Get your oven-safe skillet screaming hot over medium-high heat with that tablespoon of oil. When that oil shimmers, gently lay the thighs skin-side down. Now, this is important: Do not move them. If you try to peek or shift them after three minutes, you tear off the crispy layer. Let them sit undisturbed for a solid 6 to 8 minutes until you see that deep golden brown color. Then, just flip them for 3 quick minutes on the other side, and pull them out onto a clean plate. We’re saving that rendered fat!
Building the Velvety Sauce Base
We aren’t making a separate sauce here; we’re building it right in the same pan. That brown stuff stuck to the bottom of your skillet? That’s called fond, and it’s pure flavor magic. Turn the heat down to medium and toss in your minced garlic—be quick, 30 seconds max until you can really smell it. That’s your cue to pour in the chicken broth. Use your wooden spoon to scrape every little bit off the bottom. This is deglazing, and it’s how we get depth in our sauce! Let that broth simmer down until it’s about half its volume.
Once reduced, stir in the heavy cream and let it warm up gently. Then, here’s the decadent part: whisk in that Parmesan cheese until everything melts into a beautiful, thick sauce. If you want to check out another great sauce you can build in under five minutes, take a look at this garlic aioli recipe I love. Once the Parmesan is smooth, taste it for salt before adding the chicken thighs back in.
Skillet-to-Oven Finish for Juicy Baked Chicken Thighs
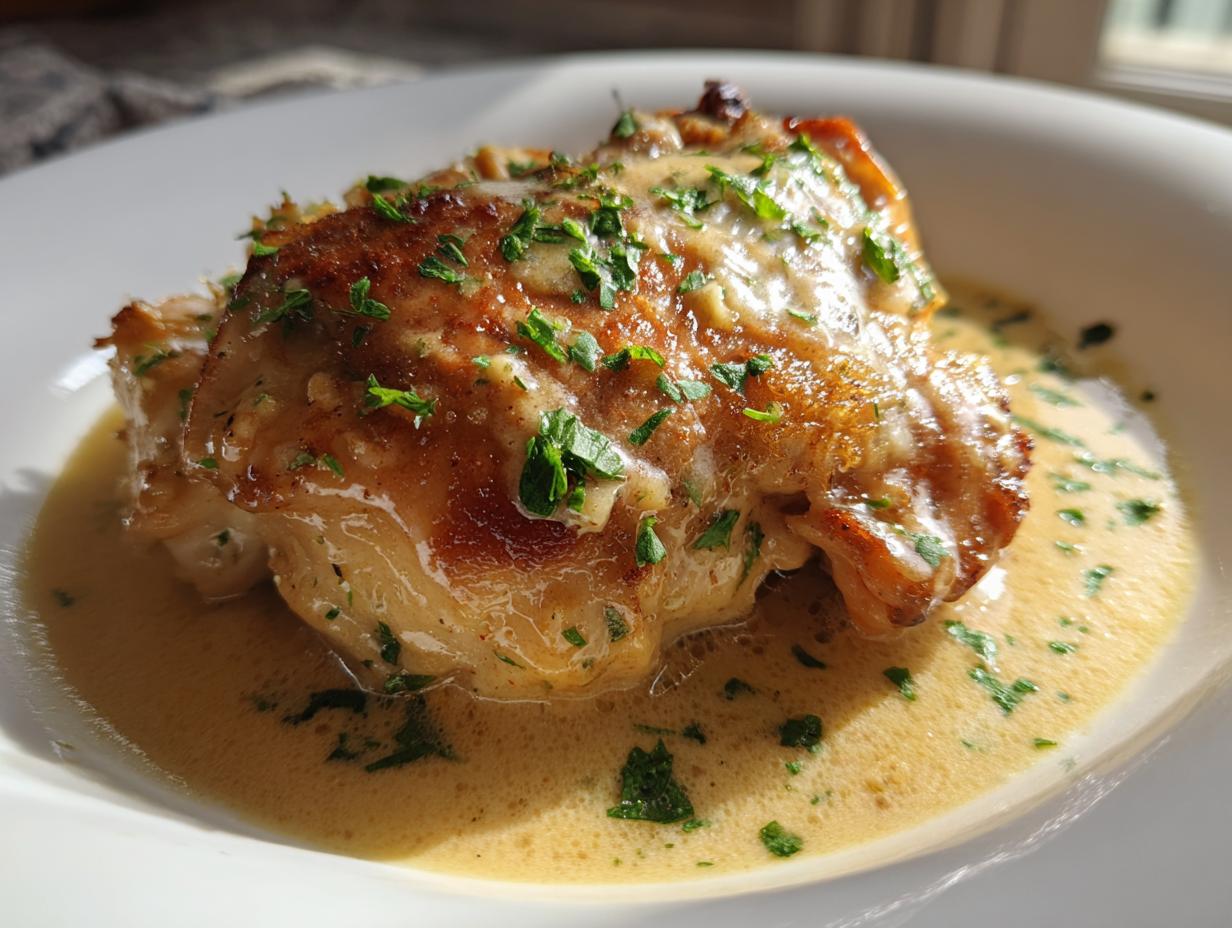
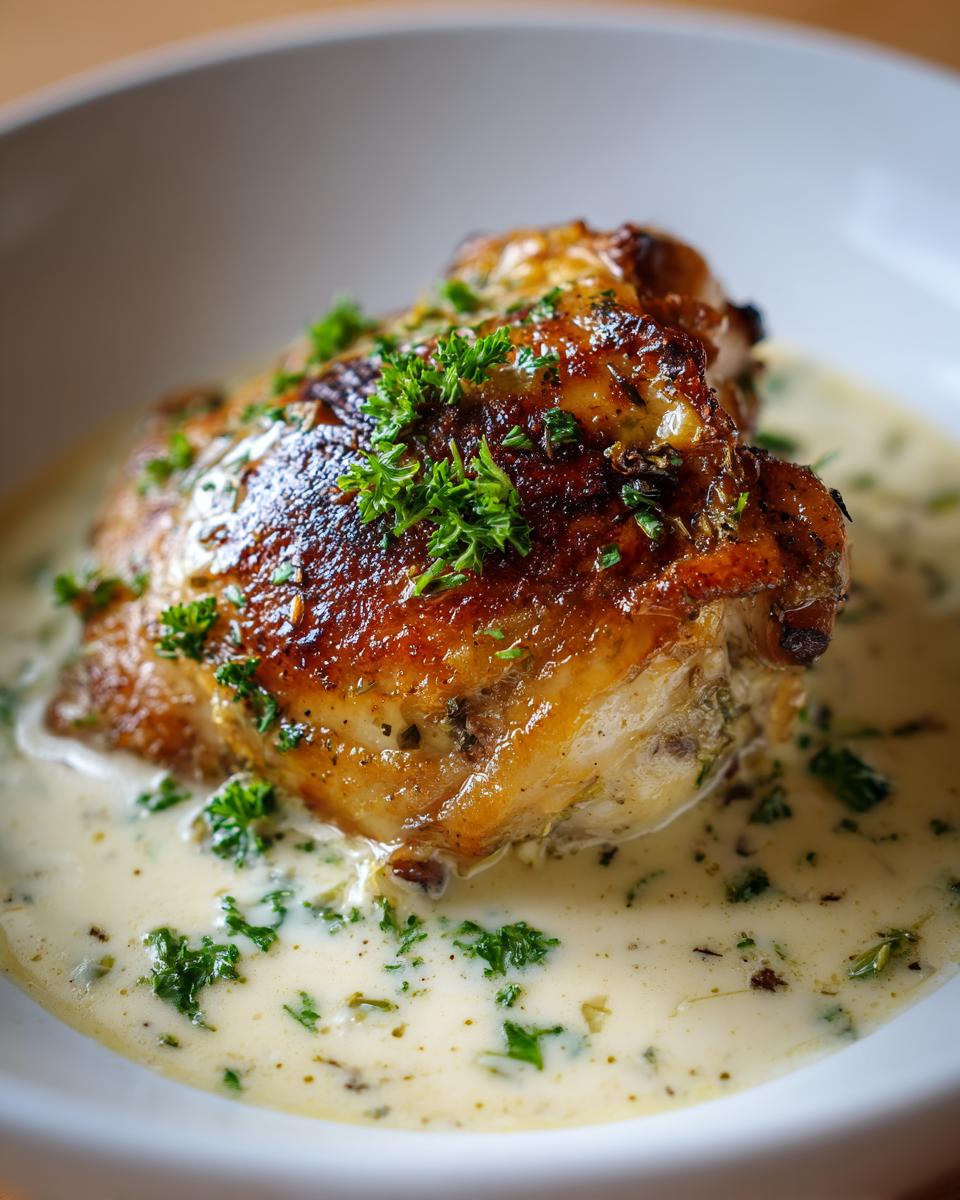
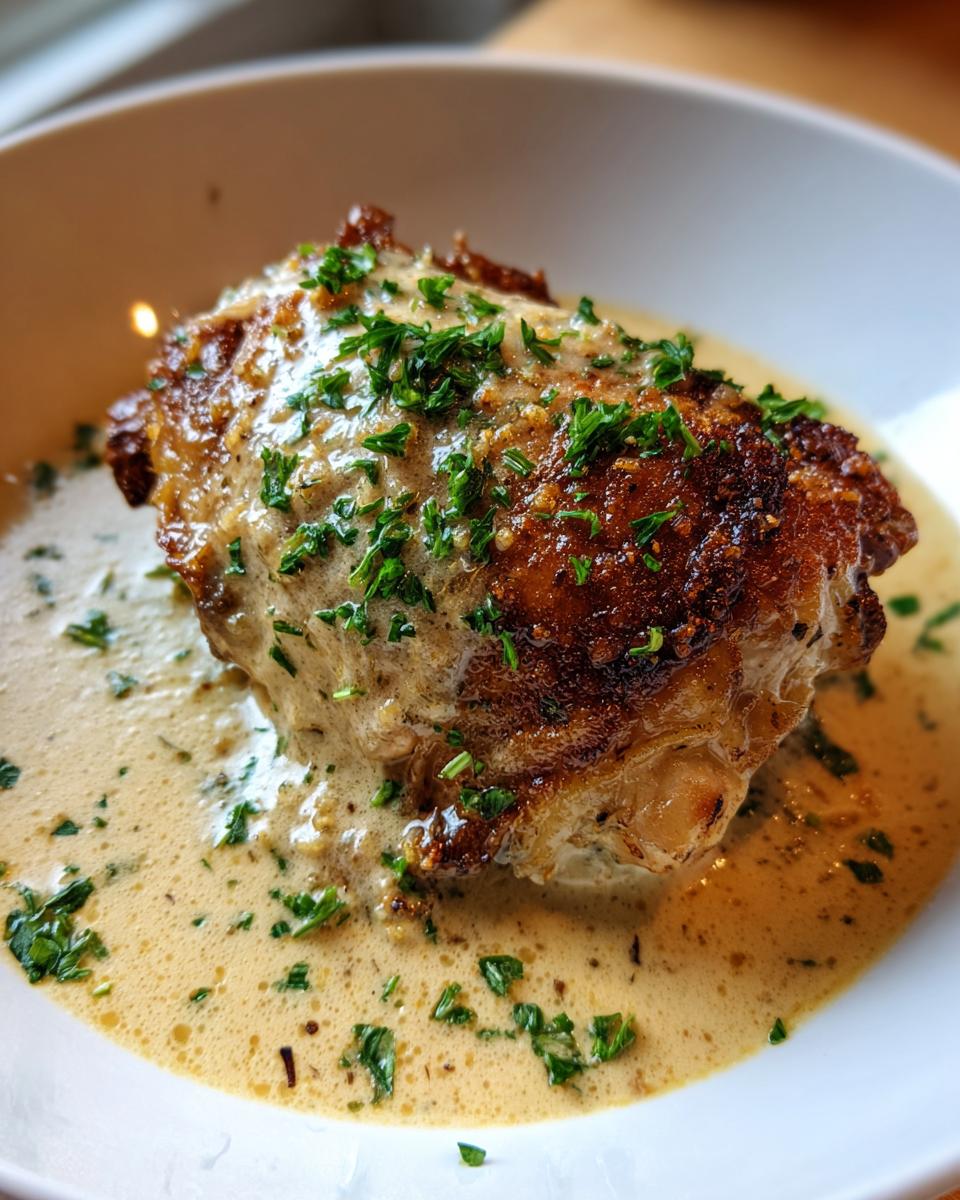
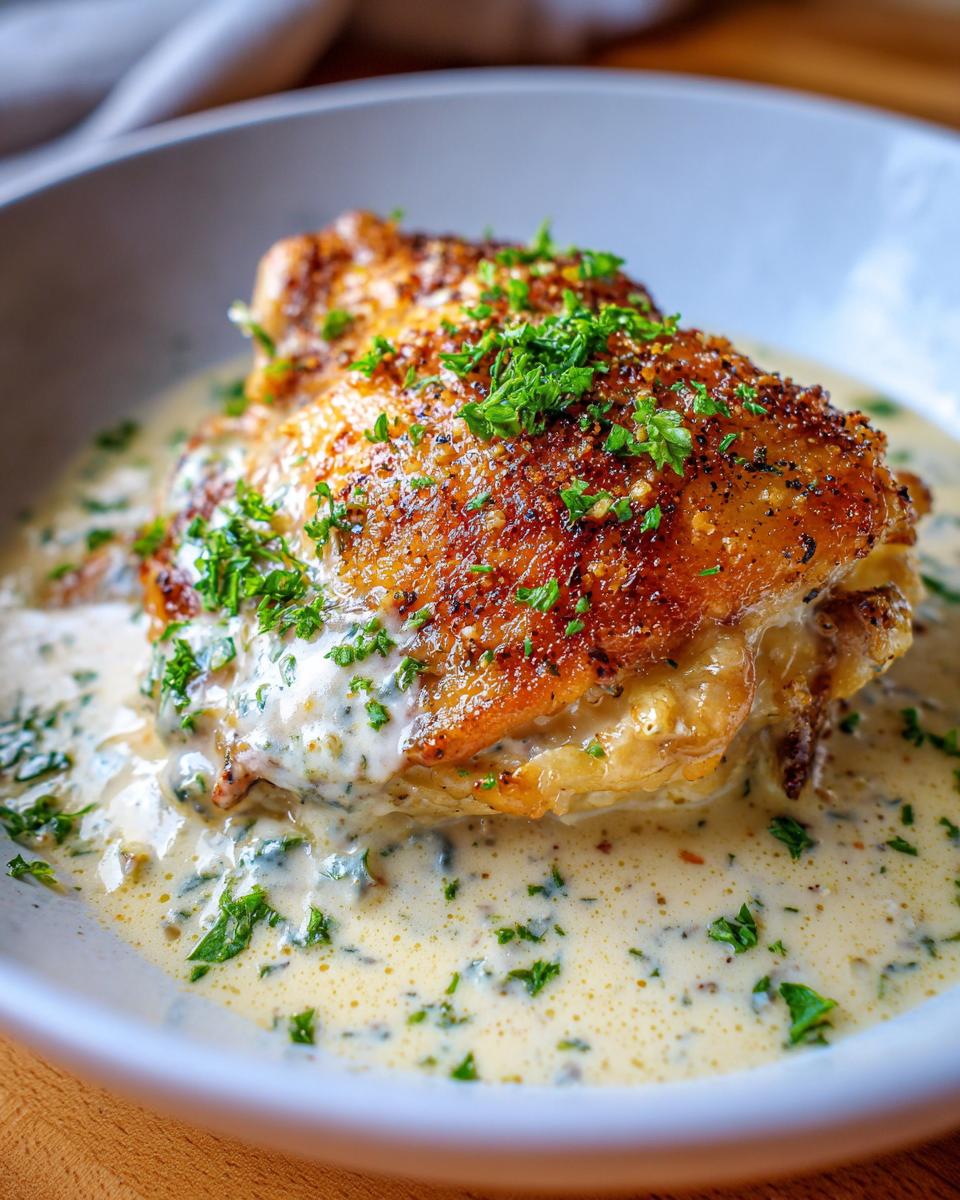
Place those seared thighs right back into the skillet, settling them skin-side up into that creamy bath. We are finishing these in a 400-degree oven. It usually takes about 15 to 20 minutes flat. That gentle heat cooks the meat through evenly without drying it out since it’s bathing in the sauce. Remember, safety first: the internal temperature needs to hit 165 degrees Fahrenheit. Use a quick thermometer if you have it! This two-stage process of high-heat sear followed by gentle oven time is the only way to guarantee those intensely juicy baked chicken thighs. For the full original method inspiration, check out this specific breakdown of Bobby Flay’s Creamy Garlic Chicken Thighs.
Expert Tips for Next-Level Chicken Thighs
Okay, you’ve nailed the sear and the sauce is simmering—that’s the heavy lifting done. But if you want to go from *great* to ‘Wait, did a chef make this?’ you need a few more pieces of insider know-how. These little tweaks are what separate simply following instructions from truly cooking with instinct. It’s all about maximizing texture and adapting when things don’t perfectly align with the recipe card.
The Broiler Trick for Extra Crispy Skin Chicken Thighs
So, your chicken is basically done, sitting there in that gorgeous cream sauce, but maybe the skin just didn’t get quite ‘crackly’ enough for your liking? Don’t sweat it! This is where we use the professional’s secret weapon: the broiler. Once the chicken hits the correct internal temp, pull the skillet out, switch your oven function up to broil (high heat, top shelf), and just let it hang out for one or two minutes. You have to watch it like a hawk, I mean it—broilers burn fast! But that blast of direct heat takes that skin from crispy to glass-like perfection in seconds. It’s a high-reward move for anyone obsessed with that crunch. If you love crispy textures, you absolutely have to check out how to make incredible garlic parmesan mashed potatoes to go alongside this.
Adapting for Boneless Skinless Chicken Thighs
I get it. Sometimes you only have boneless, skinless chicken thighs on hand, or maybe you just prefer them—no shame in that! You can absolutely use them here. The main difference is that we skip the initial long sear because there’s no skin to worry about crisping up. However, since they are thinner, they cook much faster. When you return them to the sauce for the oven finish, reduce that bake time by about five to seven minutes. Always, always check that internal temperature (165°F) to make sure they haven’t dried out, since they don’t have that protective layer of fat we usually rely on. For a great alternative approach to crispy skin, peek at how the folks over at Downshiftology handle their crispy baked method!
Serving Suggestions for Your Chicken Thighs with Sauce
So you’ve got this incredible skillet of smoky, browned chicken swimming in the most luxurious, garlic-heavy cream sauce ever. It’s rich, right? It needs something plain to heroically soak up every last drop. I can’t stress this enough: the sauce is the star here, so don’t serve it with anything that fights it!
When I make this dish, I typically treat it like a comfort food dream. Forget dainty salads; we’re going hearty here. The number one thing you need is a base that can capture all that incredible Parmesan and garlic goodness. My personal go-to is always a simple, fluffy rice. But if you want to amp up the flavor slightly while keeping the carbs handy, I have a fantastic garlic butter rice recipe that pairs perfectly without being too heavy.
If you’re going low-carb, steam up some tender, bright green vegetables to cut through the richness of the cream. Asparagus is lovely, but honestly, simple steamed broccoli works wonders because it catches the sauce beautifully on its little florets. You could also serve this over egg noodles if you’re feeling extra cozy. No matter what vehicle you choose, make sure you spoon plenty of that creamy sauce right over the top of your sides!
Storing Leftover Chicken Thighs
So, maybe you didn’t manage to eat all six of these glorious, creamy chicken thighs (which, honestly, I kind of understand, they are rich!). Don’t toss them! Good leftovers are the key to an easy lunch the next day. The great thing about this recipe is that the sauce actually helps keep the meat super moist!
When it comes to leftovers, we handle them gently. Let the entire skillet cool down just slightly—maybe 30 minutes on the counter—before covering it tightly. You want to seal in as much of that creamy garlicky sauce as possible right there with the meat. Pop the whole covered dish into the fridge. They’ll be good for about three, maybe four days, max.
Now, reheating is where people mess up and turn perfectly good chicken into tough, shoe leather—we can’t have that! You have two options, and both prioritize moisture retention:
- The Gentle Stove Method: This is my absolute favorite way. Pour the leftover chicken and all the sauce into a small saucepan. Set the heat to low—super low! You are just warming it through gently until it’s steaming hot. Don’t boil it or let it bubble hard; that will break the cream emulsion and dry out the meat.
- The Oven Reheat: If you just have a piece or two, place them in a small, oven-safe dish, spoon a tiny bit of extra broth or water over them (just to create steam), cover that dish tightly with foil, and bake at a low 300°F until warm. This traps all the humidity inside.
Don’t even think about microwaving these unless you are in a real bind and cover them well—the microwave tends to make the skin soggy anyway, which defeats half the purpose of making Bobby Flay’s version, right?
Frequently Asked Questions About Cooking Chicken Thighs
I get so many messages running this blog about common panics people have when cooking poultry, especially when it comes to the fat and the texture. Don’t worry if you run into little snags—that’s just part of learning the lingo! Here are the questions I get asked most often about mastering chicken thighs.
Can I use this method for air fryer chicken thighs?
Oh, absolutely, the air fryer is your friend for crispy skin! If you want to adapt this, you’ll do the initial sear *outside* the air fryer—use a cast iron pan on the stovetop just like step two to get that skin perfectly rendered and brown. Once they are seared, skip the oven step entirely! Toss them into the air fryer basket, skin-side up, and cook at about 380°F until they hit temperature. The air fryer is incredible at crisping things up fast, which is great if you need a super quick chicken dinner idea.
Is it better to use bone-in or boneless skinless chicken thighs for this sauce?
For *this specific* recipe—the creamy garlic one—I strongly, strongly recommend the bone-in, skin-on version. Why? The bone acts like a heat regulator, preventing the meat near it from overcooking while the skin renders fat that actually flavors the creamy sauce base. Bone-in means a deeper chicken flavor overall. However, if you must use boneless skinless chicken thighs, you can! Just remember the timing note I mentioned earlier: they’ll cook faster in the oven, probably needing closer to 10-15 minutes total bake time once they are in the sauce, so don’t walk away!
What makes this recipe better than other easy chicken thigh recipes?
Honestly, it all comes back to the two-stage heating method that Chef Flay perfected. Most easy chicken thigh recipes either bake them the whole time (resulting in dry meat) or just pan-fry them (resulting in rubbery skin and raw centers). We sear hard first to secure the crispy skin and render the fat, and then we *gently* finish them submerged in salty, fatty, garlicky sauce in the oven. That gentle finish in the sauce is what locks in the juiciness. It’s the professional shortcut that home cooks rarely use, but it guarantees success every single time. It’s a game-changer, much like learning a few simple tricks for making a next-level chili!
Understanding the Nutrition in Your Chicken Thighs
Okay, let’s talk fuel for a second. I know when you’re making creamy, cheesy, rich food like this, you might be feeling a little guilty, but we’re cooking intelligently here! Because we are using bone-in, skin-on chicken thighs, we get loads of those wonderful, flavorful fats that keep the meat tender, but you also get amazing protein and flavor without a ton of fuss.
I always run the numbers, even if I’m supposed to be ‘eye-balling’ the flavors. It keeps me grounded. Just remember that these are estimates, right? When you’re scraping every last bit of that glorious sauce from the pan—and you totally should be—the final numbers might shift slightly. But this gives you a really solid baseline for what you’re putting on the table.
For one serving (that’s one of those beauties nestled in the sauce), here’s the snapshot based on the ingredients in this recipe:
- Serving Size: 1 thigh with sauce
- Calories: Roughly 450
- Protein: A huge 35g! That’s what keeps you full.
- Fat: About 32g total. Remember, a good portion of that is the flavorful fat from the skin and breast meat, which we aren’t draining completely because it makes the sauce!
- Saturated Fat: Around 15g.
- Carbohydrates: Only 4g—you’ll get most of your carbs from whatever you serve this over, like rice or potatoes.
- Sodium: 450mg. We kept this reasonable because we seasoned to our own taste, but use low-sodium broth to help keep that number down.
See? We managed to get a truly gourmet, restaurant-quality meal into under 500 calories per serving, and it’s packed with the kind of protein that keeps you going! It’s proof that comfort food can absolutely still be smart food when you cook it yourself.
Share Your Kitchen Slang Success
Whew! We made it through the searing, the sauce building, and the perfect oven finish. Now comes the best part: sitting down to eat something you made that tastes better than most takeout spots! I sincerely hope you and your family are enjoying these Bobby Flay-inspired, unbelievably juicy chicken thighs right now.
But I want to know what happened when you translated this method into your own kitchen slang! Did you nail that crispy skin on the first try? Did you add a little extra thyme like I sometimes want to do? Don’t keep that success quiet!
Please, do me a favor and hit that star rating below. Tell me exactly what you thought—was the sauce rich enough? How did your timing turn out? Sharing your feedback not only helps other home cooks get confident in tackling this recipe but it truly fuels me to keep translating more complicated restaurant techniques into stuff we can all do after a long day.
If you want to dive deeper into why we cook the way we cook, head over to the About page and see more about the Kitchen Slang philosophy we live by. But if you just want to show off those golden, creamy thighs, drop a rating! I can’t wait to hear how your chicken thighs turned out—Go on, tell me!
PrintBobby Flay’s Creamy Garlic Chicken Thighs: Skillet Comfort

You get succulent, bone-in chicken thighs with crispy skin, finished in a rich, velvety garlic cream sauce. This one-pan recipe delivers gourmet flavor fast for your weeknight dinner.
- Prep Time: 10 min
- Cook Time: 30 min
- Total Time: 40 min
- Yield: 4 servings 1x
- Category: Dinner
- Method: Skillet to Oven
- Cuisine: American
- Diet: Low Calorie
Ingredients
- 6 bone-in, skin-on chicken thighs
- 1 tablespoon olive oil
- Salt and black pepper, to taste
- 1 teaspoon dried thyme
- 1/2 teaspoon paprika
- 4 cloves garlic, minced
- 1 cup chicken broth
- 1/2 cup heavy cream
- 1/4 cup grated Parmesan cheese
- 1 tablespoon fresh parsley, chopped (for garnish)
Instructions
- Pat the chicken thighs completely dry with paper towels. Season both sides generously with salt, pepper, thyme, and paprika.
- Heat the olive oil in a large, oven-safe skillet over medium-high heat. Place the chicken thighs skin-side down in the hot skillet. Sear for 6 to 8 minutes until the skin is deep golden brown and crispy. Do not move the chicken during this time.
- Flip the chicken thighs and cook on the second side for 3 minutes. Remove the chicken from the skillet and set aside on a plate. Drain off all but 1 tablespoon of the rendered fat from the skillet.
- Reduce the heat to medium. Add the minced garlic to the skillet and cook for 30 seconds until fragrant. Do not let the garlic burn.
- Pour in the chicken broth, scraping up any browned bits from the bottom of the pan. Let the broth simmer and reduce by half, about 3 minutes.
- Stir in the heavy cream and bring the sauce to a gentle simmer. Stir in the Parmesan cheese until the sauce is smooth. Taste and adjust salt and pepper if needed.
- Return the seared chicken thighs to the skillet, nestling them into the sauce, skin-side up.
- Transfer the skillet to a preheated oven at 400 degrees Fahrenheit (200 C). Bake for 15 to 20 minutes, or until the internal temperature of the chicken reaches 165 degrees Fahrenheit (74 C).
- Remove from the oven. Garnish with fresh parsley before serving immediately over rice or with crusty bread to soak up the sauce.
Notes
- For extra crispy skin, place the skillet under the broiler for the last 1-2 minutes of cooking, watching closely to prevent burning.
- You can substitute boneless, skinless chicken thighs, but reduce the oven cooking time by about 5 to 7 minutes.
- This recipe works well as a one pan chicken thighs meal when served with a side of steamed green beans or roasted asparagus.
Nutrition
- Serving Size: 1 thigh with sauce
- Calories: 450
- Sugar: 2
- Sodium: 450
- Fat: 32
- Saturated Fat: 15
- Unsaturated Fat: 17
- Trans Fat: 1
- Carbohydrates: 4
- Fiber: 1
- Protein: 35
- Cholesterol: 130