

Okay, real talk: sometimes you just crave that warm, pillowy, slightly salty magic that can only come from a basket of fresh breadsticks when you’re sitting down for Italian night. You know the ones I mean—the ones that disappear before the salad even shows up? Well, forget takeout! I’ve cracked the code on making the absolute best Soft Copycat Breadsticks with Garlic Parmesan Butter right here on your counter.
I know what you’re thinking: yeast breads take forever, right? Not with this translation. Just like everything we teach here at Kitchen Slang, we take professional knowledge and filter out the intimidating fluff. You don’t need a culinary degree to get fluffy results; you just need the right translation of the technique. Our philosophy is all about giving you confidence, and these breadsticks are the perfect way to prove you can master any dough.
We’re talking about rich, buttery goodness slathered on pillow-soft dough. Trust me, once you smell that garlic butter hitting the hot baking sheet, you’ll never go back to the frozen stuff again. Let’s get started on your new favorite side dish!
- Why Our Copycat Breadsticks Recipe Works So Well
- Gathering Ingredients for Your Homemade Breadsticks Recipe
- Step-by-Step Instructions for Easy Homemade Breadsticks
- Expert Tips for the Best Homemade Breadsticks
- Serving Suggestions for Your Parmesan Breadsticks
- Storing and Reheating Your Soft Breadsticks
- Frequently Asked Questions About Copycat Restaurant Breadsticks
- Nutritional Estimates for These Breadsticks
- Share Your Homemade Breadsticks Success
Why Our Copycat Breadsticks Recipe Works So Well
There are a ton of breadstick recipes out there, but ours hits that spot because it focuses exactly on what makes the restaurant ones so addictive: texture and topping synergy. We aren’t just making simple rolls; we are aiming for those famous Soft and Fluffy Breadsticks that stretch perfectly when you pull them apart. That soft texture sticks around for hours, too, which is a huge win for leftovers! If you love working with dough, you should check out my easy garlic naan bread recipe while you wait for this dough to rise!
I spent weeks trying to figure out why my first few batches were dense. It all came down to that foaming step. You have to let the yeast wake up properly! Now I refuse to move on until I see those lazy bubbles turn into a thick froth. It’s the non-negotiable step for guaranteed fluffiness in this Yeast Bread Recipe.
Achieving the Perfect Soft and Fluffy Breadsticks Texture
The secret to great texture isn’t magic; it’s elbow grease and patience with the knead. We need that dough to be smooth and elastic so it can trap the gasses released during the rise. Don’t skimp on the 5 to 7 minutes of kneading! You want it springy. Also, using vegetable oil—blended right into the dough—keeps these Soft and Fluffy Breadsticks tender long after they cool down. It’s genius, really.
The Secret to Restaurant-Style Garlic Breadsticks Recipe Topping
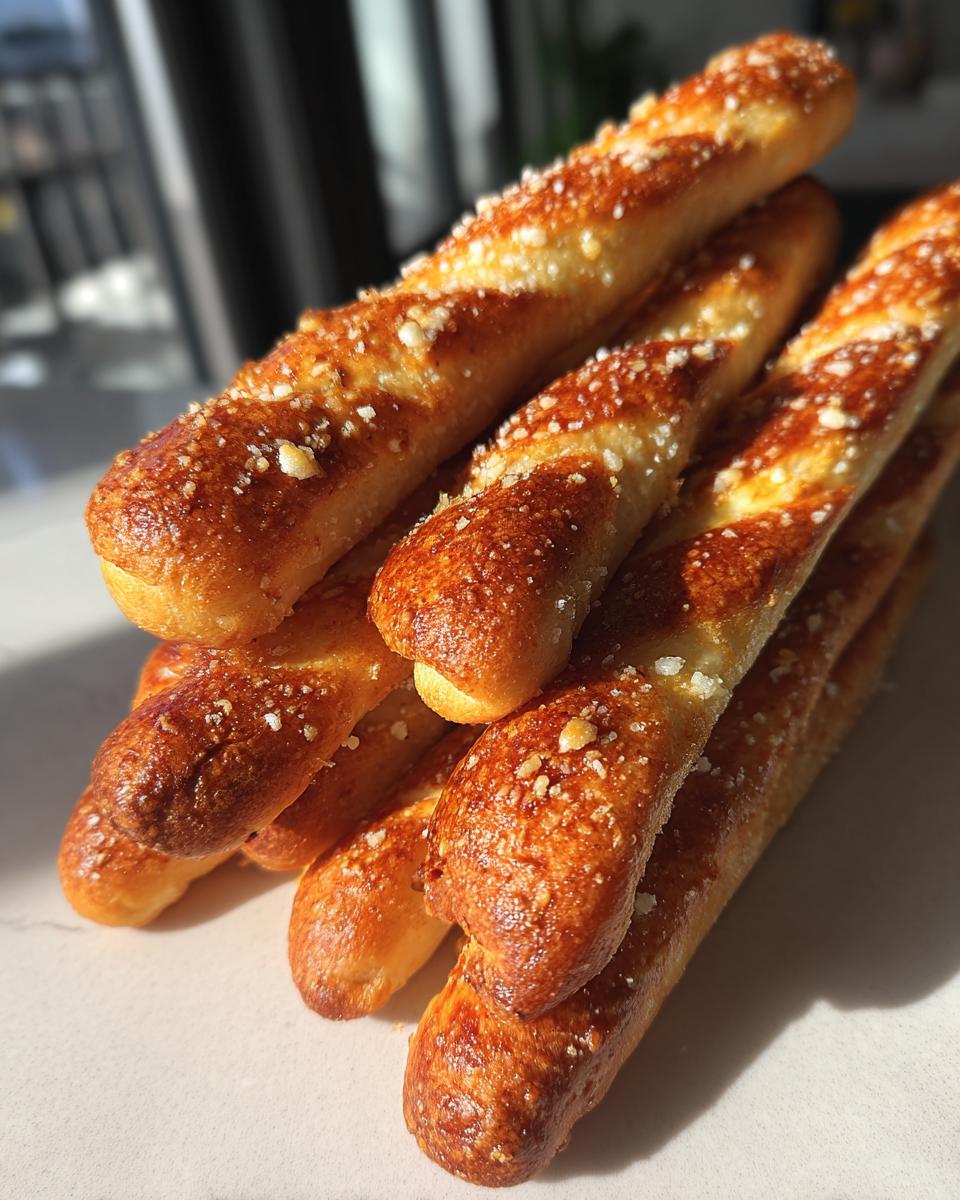
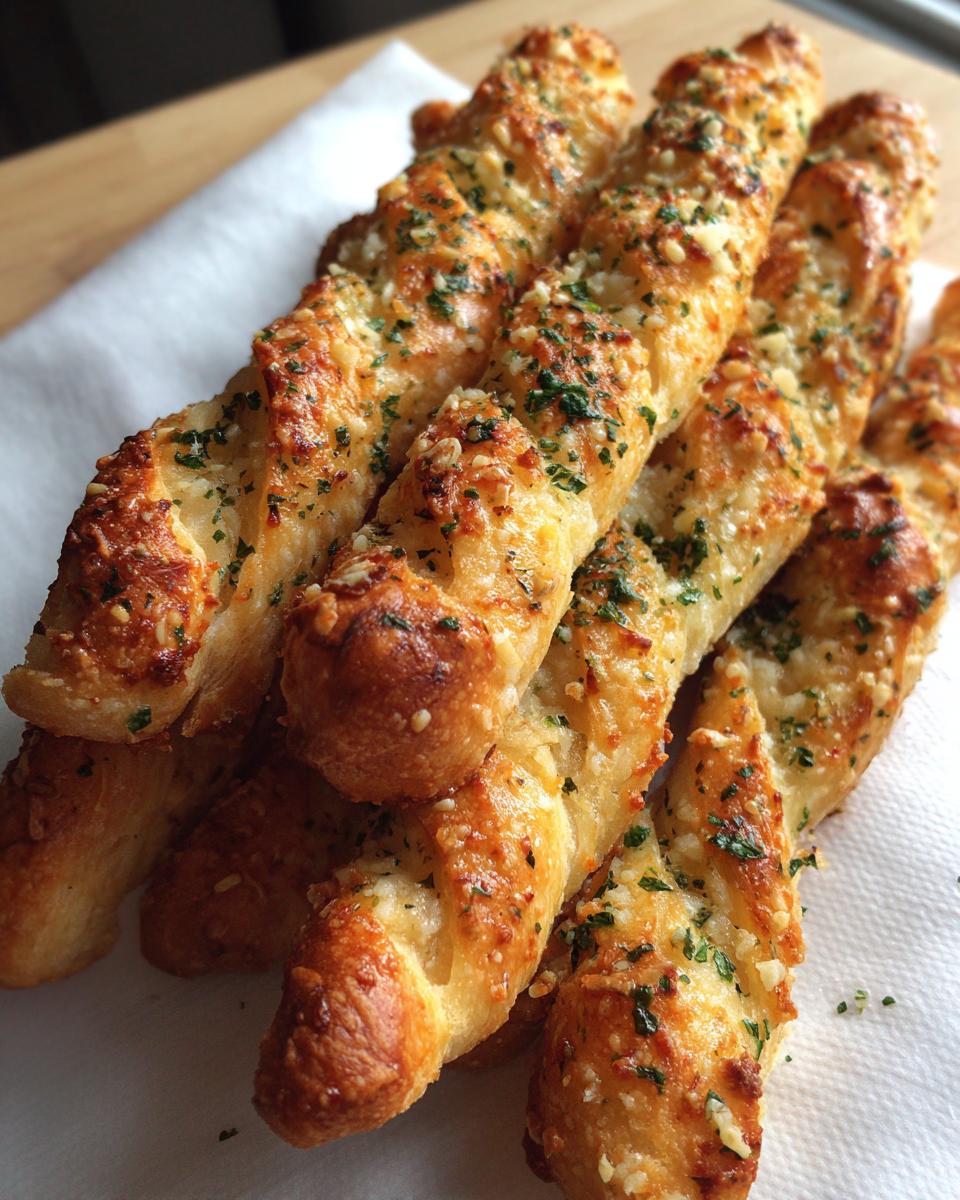
Honestly, the topping is where we win the competition. Plain breadsticks are nice, but these get coated in the perfect mix that makes them true Garlic Breadsticks Recipe stars. It’s a simple ratio of the freshest minced garlic mixed right into melted butter with some Italian herbs. It hits them immediately after they come out of the heat, so the butter soaks in, and the Parmesan melts perfectly onto the surface. That rich, savory coating is what makes these Buttery Breadsticks unforgettable.

Gathering Ingredients for Your Homemade Breadsticks Recipe
Before we get into the fun part—the kneading—we need to assemble our players. Using good stuff here is how we lock in that superior Homemade Breadsticks Recipe flavor that knocks the socks off anything store-bought. I know recipes can sometimes look like complicated shopping lists, but I promise, these are simple pantry staples. Once you see them all laid out, you’ll feel totally ready to tackle this dough. It’s all about clarity here!
We are breaking the ingredients down into two main groups: what makes the dough rise and what makes the topping amazing. If you’re ready for some serious flavor action later, you might also want to check out my garlic parmesan mashed potatoes recipe to serve alongside these!
Dough Components Clarity
The dough is where we set ourselves up for that famous soft texture. See how specific I am about the water? You absolutely must heat your water to about 110°F. Too cold and your active dry yeast won’t wake up, and too hot and you kill it! Besides the water and 2 1/4 teaspoons of yeast, you need 2 tablespoons of sugar to feed it, 4 cups of flour, 1 teaspoon of salt, and 1/4 cup of simple vegetable oil. That oil is key for keeping them tender!
Garlic Parmesan Butter Topping Ingredients
Time for the best part, right? This is where the restaurant magic happens. You will need half a cup (that’s one whole stick) of unsalted butter, melted until it’s golden but not browned. You must use freshly minced garlic—none of that jarred stuff for this flavor bomb! We combine that with 1 teaspoon of Italian seasoning. Finally, for that beautiful, salty crust, grab half a cup of finely grated Parmesan cheese. It needs to be freshly grated so it melts evenly over your warm breadsticks instead of clumping up.
Step-by-Step Instructions for Easy Homemade Breadsticks
Alright, now for the part where we turn flour and yeast into absolute edible gold! Follow these steps closely and you’ll have the crunchiest edges and softest centers imaginable. This whole process, from mixing to pulling them out of the oven, takes us about an hour and a half—total time clocks in around 1 hour 32 minutes—but trust me, the wait is worth it for these Easy Homemade Breadsticks.
If you need a refresher on making dough from scratch, I have a super detailed guide on homemade pizza crust that uses similar techniques. Use that intuition you build there!
Activating the Yeast and Mixing the Dough
First things first: we need sleepy yeast to wake up and get happy! Grab your large bowl and mix the 1 1/2 cups of warm water (remember, 110°F—test it first!) with the 2 tablespoons of sugar and your 2 1/4 teaspoons of active dry yeast. Just stir it gently and leave it alone for about 5 to 10 minutes. If you don’t see foam bubbling up on top, your yeast is dead, and you need to start that part over. No foam, no fluff!
Once you have your foam party going, start adding the dry stuff. Dump in the 4 cups of flour and 1 teaspoon of salt, followed by the 1/4 cup of vegetable oil. Mix it up until it looks kinda shaggy. Now, turn that shaggy mess onto a floured counter. You gotta knead, knead, knead for a solid 5 to 7 minutes until it’s smooth. Pop it into an oiled bowl, flip it over so it’s coated, cover that bowl with plastic wrap or a clean towel, and stick it somewhere warm. You need this dough to chill out and rise until it’s doubled—plan for 45 to 60 minutes.
Shaping and Baking Your Breadsticks
While your dough is taking its big nap, preheat that oven to 400°F (200°C). Line a big baking sheet with parchment paper; this really helps prevent sticking, which is our enemy when dealing with stretchy dough.
When the dough has doubled, you punch it down gently—that’s the fun part! Now, divide that dough into exactly 16 even pieces. Don’t eyeball this too much if you want them uniform! Stretch each piece out into a long, skinny strip, aiming for about 10 to 12 inches long. Lay them onto your prepared sheet, making sure they have a little room to breathe alongside their friends. Bake them for just 10 to 12 minutes. You aren’t looking for dark brown; just light golden edges are perfect.

Applying the Signature Buttery Breadsticks Finish
This step has to happen the *second* they come out of the oven. Have your garlic butter mixture ready to go! Melt that half cup of butter and stir in your minced garlic and Italian seasoning. As soon as those hot breadsticks hit the counter, grab a pastry brush (or even a spoon in a pinch!) and brush every single surface generously with that glorious garlic butter. Seriously, coat them!
Right after the butter bath, immediately sprinkle that grated Parmesan cheese all over everything. The residual heat melts the cheese slightly and helps hold the flavor right there on top. This is the finisher! You can see how they do it over at Savory by Lily, but trust me, doing it right off the heat seals in the flavor profile of these incredible Buttery Breadsticks.
Expert Tips for the Best Homemade Breadsticks
Okay, now that you’ve mastered the basic technique for these Best Homemade Breadsticks, let’s talk about leveling up. Getting that restaurant quality isn’t just about following directions; it’s about sneaking in those little flavor boosters that chefs do. This whole process is an amazing, simple introduction to mastering a basic Yeast Bread Recipe, and these tips make it even better.
If you are looking for inspiration on other things you can bake like this, check out my tips on achieving flaky perfection with my buttermilk biscuit guide.
Boosting Flavor in the Breadstick Dough
This is my biggest little secret for taking these past “good” to “OMG what is in this?” Before you even start mixing the wet and dry ingredients in Step 2, toss an extra 1/2 teaspoon of garlic powder right into your flour and salt mixture. It won’t be overpowering since it’s uncooked, but it permeates the whole dough as it rises. When you bake them, that subtle garlic note deepens, adding a layer of flavor that the surface topping can’t duplicate alone. It’s subtle, but it’s huge!
Making Cheesy Breadsticks Variations
When I’m making these for a football party, the standard garlic Parmesan just isn’t enough; we need upgrades! If you want to turn these into fantastic Cheesy Breadsticks, it’s super easy. You just have to time it right. Once your breadsticks are in the oven, wait until they have about two minutes left on the cook time. Pull them out, quickly sprinkle over some shredded mozzarella, and pop them back in until the cheese just melts and starts to bubble. Then, take them out and proceed with the regular garlic butter slathering. Genius, right?
For a deeper dive on flavor ideas, you must see how Kristine’s Kitchen tops theirs—it’s a good comparison point!
Serving Suggestions for Your Parmesan Breadsticks
These Parmesan Breadsticks are so versatile they practically belong on every single dinner menu you create. Of course, they are the ultimate movie night snack, perfect for grabbing right out of the basket! But the real fun starts when you think about serving them up as Appetizer Breadsticks alongside something saucy.
Because these are savory, garlicky, and rich, they cry out for something bright or creamy to dip into. Seriously, you can’t go wrong keeping it classic with a good bowl of thick marinara sauce. If you’re feeling fancy—maybe pasta night features a rich Alfredo, or perhaps you’re having chicken souvlaki for dinner—these breadsticks soak up that goodness like little flavor sponges.
I once tossed some extra ones on a platter with some fresh veggies and hummus, and they disappeared first! If you’re looking for a really unique dip that cuts through the richness of all that butter and Parmesan, I highly recommend whipping up my homemade tzatziki sauce. It’s cool, tangy, and a surprisingly fantastic partner for these warm breadsticks.
Storing and Reheating Your Soft Breadsticks
Let’s be honest, the biggest tragedy in any batch of homemade breadsticks is when they get hard the next day. I totally get it; you want that same soft, fluffy experience for lunch the next day, right? Since we built this recipe from the ground up to be tender, we need to treat the leftovers right so they live up to that reputation. Keeping that soft texture means treating them gently!
The absolute best way to save them is simple airtight storage. Once they are completely cool—and I mean totally cooled down, or you’ll end up with sad, soggy breadsticks—tuck them into a zipper-top bag or a sealed container. They keep really well at room temperature for about two days. They don’t need the fridge, which can sometimes dry out yeast breads faster, believe it or not.
When you are ready to eat them again, the oven is your best friend. Forget the microwave unless you enjoy eating crunchy rubber bands! To bring that buttery softness back, wrap just a few breadsticks loosely in aluminum foil. Pop that foil packet into an oven that’s already heated to about 300°F (150°C). Give them about 8 to 10 minutes. The foil traps the residual moisture and that buttery seasoning while gently warming them through. They come out nearly perfect!
If you’re drowning in leftovers and need a fun way to use them up, try cutting them into chunks and tossing them into a big pot of my easy chili recipe! They soak up the broth beautifully and don’t get too stiff. It’s a fantastic way to salvage any that might have dried out a little too much, though mine rarely last that long!
Frequently Asked Questions About Copycat Restaurant Breadsticks
Even though I’ve tried to translate every tricky bit about achieving those perfect Olive Garden Breadsticks Copycat flavors, I know questions still pop up. That’s totally normal when you’re working with a yeast dough for the first time!
We want you to feel totally comfortable making these any night of the week, so here are the things I get asked most often about skipping steps or swapping ingredients in this recipe. If you’re looking for more quick meals, you can always browse through my list of easy weeknight dinners!
Can I make these breadsticks faster than the listed time?
I get this one all the time, especially when someone is hoping for true Quick Breadstick Recipe success. The rise time in Step 3 (45 to 60 minutes until doubled) is essential for getting that light, airy interior. If you skip it, they are going to be dense disks, not fluffy breadsticks! However, you can speed up the yeast activation process by making sure your water is definitely on the warmer side—around 115°F—and by increasing the sugar slightly. That gives the yeast a quick jump start. If you want to see a recipe that promises 1-hour results, check out this breakdown here, but know that my method guarantees a better texture!
What is the best dipping sauce for these breadsticks?
Oh, the dipping sauce is almost as important as the breadsticks themselves! For an authentic experience, nothing beats a classic, robust marinara that’s slightly warmed up. But if you’re serving these on a night where you’ve made something creamy, like chicken alfredo, use a scoop of that sauce! Since I don’t have a fully dedicated sauce post yet, I’ll just say that any good creamy option works. My own recipe for a cooling tzatziki dip is actually a wild but excellent pairing if you need a fresh counterpoint to all that garlic butter.
Can I use instant yeast instead of active dry yeast for these breadsticks?
Yes, absolutely! That’s a great shortcut to know. The main difference is that active dry yeast needs that warm water bath (the proofing step) to make sure it’s alive before you add the flour. Instant yeast, though, is ready to go! If you swap it out, skip Step 1 entirely. Just combine your instant yeast right in with the flour, salt, and sugar when you get to Step 2. Mix it all together dry, then add your wet ingredients. It cuts down time slightly, though you still need that full rise time for the dough development.
Nutritional Estimates for These Breadsticks
I always include the numbers because, hey, knowledge is power! But I want to be super clear upfront: these are estimates. Remember, the exact amount of garlic, the brand of flour you use, and how generously you glob on that Parmesan topping can all shift things significantly. These numbers are calculated based on dividing the entire recipe yield (16 breadsticks) into 16 equal servings.
Think of this more as a guideline than a strict measurement when you’re sitting down with a basket of these warm beauties. We cook for joy here, not spreadsheets! But for those who like to keep track, here’s what you can generally expect from one of these amazing, buttery bites:
- Calories: About 180 per breadstick
- Total Fat: Roughly 7g (with about 4g coming from Saturated Fat)
- Carbohydrates: Around 26g
- Protein: About 4g
- Sodium: Pretty standard for a savory side, around 250mg
Since we are using real butter and a good amount of Parmesan cheese, the fat content is what contributes the most to that incredible, soft texture and flavor—it’s worth every single bit! Enjoying these fresh from the oven is the best way to consume them, but knowing the baseline data for your Parmesan Breadsticks helps you budget for the next time you serve them as an appetizer!
Share Your Homemade Breadsticks Success
That’s it! You’ve managed the rise, you’ve kneaded the dough, and the smell of cheesy, garlicky goodness is filling your house. It’s moments like this when I really feel like we’ve translated the lingo successfully! Making great food should be shared, not kept secret.
So now that you’ve pulled that first glorious batch of breadsticks out of the oven, I want to know everything! Did you get that perfect stretch? Did the kids devour them before you could even get the salad dressed? Don’t be shy!
Please, please leave me a comment below telling me how your batch turned out. Rate this recipe so other cooks know they can trust this translation. If you snap a picture of your buttery, cheesy masterpiece, tag me on social media! Showing off your success is the best part of teaching this language. If you ever have questions, or maybe you’ve discovered a genius dipping sauce I need to try—seriously, tell me everything—use that contact form right here to reach out. Happy dipping!
PrintSoft Copycat Breadsticks with Garlic Parmesan Butter

Make soft, fluffy breadsticks at home that taste like your favorite restaurant version, topped with a rich garlic parmesan butter sauce.
- Prep Time: 20 min
- Cook Time: 12 min
- Total Time: 1 hour 32 min
- Yield: 16 breadsticks 1x
- Category: Appetizer
- Method: Baking
- Cuisine: American
- Diet: Vegetarian
Ingredients
- 1 1/2 cups warm water (110°F)
- 2 1/4 teaspoons active dry yeast
- 2 tablespoons granulated sugar
- 4 cups all-purpose flour
- 1 teaspoon salt
- 1/4 cup vegetable oil
- 1/2 cup (1 stick) unsalted butter, melted
- 4 cloves garlic, minced
- 1 teaspoon dried Italian seasoning
- 1/2 cup grated Parmesan cheese
Instructions
- Combine the warm water, yeast, and sugar in a large bowl. Let this stand for 5 to 10 minutes until the mixture becomes foamy. This shows the yeast is active.
- Add the flour, salt, and vegetable oil to the yeast mixture. Mix until a shaggy dough forms, then turn it out onto a lightly floured surface.
- Knead the dough for 5 to 7 minutes until it becomes smooth and elastic. Place the dough in a lightly oiled bowl, turning once to coat. Cover the bowl and let the dough rise in a warm place for 45 to 60 minutes, or until doubled in size.
- Preheat your oven to 400°F (200°C). Line a large baking sheet with parchment paper.
- Punch down the risen dough and divide it into 16 equal pieces. Roll each piece into a long, thin strip, about 10 to 12 inches long, resembling a breadstick. Place the breadsticks on the prepared baking sheet, leaving a small space between them.
- Bake for 10 to 12 minutes, or until the breadsticks are light golden brown.
- While the breadsticks bake, prepare the topping: In a small bowl, combine the melted butter, minced garlic, and Italian seasoning.
- As soon as the breadsticks come out of the oven, brush them generously with the garlic butter mixture.
- Immediately sprinkle the grated Parmesan cheese over the buttered breadsticks. Serve warm.
Notes
- For extra flavor, add a pinch of garlic powder to the dough before the first rise.
- If you want cheesy breadsticks, sprinkle mozzarella cheese over the tops during the last 2 minutes of baking, then add the garlic butter after they come out.
- Serve these breadsticks with marinara sauce or Alfredo sauce for dipping.
Nutrition
- Serving Size: 1 breadstick
- Calories: 180
- Sugar: 1
- Sodium: 250
- Fat: 7
- Saturated Fat: 4
- Unsaturated Fat: 3
- Trans Fat: 0
- Carbohydrates: 26
- Fiber: 1
- Protein: 4
- Cholesterol: 15