
You know those times when you crave something truly decadent, like a perfect slice of cheesecake, but the thought of hauling out a springform pan and crossing your fingers about cracks just ruins the mood? Me too! That’s exactly why I love baking these mini cheesecake gems in a standard muffin tin. Forget the fuss; these Bite Sized Cheesecake Bites are my go-to Weekend Baking Treats because they handle themselves!
Here at Kitchen Slang, we don’t believe in secret chef language keeping you from amazing desserts. We translate the pro techniques—making sure your filling stays smooth and never turns into scrambled eggs—into simple steps you can nail every time. This is the core of what Zoe Thompson built our site on: turning pro knowledge into home cooking confidence. Trust me, making perfect, Creamy Mini Cheesecakes for a small crowd or a huge party platter is easier than you think! If you want to know more about our mission, check out our About Page.
- Why This Easy Mini Cheesecake Recipe Works for Everyone
- Ingredients for Your Classic Mini Cheesecake
- Step-by-Step Instructions for Simple Cheesecake Cupcakes
- Making New York Style Mini Cheesecakes Variations
- Topping Your mini cheesecake Bites for Parties
- Make Ahead Desserts: Storing Your mini cheesecake Portions
- Troubleshooting Common mini cheesecake Issues
- Frequently Asked Questions About mini cheesecake Bites
- Next Steps for Your Weekend Baking Treats
Why This Easy Mini Cheesecake Recipe Works for Everyone
Listen, I’m all about making things look impressive without spending three days in the kitchen. That’s why these little guys are my obsession! They hit that sweet spot between being a quick cleanup and feeling totally gourmet. If you’re hosting a shower, a game night, or just want an Individual Cheesecake Dessert that isn’t gigantic, these fit the bill perfectly.
They are built for entertaining. You just pull them off the platter, and bam! No slicing required. These shine as Party Platter Desserts because they look fantastic lined up, ready to go. Seriously, if you have a small crowd or just can’t trust yourself near a full-sized cheesecake (I see you!), these are lifesavers. I love being able to just whip up 12 without committing to a huge bake, which is why I put together a whole list of my favorite fast recipes.
Perfect Portion Control Sweets
The muffin tin handles the hard work for us. You’re not messing with measuring slices; every single treat is exactly the same size. This makes counting them way easier for a party, and you never have to worry about one person getting a giant edge piece while someone else lucks out with the center. It’s equality in dessert form!
Achieving Creamy Mini Cheesecakes Every Time
The difference between good cheesecake and *wow* cheesecake is texture. My secret from the professional kitchens? Room-temperature ingredients. Seriously, don’t try to rush the cream cheese! When it’s softly pliable, it creams up beautifully, which is the first step to getting those wonderfully Creamy Mini Cheesecakes. We mix gently once the eggs go in—you don’t want air bubbles messing up the top—and that simple translation from pro technique keeps them smooth every time.

Ingredients for Your Classic Mini Cheesecake
When it comes to baking something this good, you can’t mess around with the quality! Thankfully, the list for these tasty treats is super straightforward—nothing weird or hard to find, I promise. We keep the ingredients grouped so you can easily see what’s going into the base versus the creamy part. You’ll be surprised how few things you need to grab from the pantry to pull off dessert perfection.
I always pull my cream cheese out about two hours before I plan to mix. Cold ingredients are the enemy of a smooth result! When you check out this list, you’ll see we stick to the classics that make these the best. If you’re looking for other reliable classics, I just posted my thoughts on the No Bake Pumpkin Cheesecake.
For the Graham Cracker Crust Desserts Base
- 1 1/2 cups graham cracker crumbs (make sure they are fine crumbs!)
- 1/4 cup granulated sugar
- 6 tablespoons unsalted butter, melted (don’t use less, trust me on the butter!)
For the Rich Filling of Your mini cheesecake
- 16 ounces cream cheese, softened (must be room temperature!)
- 3/4 cup granulated sugar
- 2 large eggs (these need to be room temperature too!)
- 1 teaspoon vanilla extract
Step-by-Step Instructions for Simple Cheesecake Cupcakes
Alright, let’s get baking! This is where the magic happens, and I promise, if you follow the technique points, you’ll skip all the drama that usually comes with baking cheesecake. We’re aiming for super smooth Simple Cheesecake Cupcakes without any fuss. Remember how I said those room-temp ingredients were important? They pay off right here!
Preparing the Crust and Oven Setup for your mini cheesecake
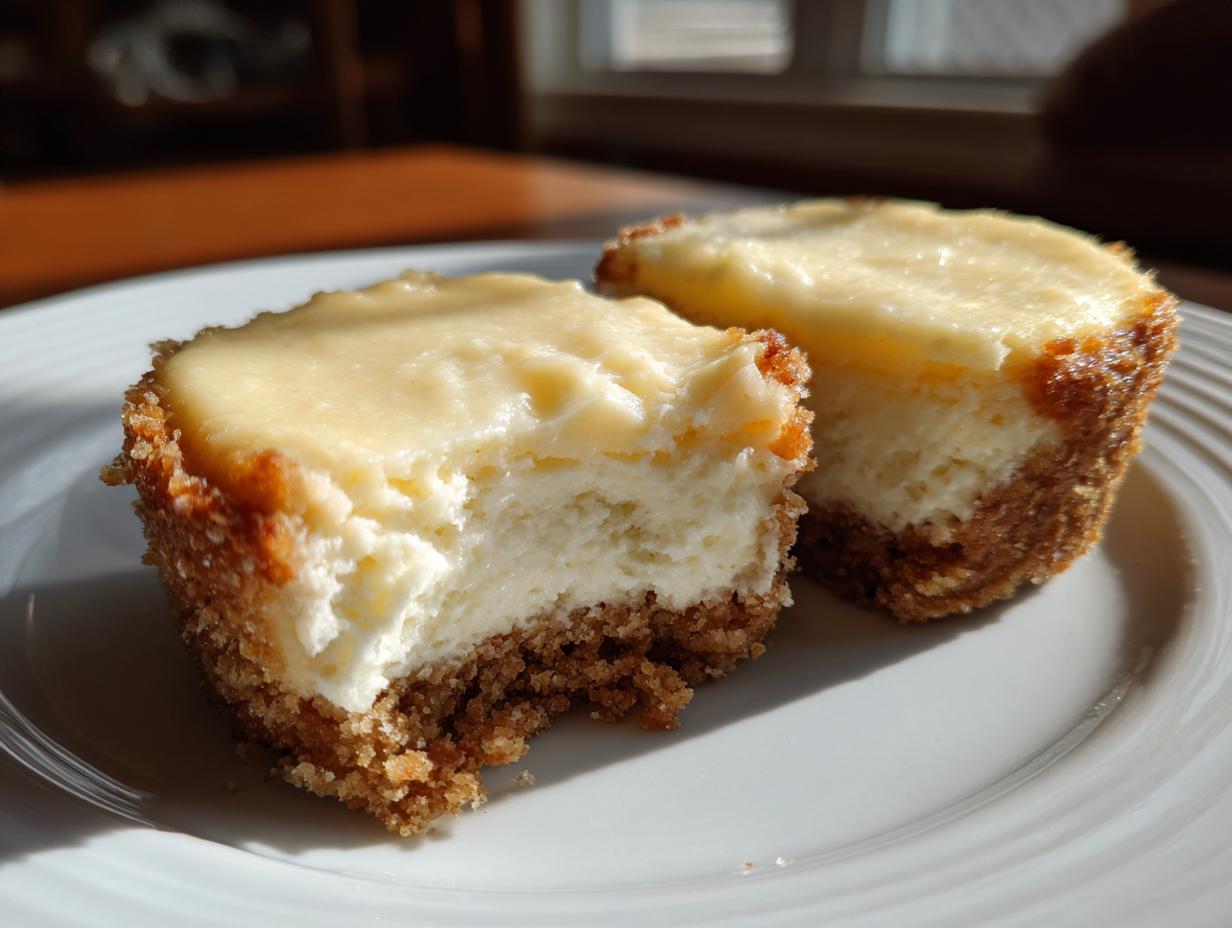
First things first, crank that oven up to 325°F (160°C). Grab that 12-cup muffin tin and make sure you line every cup with a paper liner—this is your secret weapon for easy removal later; trust me, you don’t want sticky sides!
In a small bowl, mix up your graham cracker crumbs, that little bit of sugar, and the melted butter. You want it to look like wet sand—evenly moistened. Then, take about a tablespoon of that mixture and press it *firmly* into the bottom of each paper liner. Firm pressure is key here so your mini cheesecake bases don’t crumble when you pull them out.
Mixing the Creamy Mini Cheesecakes Filling
Take your softened cream cheese and beat it on its own until it’s absolutely velvety smooth. No lumps allowed! Now add the 3/4 cup of sugar and combine those. This is serious: when you add the two eggs, go in one at a time, mixing only until they just disappear. If you start whipping air into this batter, you’ll get cracks later. Stop mixing once the eggs are incorporated, then give it one quick stir with a spoon for the vanilla extract.
Baking and Essential Cooling for Perfect mini cheesecake Tops
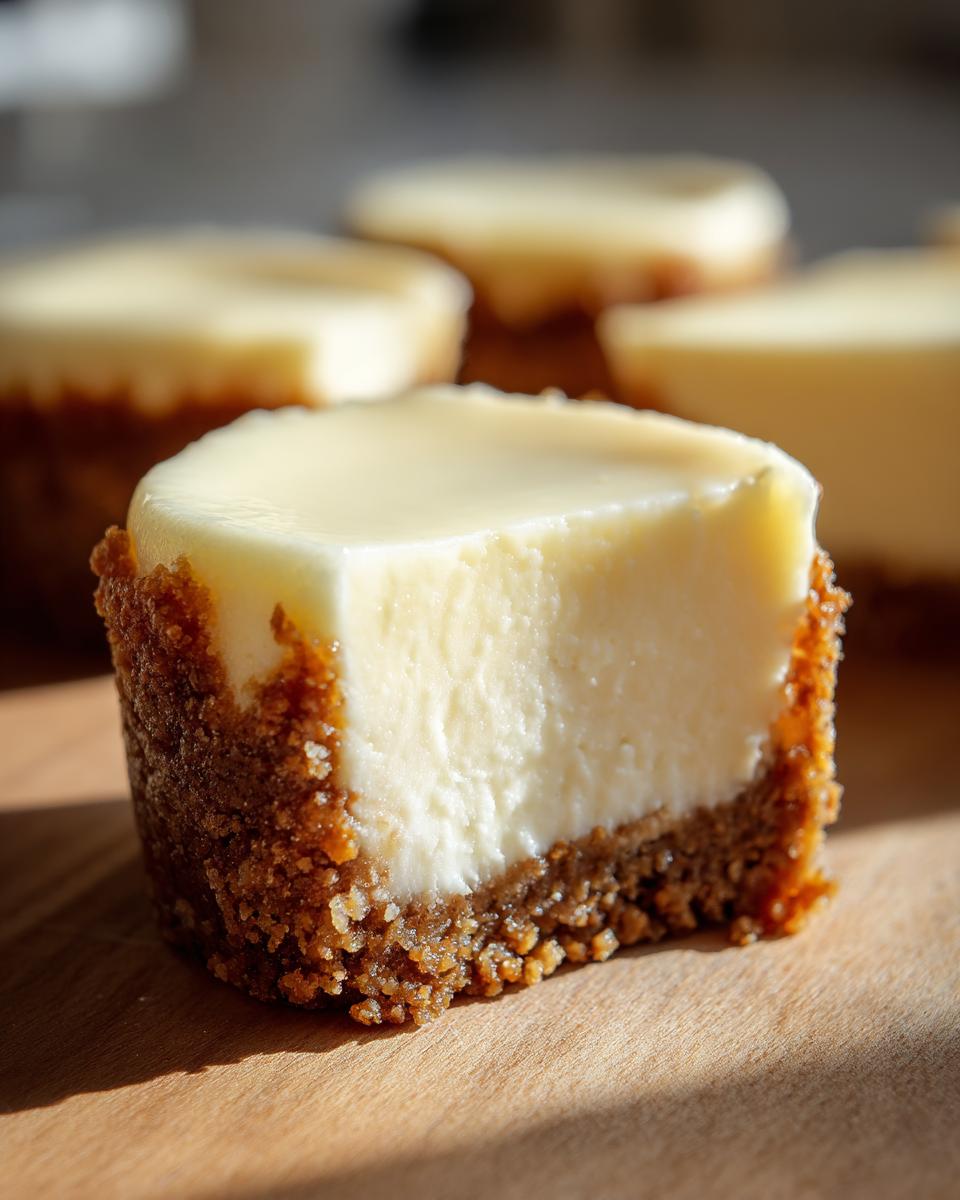
Spoon that beautiful batter over your crusts—fill them about three-quarters of the way up. We’re baking these for about 18 to 20 minutes. You’ll know they’re done when the edges look set, but the center still has that little wiggle, that classic sign of doneness for a creamy mini cheesecake.

Here is the PRO move Zoe taught me to stop cracking: Turn the oven OFF. Crack the door open just a little crack, and let them sit in that residual heat for thirty minutes. Seriously, don’t skip that step! After that gentle warm-down, take them out, let them fully cool on the counter, and then they must chill for at least 4 hours, but overnight is way better. Don’t forget to check out more easy recipes while they chill!
Making New York Style Mini Cheesecakes Variations
So you want that super dense, tangy bite you usually only get from the big city? I’ve got good news! You don’t need a whole new recipe to turn these into New York Style Mini Cheesecakes. It’s actually such a small change, like adding an extra secret ingredient to your spice rack!
The trick is just a little extra richness. If you look at the notes, you’ll see that adding just one extra tablespoon of heavy cream into the filling mixture—right when you’re mixing in the vanilla—changes everything. It gives the batter that signature velvety mouthfeel that screams New York. It makes your finished mini cheesecake just that much more decadent and luxurious.
It’s easy to see why people love this style, and you can read more about the classic take on this flavor profile over at this link. If you’ve got pumpkin spice on your mind instead of that tangy zip, I also broke down my favorite pumpkin cheesecake recipe!
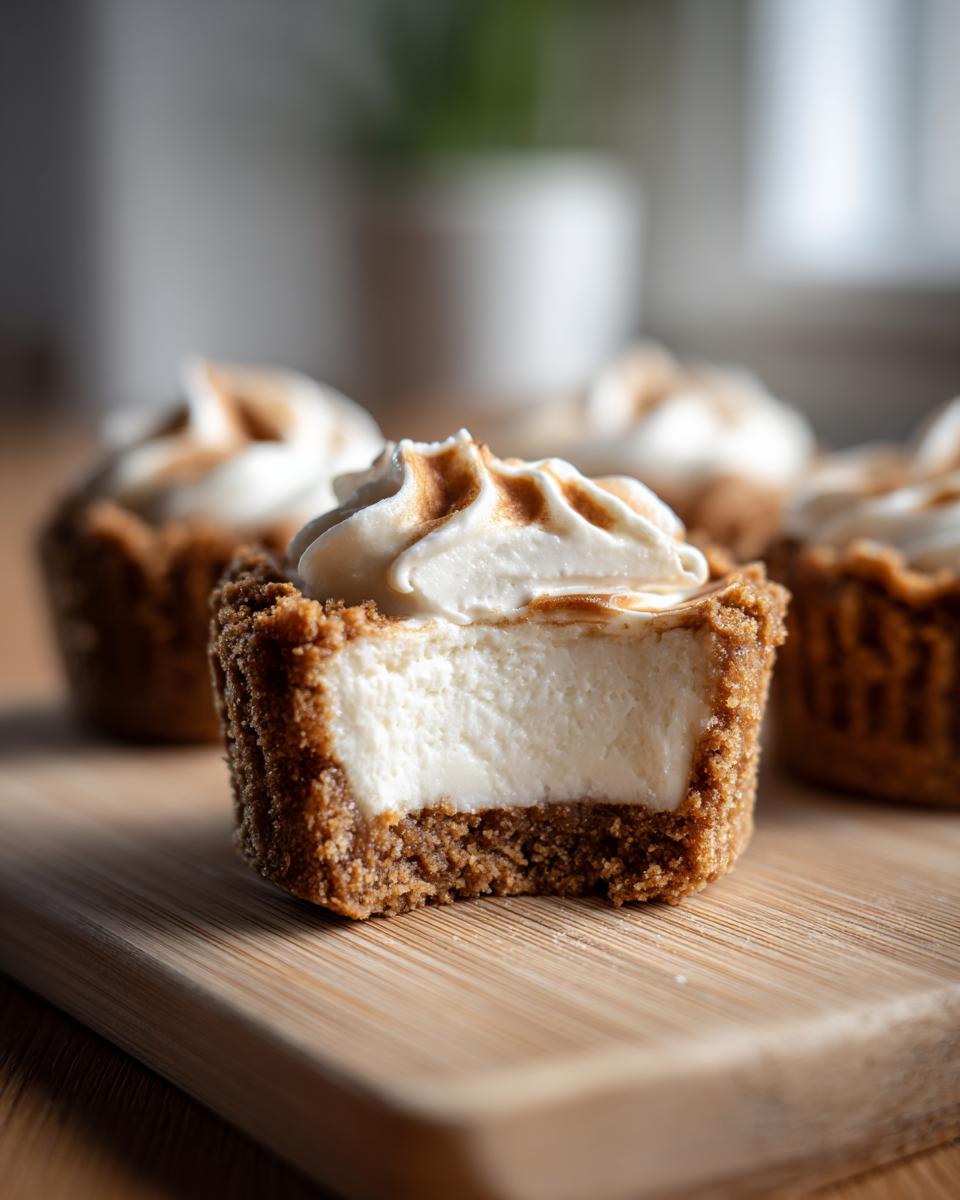
Topping Your mini cheesecake Bites for Parties
Okay, so you’ve mastered the bake and the chill—now for the fun part! These little guys are practically begging for some flair on top. Half the joy of having individual cheesecake dessert portions is that you can tailor the toppings to whoever is eating them! It turns a simple bake into a feast of customizable Decadent Bite Sized Desserts that look amazing on any serving tray.
Honestly, I often just keep a couple of toppings ready in the fridge for impromptu dessert nights. It’s such an easy way to elevate something that was already delicious to begin with. It makes your mini cheesecake platter look like you spent way more time on it than you actually did, and who doesn’t love that? If you’re looking for savory bites to balance out all this sweetness, I have a killer recipe for Jalapeño Popper Dip!
Simple Cheesecake with Fruit Toppings
When I want something bright and fresh—especially in the summer—you can’t beat fruit. Forget making a complicated jam; just grab some fresh raspberries or blueberries and give them a quick toss with a drizzle of maple syrup and maybe a tiny squeeze of lemon juice. It’s instant elegance! This creates perfect Cheesecake with Fruit Toppings that cuts right through the richness of the cheese filling. They look so bright!
Decadent Bite Sized Desserts: Caramel and Chocolate Drizzles
If you’re feeling extra indulgent, go for the sauces. This is where you absolutely should use store-bought if you’re running short on time. A good quality salted caramel sauce drizzled over the top of a chilled mini cheesecake? Forget about it. It’s total heaven.
You can dip the very tops into chocolate ganache you just warmed up, or drizzle it artfully across the plate. Seriously, if you want an impressive dessert lineup for your next party, check out the wild topping ideas people have come up with over at this link. It totally inspires my next baking session!
Make Ahead Desserts: Storing Your mini cheesecake Portions
One of the best things about baking these in a muffin tin is that they are truly fantastic Make Ahead Desserts. Life gets busy, right? So being able to whip up a batch of mini cheesecake bites on a quiet Sunday and have them ready for a party on Friday is just smart cooking!
For short-term storage—say, up to four days—just keep them covered tightly in the fridge. Putting a sheet of plastic wrap directly over the tops helps keep that creamy texture nice and fresh. If you plan on freezing them for a special occasion later, that’s super easy too. Make sure they are completely chilled first, then freeze them right in the paper liners on a flat tray. Once they are totally frozen, you can move them into a freezer-safe airtight container. You can find tons of other great make ahead ideas on our dedicated section!
They thaw out really nicely in the fridge overnight. I always forget to pull them out with enough time, so plan for that morning chill if you need them for that evening!
Troubleshooting Common mini cheesecake Issues
Look, even the best bakers have days where the dessert doesn’t cooperate. That’s part of the fun! When you’re making something delicate like these little guys, sometimes the oven temperature or your mixing speed throws things off. But don’t panic or throw them out! Almost every texture issue has a simple, fixable answer. I learned all these tricks I the hard way, usually by ruining one batch, so you don’t have to!
Why Did My Cheesecake Tops Crack?
This is the number one drama in the cheesecake world, right? The main reason those beautiful tops split open is usually a temperature shock. It means the outside set much faster than the inside, so when it cools, it tears because it’s shrinking unevenly. You’ve got to remember that slow cooling tip I gave you? It’s crucial for this step, so let them sit in that cracked-open, turned-off oven for a good half hour.
Also, check back on your mixing: if you beat the eggs too much, you whipped air in there. When that trapped air tries to escape during baking, it forces the top layer to crack open. Next time, just mix the eggs in gently until they vanish. That’s it!
Addressing Weeping or Watery Filling
Ugh, weeping. It’s when little beads of water or oil form on top or around the sides, making everything look sweaty. For these Individual Cheesecake Dessert portions, this usually happens for one of two reasons. First, sometimes the cream cheese wasn’t quite softened enough, so it didn’t incorporate the fats and liquids properly.
The second reason is often humidity or a rushed chill. If your kitchen was super steamy while you baked, that moisture gets trapped. More importantly, if you pull them out of the oven and pop them straight into the fridge without letting them come to room temperature first, it can shock the filling and cause that liquid separation. Patience saves the day here!
Frequently Asked Questions About mini cheesecake Bites
I always get a ton of similar questions once people start baking these, which tells me exactly what you all need help with! It’s good to ask, because tackling these small sticking points makes the whole process stress-free. While this recipe is designed to be foolproof, sometimes you just need that extra bit of reassurance.
If you have questions while you’re actually cooking, I cover tons of quick fixes in my guide to easy weeknight scenarios, because often the solutions look similar if you’re dealing with timing issues!
Can I make a No Bake Cheesecake Cups version of this mini cheesecake?
That’s a great question! This particular recipe, with the eggs and the baking process, is designed to give you that rich, dense, almost New York style texture that I love. It absolutely requires the oven to set up properly. If you are dead set on skipping the oven—maybe it’s 100 degrees outside—you would need an entirely different recipe that relies on a stabilizer like gelatin or heavy whipping cream that gets whipped stiff. Those No Bake Cheesecake Cups are wonderful, but they have a completely different, fluffier texture than what you get from baking these mini cheesecake treats.
What is the best way to serve this Individual Cheesecake Dessert?
The beauty of the muffin tin method is that you have presentation options! For casual snacking at home, just serve them right in the paper liner—it’s easy and keeps your hands clean. But for a real showstopper at a party, carefully peel the paper liner away once they are fully chilled. They hold their shape beautifully when cold!
Line them up close together on a pretty platter, maybe a slate board or a white tiered stand, and then bring out those toppings we talked about! Serving them straight from the fridge ensures you get that firm, luxurious bite that makes the Individual Cheesecake Dessert so satisfying. They look way more professional than a full-sized slice, I promise!
Next Steps for Your Weekend Baking Treats
Whew, we made it! Now that you have this super simple blueprint for perfect little mini cheesecake portions, it’s time to put them to the test. I truly want to know how they turned out for you. Did the crush stay crisp? Did you manage to keep your hands off them until they were fully chilled? I always get so excited to hear what you all come up with.
Please jump down into the comments right below this and tell me what topping combination you tried! Were you all about the fresh berries, or did you dive right into the salted caramel? Hearing what toppings you choose for your Weekend Baking Treats is half the fun for me.
If you found this recipe saved your dessert game, give it a quick rating five stars if you’re feeling generous! And if you’re already planning your next baking adventure, I just shared my recipe for a stunning Easy Apple Crumble that uses a similar mix of easy creaming and simple assembly. Happy baking, everyone!
PrintEasy Muffin Tin Mini Cheesecakes

Make creamy, bite-sized cheesecakes using a standard muffin tin. This recipe provides a simple graham cracker crust and a rich filling, perfect for parties or small desserts.
- Prep Time: 20 min
- Cook Time: 20 min
- Total Time: 4 hours 40 min
- Yield: 12 servings 1x
- Category: Dessert
- Method: Baking
- Cuisine: American
- Diet: Vegetarian
Ingredients
- 1 1/2 cups graham cracker crumbs
- 1/4 cup granulated sugar (for crust)
- 6 tablespoons unsalted butter, melted
- 16 ounces cream cheese, softened
- 3/4 cup granulated sugar (for filling)
- 2 large eggs
- 1 teaspoon vanilla extract
Instructions
- Preheat your oven to 325°F (160°C). Line a 12-cup muffin tin with paper liners.
- Prepare the crust: In a small bowl, combine the graham cracker crumbs, 1/4 cup sugar, and melted butter. Mix until the crumbs are evenly moistened.
- Press about 1 tablespoon of the crumb mixture firmly into the bottom of each muffin liner.
- Prepare the filling: In a large bowl, beat the softened cream cheese with an electric mixer until smooth. Add the 3/4 cup sugar and beat until combined.
- Beat in the eggs one at a time, mixing just until incorporated after each addition. Stir in the vanilla extract. Do not overmix the batter.
- Spoon the cream cheese mixture evenly over the crusts, filling each liner about three-quarters full.
- Bake for 18 to 20 minutes, or until the edges are set and the centers are mostly firm but still slightly jiggly.
- Turn off the oven, crack the oven door open slightly, and let the cheesecakes cool inside the oven for 30 minutes. This prevents cracking.
- Remove the cheesecakes from the oven and let them cool completely on a wire rack.
- Chill the mini cheesecakes in the refrigerator for at least 4 hours, or preferably overnight, before topping and serving.
Notes
- For a New York Style flavor, add 1 tablespoon of heavy cream to the filling mixture.
- To prevent the tops from cracking, do not overbeat the batter once the eggs are added.
- Top with fresh berries, salted caramel sauce, or chocolate ganache before serving.
Nutrition
- Serving Size: 1 cheesecake
- Calories: 250
- Sugar: 18
- Sodium: 150
- Fat: 16
- Saturated Fat: 9
- Unsaturated Fat: 5
- Trans Fat: 0
- Carbohydrates: 22
- Fiber: 1
- Protein: 5
- Cholesterol: 55