

There is nothing—and I mean *nothing*—that beats the smell of fresh breakfast bread filling your kitchen on a lazy Saturday morning. Forget those sad, thin discs from the supermarket aisle; we are making the real deal today. I’m going to show you the secret to truly foolproof homemade english muffins. This is the easy, no-knead method that strips away all the professional fuss, translating that essential chef knowledge so you get those incredible, buttery nooks and crannies every single time. Trust me, once you master this simple stovetop technique, you’re never going back. This is cooking that feels like joy, not like homework!
- Why This Is the Best English Muffin Recipe for Home Cooks
- Gathering Ingredients for Your Homemade English Muffins
- Step-by-Step Instructions: How To Make English Muffins
- The Final Step for Perfect Homemade English Muffins
- Tips for Success with Your Homemade English Muffins Recipe
- Serving Suggestions for Your Weekend Breakfast Recipes
- Storage and Reheating Instructions for Homemade English Muffins
- Frequently Asked Questions About Homemade English Muffins
- Share Your Homemade English Muffins Experience
Why This Is the Best English Muffin Recipe for Home Cooks
I know what you’re thinking: making bread from scratch is hard, right? Wrong! This is designed to be one of those best English muffin recipes because we skip the messy kneading entirely. It’s truly a no-knead situation—you just mix it up! Plus, we cook these on the skillet, which means you don’t need any special equipment like proofing boxes or commercial baking sheets. These are so much Better Than Store Bought Muffins because you control the texture to be perfectly soft and Fluffy English Muffins heaven. It’s beginner-friendly magic, I promise!
Achieving True Nooks and Crannies Muffins
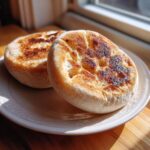
That holy grail texture—the nooks and crannies—isn’t a fluke; it’s physics! When you cook these muffins gently on a dry griddle, they rise upwards instead of spreading outwards. This creates those little tunnels inside. Here’s the professional translation for home cooks: You absolutely must slice them open with a fork afterward! Don’t grab a knife; a knife cuts off the internal structure. The fork teases those tunnels open brilliantly, ready to capture every drop of melted butter.

Gathering Ingredients for Your Homemade English Muffins
Okay, let’s talk supplies. The beauty of these Easy English Muffins From Scratch is that you probably have most of this stuff already sitting in your pantry. We are keeping it simple because that’s how the best things are made! Before we dive into the list, let’s manage expectations. This recipe yields about 10 to 12 muffins, and it takes about 20 minutes of actual hands-on prep. The whole process, including the rising and cooking, wraps up in just over two hours total. That’s pretty fast for making something this delicious!
- 1 cup warm milk (about 105-115°F)
- 2 1/4 teaspoons active dry yeast
- 1 tablespoon granulated sugar
- 3 cups all-purpose flour, plus more for dusting
- 1 teaspoon salt
- 1/4 cup unsalted butter, melted, plus more for greasing
- Cornmeal or semolina, for dusting
Ingredient Notes and Substitutions for Easy English Muffins From Scratch
A couple of quick translations here to make sure your yeast wakes up happy! Your milk *must* be warm, not hot. If it burns the yeast (over 120°F), you’ll get flat disks instead of fluffy muffins. Aim for that sweet spot between lukewarm and hot—think of a nice warm bath temperature. Also, pay attention to your dusting material. I use coarse semolina if I have it because it gives a great texture, but if you only have fine cornmeal, that totally works too! Don’t worry if it feels sticky—that’s what makes them so soft inside.
Step-by-Step Instructions: How To Make English Muffins
Alright, this is where the magic happens! Remember, we are translating professional baking into your kitchen, and the best part about these Easy Bread Recipes for Beginners is that we skip the kneading workout. We are focusing on technique over brute force here, especially when we get to those crucial Skillet English Muffins. Follow these steps carefully, and you’ll feel like a seasoned pro.
Mixing and First Rise for Fluffy English Muffins
First things first: wake up that yeast! Pour your warm milk into a big bowl—make sure it feels warm but not hot on your wrist—and sprinkle in the sugar and yeast. Give it a gentle stir and walk away. You need to see that foamy layer appear in about 5 to 10 minutes. If it doesn’t foam, your milk was too hot or the yeast died, so toss it and start over! Once foamy, toss in the melted butter, flour, and salt. We are only stirring this with a wooden spoon until it becomes one shaggy, sticky mass. I mean it: *do not knead this dough*. Cover that bowl up tight and find a cozy, warm spot—like near the stove or in a slightly warm oven that’s turned off. Let it hang out for a good hour to an hour and a half until it has doubled in size. It does the work for you!
Cutting and Second Rest for Homemade English Muffins
When the dough has puffed up nicely, it’s time to move it gently onto a surface you’ve dusted liberally with flour. We aren’t punching it down; we are being gentle here. Just pat or roll it out until it’s about 3/4 of an inch thick. Think rustic, not perfectly uniform! Now grab a 3-inch round cutter—a glass rim works great if you don’t have one. Cut out as many rounds as you can. You’ll get scraps, and that’s fine; just pat them gently back together and cut more. Now, this next step is super important for that signature texture: generously dust a clean baking sheet with lots of cornmeal or semolina. That’s what keeps them from sticking and gives them that classic base texture. Lay your cut rounds onto the cornmeal, cover them loosely, and give them a 30-minute rest. This second rest helps them puff up just before they hit the heat.

Cooking Homemade English Muffins on the Griddle
Time to cook! You need a large, heavy skillet or griddle, and remember this professional secret: heat management is everything for these Homemade English Muffins Recipe. Set your burner to medium-low. Seriously, low and slow is the mantra here. If the heat is up too high, you’ll burn the outside and the inside will stay raw and doughy. Once the skillet is warmed up (test with a tiny sprinkle of water—it should sizzle slowly), place your muffin rounds onto the dry pan. Do *not* crowd them! Cook them for 8 to 12 minutes per side. When you flip them, they should be golden brown. **Do not press down on them with your spatula!** Pressing them compacts the dough and crushes the air bubbles. That’s how you kill those lovely internal nooks.

The Final Step for Perfect Homemade English Muffins
Okay, your Homemade English Muffins are cooked, they look golden, and they smell amazing! Now, resist the urge to grab your sharpest knife to slice these babies in half for toasting. That’s rookie mistake number one. To unlock those beautiful internal tunnels that hold all the melted butter, you have to use a fork! Gently pierce the edges all the way around and use the fork tines to pull them apart slowly. This tearing action creates the signature, airy interior structure that makes these infinitely Better Than Store Bought Muffins. It’s the easiest trick to master for the best texture!
Tips for Success with Your Homemade English Muffins Recipe
Even though this is a no-knead recipe, there are a few insider pointers I’ve picked up over the years that guarantee you skip the frustration and go straight to success. These aren’t just steps; they’re the language of a successful baker that I want to share with you so you nail these Homemade English Muffins Recipe every single time.
Listen, the absolute most important thing I learned watching others try this? Don’t cheat the fork-splitting! I know it feels weird, but the pros—me included now, obviously—always split these open using a fork, never a knife. A knife slices, which crushes those perfect pockets we worked so hard to create. The fork actually shreds the interior just right, creating those open areas that soak up butter like, well, a sponge in glorious, melted butter. It might feel a little awkward at first, but trust me, that’s the secret handshake.
Here’s another game-changer, especially if you’re planning a big Make Ahead Breakfast. If you find yourself too busy for the full rise time but still want warm muffins in the morning, you can totally do a slow, cold proof! After you mix that shaggy dough in Step Two, just pop the covered bowl right into the fridge instead of a warm spot. Let it chill overnight, maybe 10 to 14 hours. The yeast works super slowly in the cold. When you pull it out the next day, let it warm up on the counter for an hour before you pat it out and cook it. It develops a deeper, richer flavor too!

And finally, remember what I said about heat? Low and slow is the only way for your homemade english muffins to cook through properly. If your skillet seems too hot, pull it off the burner for a minute or two between batches to let the temperature settle back down. We are looking for patience here, not speed; slow cooking ensures the soft, fluffy inside without burning that beautiful golden exterior.
Serving Suggestions for Your Weekend Breakfast Recipes
Now that you’ve mastered the cooking part of your Homemade English Muffins, the real fun begins: setting up the perfect breakfast spread! Sure, a thick slab of melting butter is non-negotiable, but these muffins are begging for more. Since we put in the effort to make these perfectly fluffy, let’s treat them like the star of the show. This is the ultimate addition to your Weekend Breakfast Recipes rotation.
When it comes to serving, you absolutely have to toast them. Toasting them on the skillet where you cooked them is great, but splitting them open and putting them under the broiler for a minute or two is where you really activate those nooks and crannies so they can trap the goodies. They should be lightly golden brown and crispy on the edges, but still soft in the center.
If you’re looking to upgrade these beyond simple toast, think breakfast sandwiches! These cut-and-toasted rounds are the perfect size for holding a fried egg, crispy bacon, and a slice of sharp cheddar. That texture holds up so much better than regular bread, avoiding that soggy mess when you stack things high. This is where these become fantastic Breakfast Baking Ideas, not just sides.
Also, don’t forget the sweet side! They are incredible smeared with homemade strawberry jam or even layered with cream cheese and smoked salmon—that’s a very classy brunch look, if you ask me. We also love pairing them with savory spreads, like turning them into little sliders using pulled pork or even ham. If you’re feeling adventurous, check out how great these are used instead of buns for little mini sandwiches, kind of like my slider recipe—just think savory!
Storage and Reheating Instructions for Homemade English Muffins
You made a huge batch of the best Homemade English Muffins, which is awesome, but now you have extras! Don’t stress about keeping them fresh; these are super sturdy. You want to store any cooled, uncut muffins in a completely airtight container at room temperature for three or four days. I find storing them sliced makes them go stale faster, so keep them whole until serving time.
When you’re ready for that perfect breakfast again, the reheating method is crucial if you want that bakery texture back! Throw them under the broiler for just a minute or two, or pop them directly into a toaster. Remember the fork trick? Do that first, then toast or broil. This crisps up the outside while heating the interior, making those nooks and crannies ready to melt butter again!
Frequently Asked Questions About Homemade English Muffins
It’s totally normal to have questions when you’re diving into a new bread recipe, especially when you’re aiming for that perfect texture. I get asked all the time why these loaves don’t rise like regular bread or what that weird cornmeal dusting is for. Don’t sweat it! Baking is just chemistry explained simply, and I’m here to translate those tricky bits so your next batch of homemade english muffins is a huge win. Think of these as answers I give to my friends hanging out in my kitchen!
Can I use instant yeast instead of active dry yeast in this Easy English Muffins From Scratch recipe?
Yes, you absolutely can! That’s a great shortcut substitution. If you’re using instant yeast, here’s the one thing you skip: the initial proofing of the yeast in the milk. You don’t need to wait for that foamy layer! Just whisk your instant yeast right in with the flour, salt, and sugar. Then, add the warm milk and melted butter and start stirring. The yeast will activate once it gets wet, and you can just move straight to mixing that shaggy dough. Easy peasy!
Why are my homemade english muffins flat and not fluffy?
This is usually a heat issue, and I see it happen a lot when people rush the cooking. The number one reason your homemade english muffins turn out flat is that your griddle heat was too high! If the outside cooks too fast, it seals up before that tender dough has a chance to build up steam and puff up underneath. The other common culprit is skipping that second 30-minute rest after you cut them out; that last little rest gives them the spring they need. Remember, we need low, gentle heat for those fluffy insides.
What is the best way to get perfectly round homemade english muffins?
Well, perfectly round is subjective when you’re going for that rustic, homemade feel, right? But if you want uniformity, the secret is your cutter. You need something with a nice, sharp edge; don’t use something dull that squishes the sides down as you press. I actually prefer using the rim of a sturdy, clean drinking glass instead of a dedicated cutter sometimes because the edge is clean and smooth. The important thing is to press straight down—don’t twist the cutter into the dough! Twisting seals the edges and prevents the muffin from rising evenly around the perimeter, which can lead to sad, oval-shaped results instead of satisfyingly Soft Homemade Bread circles.
Share Your Homemade English Muffins Experience
Okay, now that you’ve gone through the whole process—from the foamy yeast to that beautiful low-and-slow skillet cook—I want to hear all about it! Making homemade english muffins should feel like an accomplishment, and I bet you crushed it. Did you get those gorgeous, buttery pockets I was raving about? Did your kitchen smell like the best bakery in town?
Seriously, don’t be shy! Leave a comment down below and let me know what you thought of this translation of the classic technique. Did you try chilling the dough overnight? Are you now planning your whole weekend around making another batch of these nooks and crannies muffins? Telling me what worked for you helps me keep translating these recipes better for everyone else who walks into their kitchen feeling a little hesitant. Rate the recipe, drop your advice, and send me pictures if you can! Happy toasting!
PrintFoolproof Homemade English Muffins with Perfect Nooks and Crannies (Easy No-Knead Method)
Make soft, fluffy homemade English muffins from scratch using this simple, no-knead recipe. Achieve the signature nooks and crannies texture easily on your stovetop for the best breakfast bread.
- Prep Time: 20 min
- Cook Time: 30 min
- Total Time: 2 hours 20 min
- Yield: 10 to 12 muffins 1x
- Category: Breakfast
- Method: Skillet Cooking
- Cuisine: American
- Diet: Vegetarian
Ingredients
- 1 cup warm milk (about 105-115°F)
- 2 1/4 teaspoons active dry yeast
- 1 tablespoon granulated sugar
- 3 cups all-purpose flour, plus more for dusting
- 1 teaspoon salt
- 1/4 cup unsalted butter, melted, plus more for greasing
- Cornmeal or semolina, for dusting
Instructions
- Combine the warm milk, yeast, and sugar in a large bowl. Let this mixture sit for 5 to 10 minutes until it becomes foamy. This shows the yeast is active.
- Add the melted butter, flour, and salt to the yeast mixture. Stir with a wooden spoon until a shaggy, sticky dough forms. Do not knead the dough.
- Cover the bowl with plastic wrap and let the dough rise in a warm place for 1 to 1.5 hours, or until it has doubled in size.
- Gently turn the dough out onto a lightly floured surface. Pat or lightly roll the dough to about 3/4 inch thickness.
- Use a 3-inch round cutter (or the rim of a glass) to cut out the muffins. Gather the scraps, gently re-pat, and cut out more if desired.
- Generously dust a baking sheet or large cutting board with cornmeal or semolina. Place the cut dough rounds onto the prepared surface, leaving space between them.
- Cover the muffins loosely and let them rest for 30 minutes.
- Heat a large, dry, heavy-bottomed skillet or griddle over medium-low heat. You want low, gentle heat for even cooking.
- Place the muffins on the warm skillet, working in batches if necessary. Cook for 8 to 12 minutes per side, until golden brown. Do not press down on them while cooking.
- Remove the cooked muffins and set them aside. If you want the classic texture, split them open using a fork (not a knife) to preserve the nooks and crannies.
- Toast the split muffins lightly before serving with butter or jam.
Notes
- Use a fork, not a knife, to split the muffins open after cooking. This action creates the famous internal texture that holds melted butter.
- Cooking low and slow is key. If the heat is too high, the outside will burn before the inside cooks through.
- You can make this dough ahead and refrigerate it for a slower, overnight rise if you prefer.
Nutrition
- Serving Size: 1 muffin
- Calories: 180
- Sugar: 2
- Sodium: 250
- Fat: 5
- Saturated Fat: 3
- Unsaturated Fat: 2
- Trans Fat: 0
- Carbohydrates: 30
- Fiber: 1
- Protein: 6
- Cholesterol: 15