
When the holidays roll around, everyone starts reaching for the same tired cookie recipes, right? I get it; tradition is comforting. But this year, I’m shaking things up with something that tastes like Christmas threw a fancy party: the peppermint cheesecake. Seriously, this dessert stops conversations! We’re taking that unbelievably rich, classic cheesecake flavor and merging it with the cool, crisp kiss of peppermint bark.
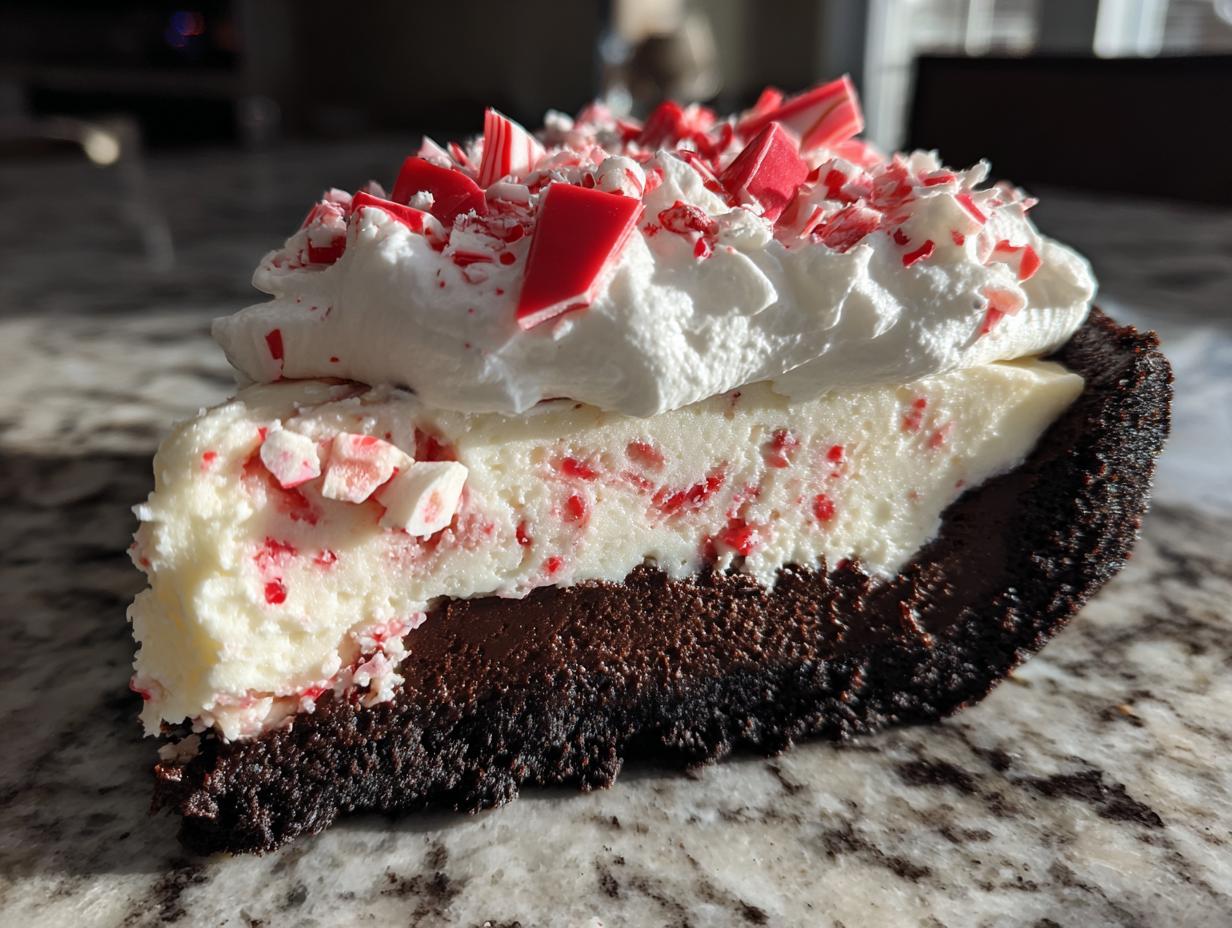
It’s visually stunning—that chocolate crust against the creamy filling and the candy cane crunch? Wow! Now, let’s talk technique for just a second. The difference between a showstopper and a cracked disaster is usually just one thing: the water bath. Trust me on this one; mastering that little hot water trick is the secret handshake to achieving the smoothest, crack-free peppermint cheesecake you’ll ever bake. If you stick with me, you’ll master it, I promise! Check out some of my other favorite delicious dessert recipes while you gather your pans.
- Why This Peppermint Cheesecake Recipe Delivers Holiday Magic
- Gathering Ingredients for Your Peppermint Cheesecake
- Essential Equipment for a No-Crack Peppermint Cheesecake
- Step-by-Step Instructions for the Ultimate Peppermint Bark Cheesecake
- Tips for Success When Making Peppermint Cheesecake
- Storage and Serving Suggestions for Your Peppermint Cheesecake
- Frequently Asked Questions About This Christmas Dessert Idea
- Estimated Nutritional Data for Peppermint Cheesecake
- Share Your Festive Peppermint Cheesecake Creations
Why This Peppermint Cheesecake Recipe Delivers Holiday Magic
Why mess with perfection? Because sometimes perfection needs a little holiday sparkle! This peppermint cheesecake isn’t just another dessert; it’s your star attraction. It hits all the right notes for a stunning Christmas dessert idea. You get that deep, satisfying chocolate crunch right under the surface, followed by the cool, sweet hit of mint.

- Ultra-creamy texture that melts in your mouth.
- Stunning visual contrast—perfect for holiday photos!
- That classic peppermint bark flavor in every slice.
The Secret to a Perfect Peppermint Cheesecake Texture
Look, I know cheesecake scares people because of the cracks, but that’s just rookie talk! The true secret weapon here, besides the water bath we talked about, is temperature control in a big way. You absolutely *must* use room temperature cream cheese and mixers. If your cream cheese is cold, you’ll beat it forever trying to get smooth, which whips in too much air.
And speaking of beating—once those eggs get in there? You treat that batter like spun glass. Mix just until it vanishes. Overmixing after the eggs are in is what causes the batter to expand too much in the oven and then crater on the way down. We are aiming for a dense, luxurious, never-cracked peppermint cheesecake, so gentle hands are mandatory!
Gathering Ingredients for Your Peppermint Cheesecake
Okay, let’s talk shopping! This isn’t the time to eyeball things. For a perfect peppermint cheesecake, the ingredients count. Everything needs to be measured precisely, especially when you’re dealing with extracts! I’ve broken it down by section so you can shop like a pro and feel totally organized before you even turn the mixer on.
First up, the crust. We’re going dark and rich here. Remember, we want that great contrast against the bright mint filling!
Crust Components
- 1 1/2 cups chocolate wafer cookie crumbs (Grab about 30 cookies, crush them up good)
- 1/4 cup granulated sugar
- 6 tablespoons unsalted butter, melted
The Creamy Filling
This is where the magic happens. And listen, the quality of your peppermint extract really shines through, so don’t skimp here!
- 3 (8 ounce) packages cream cheese, softened (This is non-negotiable—softened!)
- 1 1/2 cups granulated sugar
- 1 teaspoon vanilla extract
- 1 teaspoon peppermint extract
- 1/4 teaspoon salt
- 4 large eggs
- 1/2 cup sour cream
- 1/2 cup heavy cream
- 1/2 cup crushed peppermint candies (These go *in* the batter!)
The Whipped Topping & Garnish
This part is all about texture and that final peppermint visual pop.
- 1 cup heavy cream, cold, for topping
- 2 tablespoons powdered sugar, for topping
- 1/2 teaspoon peppermint extract, for topping
- 1/2 cup crushed peppermint candies for garnish
Ingredient Notes and Substitutions for Your Holiday Cheesecake Recipe
I always keep the sour cream and heavy cream in the filling because they provide the creamy insurance policy! The addition of that extra fat prevents the cheesecake from becoming too stiff when it chills; it keeps it silky smooth. If you use lower fat dairy, you run a risk of a stiffer set. Don’t do it!
Now, for the mint flavor. I used peppermint extract here because it gives that nostalgic candy cane punch. If you only have regular mint extract on hand—maybe you usually use it for cookies—you can swap it, but be careful! Mint extract is usually way stronger than peppermint. Start with just a tiny dash, maybe 1/4 teaspoon, mix it up, taste a tiny bit of the batter (don’t worry, we aren’t sick from raw egg, just spit it out!), and see if you need more. Your peppermint cheesecake flavor should be cool, not toothpaste-y!
Essential Equipment for a No-Crack Peppermint Cheesecake
Before you even think about mixing that chocolate crust, let’s talk tools. This is critical, honestly. Because we are using the water bath method—which is the only way I trust to get that flawless, silky surface on our peppermint cheesecake—you need specific hardware. Don’t try to fake this part; having the right equipment makes the process almost foolproof, which is exactly what we want when baking something this special!
First and foremost, a 9-inch springform pan. You need that removable side, period. Trying to serve a cheesecake without one is just asking for major kitchen stress.
Then, you need something bigger to hold the water bath. I always grab my heaviest, deepest roasting pan—the one I usually use for Thanksgiving turkey. It needs to be wide enough that the springform pan sits inside with at least an inch or two of space all the way around it. That space? That’s where the boiling water goes to keep things cozy and temperate in the oven. That water bath is the hero that prevents those dreaded cracks in your beautiful peppermint cheesecake!
Finally, you’ll need heavy-duty aluminum foil. Don’t grab the cheap thin stuff! You need to wrap that springform pan *tightly*—two or three overlapping layers—around the bottom and up the sides. We want zero chance of water seeping in and turning our chocolate crust into soggy mush. A little prep work here saves you tons of heartbreak later when you’re ready to slice!
Step-by-Step Instructions for the Ultimate Peppermint Bark Cheesecake
Alright, let’s get baking! Making this gorgeous peppermint bark cheesecake is totally manageable if we break it down. First things first, get that oven warmed up to 325°F before you do anything else. While it’s heating, take your 9-inch springform pan and wrap the outside really tightly with heavy-duty aluminum foil. I mean tight, like a professional baker wrapped it three times, just to be safe against any sneaky water!
Now for the crust. Mix those chocolate wafer crumbs with the little bit of sugar and that melted butter until it looks like damp sand. Press it firmly—and I mean *firmly*—into the bottom and just an inch up the sides. Pop that into the oven for just 10 minutes to set up. Once it’s done baking, pull it out and let it cool down while we tackle the filling.
Next, we build the main event! Beat your room-temperature cream cheese until it’s silky smooth, then add the sugar, vanilla, that teaspoon of peppermint extract, and the salt. Remember what I said? Don’t go crazy! Mix until it’s just blended. Then, carefully, one by one, add the eggs, mixing only until you see the yellow disappear. Fold in the sour cream, heavy cream, and those beautiful half-cup of crushed peppermint candies. Pour that creamy mix right over your cooled crust.
This is where we jump over to my guide on getting cheesecake right by using a water bath, which we’ll cover next. Once it’s ready, bake for about 60 to 75 minutes. When you check it, the edges should look set, but the very middle should still have a little, gentle wobble. Don’t rush the cooling, either! Turn the oven off, prop the door open with a wooden spoon, and let it hang out in there for a full hour. Then, let it finish cooling on the counter before it heads to the fridge overnight. This chilling time is crucial for getting amazing slices!

Mastering the Water Bath Technique for Your Peppermint Cheesecake
Seriously, the water bath, or *bain-marie*, is your best friend when making any decadent holiday cheesecake recipe. Why do we bother with boiling water? Because cheesecake is basically a giant, delicate custard, and those custards hate direct, harsh heat! The boiling water you set up in the roasting pan creates steam inside the oven. This steam locks in moisture and keeps the temperature around the pan incredibly steady and gentle.
This gentle heat means the cheesecake bakes evenly from the edge to the center without drying out the outside layers. If the outside dries out before the middle sets, guess what happens? Shrinkage and cracking! By using that deep roasting pan filled halfway up the foil-wrapped sides of your springform pan, you’re creating a perfect little sauna for a smooth, beautiful top. And don’t forget that step where you turn the oven off and let it cool inside for an hour—that slow, gradual temperature drop is just as important as the bath itself because it stops sudden changes that cause cracks.
Creating the Cool Peppermint Topping for Your Candy Cane Cheesecake
Once that cake has chilled completely—and I mean *completely*, overnight is best for that dense snap—it’s time for the grand finale! This topping is so simple but looks so festive on your candy cane cheesecake.
Take your cup of cold heavy cream, the powdered sugar, and that final half-teaspoon of peppermint extract. Whip it up! A hand mixer or a stand mixer on medium-high works great, but you need to watch it like a hawk. You keep beating until you get stiff peaks. That means when you lift the whisk out of the bowl, the cream stands up tall, like a little mountain peak that doesn’t droop over.
Spread that gorgeous, fluffy cream over the top of your chilled cheesecake. Don’t aim for smooth perfection; a rustic swirl looks fantastic! Then, take your remaining half-cup of crushed peppermint candies and rain them down over the top. Do this right before serving, though! Candy canes melt slightly when they sit on the cool whipped cream, and we want that distinct, crunchy shatter in every bite of our amazing candy cane cheesecake.

Tips for Success When Making Peppermint Cheesecake
We’ve already talked about keeping the water bath steady and using room temperature ingredients, but there are a few more professional secrets I picked up rattling around in that old bistro kitchen that will guarantee you get the perfect slice of this peppermint cheesecake. Listen up, because these small tweaks are the difference between tasty and legendary!
The absolute biggest mistake people make with any rich, baked dessert like this is over-beating the eggs. Once you add the eggs, the structure of your cheesecake begins to form, and it relies on those delicate proteins to set evenly. If you keep whipping away after they’re just incorporated, you incorporate too much air—air that expands rapidly under heat and then collapses dramatically when it cools down. That’s exactly how you get those ugly cracks. So, my tip is simple: Eggs go in one at a time, and you mix just until you can’t see the yolk anymore. That’s it. We want density, not fluffiness, for this specific cookie-crust treat.
Another thing I learned is that you can’t rush the chilling process. I know you want to dig into that cool, minty goodness right away, but a peppermint cheesecake needs time—at least six hours, but honestly, overnight is where it truly shines. That chilling time allows the texture to firm up properly. If you cut it too soon, it’ll just be mushy. When it’s perfectly chilled, you get that satisfying density that contrasts perfectly with the light whipped topping and the chocolatey crust. That slow chill locks in the marriage between the sweet cream cheese and the sharp peppermint, creating that signature well-balanced mint chocolate cheesecake flavor.

If you want to know more about the philosophy, why we translate chef secrets for the home cook, and how we approach these recipes, I talk all about it over on the About page. It’s all about making cooking less intimidating and more joyful!
Storage and Serving Suggestions for Your Peppermint Cheesecake
Once you’ve gone through all that effort to create the perfect, crack-free, minty masterpiece, you absolutely need to know how to treat your peppermint cheesecake right! The chilling process is not just a suggestion; it’s essential for texture. When it comes out of the oven and through its cool-down period, it’s still a little fragile. It needs time for those fats and proteins to fully stabilize.
I always recommend covering the completely cooled cake—after you’ve taken off that foil wrap—loosely with plastic wrap and letting it chill in the fridge for at least six hours. But honestly? Overnight is where it shines. That long chill helps the cheesecake firm up to that dense, satisfying texture we’re aiming for, making those slices clean and beautiful, especially with the chocolate crust underneath.
When it’s time to serve? Don’t let it sit out on the counter for hours! While you don’t want it rock-hard straight from the coldest part of the fridge, you’re aiming for slightly chilled. Take it out about 15 or 20 minutes before you plan to slice and serve. This just takes the hard chill off the cream cheese, making it taste richer and creamier when you bite into it. It keeps that coolness we love from the peppermint, but lets the flavor profile open up a bit.
For pairings, since this is such a rich and festive dessert, something bright and acidic is a perfect counterpoint. Think about chilling up a batch of seasonal punch or maybe even a lovely fruit-forward wine. I actually have a great recipe for a Fall Sangria that works beautifully through Christmas, as the fruit cuts right through the richness of the cream cheese. It just cleanses your palate before your next amazing, minty bite!
Storing leftovers is easy. Keep it covered tightly in the refrigerator. Because of the high sugar content that both the cheesecake and whipped cream contain, it holds up really well for several days. Just try to keep the majority of that beautiful crushed peppermint topping intact until you serve each slice!
Frequently Asked Questions About This Christmas Dessert Idea
I get so many messages after people try making this showstopper, and honestly, most questions circle back to texture and flavor intensity. It’s totally normal! You want that perfect holiday cheesecake recipe, not one that tastes like toothpaste! Let’s run through the most common things folks ask when preparing their peppermint cheesecake.
Can I use a different crust than chocolate wafers?
You absolutely can, but you’re giving up some serious flavor contrast! The chocolate wafer crust paired with that cool mint is what really defines the peppermint bark cheesecake inspiration. I recommend keeping the chocolate theme going if you sub out the wafers—maybe use Oreos with the cream filling scraped out. If you must use graham crackers, that’s fine, but you’ll need to add about two tablespoons of cocoa powder to the mix to try and deepen the flavor profile a little bit. Just remember to still press it firmly!
Why is my peppermint flavor not strong enough?
This is usually a peppermint extract issue. Not all extracts are created equal, trust me! If you followed the recipe and it’s too subtle, the chilling time might be the culprit. A long chill deepens all the flavors. If you need an instant boost for your next batch, I suggest adding just a tiny bit more extract to the whipped cream topping instead of the filling, since that’s the last thing your guests taste! It gives you a brighter mint punch right on top.
How far ahead of time can I bake this Christmas dessert idea?
For the best texture and flavor integration, aim to bake this about 1 to 2 days before you need it. It tastes *better* the next day! If you bake it the day before you need it, that gives you plenty of time for the long chill. If you try to bake and serve it the same day, it simply won’t have the structure we need. Making it ahead of time is the easiest way to guarantee you aren’t scrambling on Christmas day!
Is this cheesecake recipe difficult to pull off?
Listen, if you can follow directions, you can make this! The only tricky part is the water bath, but we went over that extensively. If that seems intimidating, go check out my guide on easy weeknight dinners—sometimes seeing simple techniques anywhere helps build confidence across the board! This peppermint cheesecake uses standard baking procedures, just with a little extra care on the cooling phase. I promise, the payoff is worth the initial nervousness!
Can I make a no-bake version of this peppermint cheesecake?
The beauty of this recipe is that baked texture—that ultra-creamy, almost velvety feel that only baking can achieve, especially with the egg structure. A no-bake version would require adding stabilizers like gelatin or relying heavily on stabilized whipped cream, which changes the final mouthfeel completely. If you’re craving no-bake, you’d need an entirely different flavor profile, probably heavier on cream cheese and powdered sugar rather than eggs. For this specific ultra-creamy peppermint cheesecake, stick to the oven!
Estimated Nutritional Data for Peppermint Cheesecake
Okay, friends, let’s talk realistically about what we’re digging into here. This is a decadent, holiday-level slice of heaven. It’s not exactly diet food, but hey, that’s why we save it for special occasions, right? Because we are using rich cream cheese and full-fat dairy, these numbers reflect that amazing creamy texture we worked so hard to achieve in our peppermint cheesecake!
Below are the estimated nutritional facts based on the ingredients list provided for one slice, assuming you yield 12 servings. Remember, these are my best estimates—if you use organic butter or different cookie crumbs, the final count might shift slightly. Cooking is fluid, even when we’re being precise!
- Calories: 450
- Sugar: 40g
- Fat: 30g
- Saturated Fat: 18g
- Carbohydrates: 42g
- Protein: 7g
- Sodium: 250mg
See that sugar content? That mostly comes from the sugar in the filling, the powdered sugar on top, and, of course, the candy canes! It’s packed with flavor. The good news is that it also has a decent dose of protein from the dairy and eggs, which helps slow down that sugar rush a tiny bit as you enjoy this incredible peppermint cheesecake. Just know, when you slice this gorgeous thing, you are tasting pure, concentrated holiday joy!
Share Your Festive Peppermint Cheesecake Creations
Whew! You did it! You conquered the water bath, you managed the gentle bake, and now you have this absolutely stunning, crack-free peppermint cheesecake sitting in your fridge, ready to blow your guests away. Seriously, give yourself a massive pat on the back, because this is next-level holiday baking!
Now that you’ve made this beautiful candy cane cheesecake, I absolutely want to hear from you! Don’t leave me hanging! Tell me how it went. Did you manage to keep that center wobbly before you turned the oven off? Did your family instantly smell Christmas the minute you started crushing those peppermints?
Please, please leave a rating and tell me about your experience in the comments below. Hearing what worked for you—or if you had any little hiccups that we can troubleshoot together for the next batch—is what makes this whole community thing worthwhile. It helps me know that the kitchen slang is making sense!
And the best part? I live for the visuals! Snap a picture of your finished peppermint bark cheesecake—especially if you got a perfect slice showing that clean chocolate crust and the whipped cream topping—and tag me whenever you share it on social media. Seeing your holiday baking success is my favorite way to wrap up the year. Happy holidays, and happy baking!
PrintPeppermint Bark Cheesecake with Chocolate Crust

Make a creamy, festive peppermint cheesecake inspired by peppermint bark, featuring a chocolate cookie crust and crushed candy canes.
- Prep Time: 25 min
- Cook Time: 75 min
- Total Time: 100 min
- Yield: 12 servings 1x
- Category: Dessert
- Method: Baking
- Cuisine: American
- Diet: Vegetarian
Ingredients
- 1 1/2 cups chocolate wafer cookie crumbs (about 30 cookies)
- 1/4 cup granulated sugar
- 6 tablespoons unsalted butter, melted
- 3 (8 ounce) packages cream cheese, softened
- 1 1/2 cups granulated sugar
- 1 teaspoon vanilla extract
- 1 teaspoon peppermint extract
- 1/4 teaspoon salt
- 4 large eggs
- 1/2 cup sour cream
- 1/2 cup heavy cream
- 1/2 cup crushed peppermint candies (candy canes) for filling
- 1 cup heavy cream, cold, for topping
- 2 tablespoons powdered sugar, for topping
- 1/2 teaspoon peppermint extract, for topping
- 1/2 cup crushed peppermint candies for garnish
Instructions
- Preheat your oven to 325 degrees F. Wrap the outside of a 9-inch springform pan tightly with heavy-duty aluminum foil.
- Prepare the crust: Mix the chocolate wafer crumbs, 1/4 cup sugar, and melted butter in a bowl. Press the mixture firmly into the bottom and 1 inch up the sides of the prepared springform pan. Bake for 10 minutes. Remove from the oven and let cool while you prepare the filling.
- Prepare the water bath: Place the foil-wrapped springform pan inside a larger roasting pan.
- Prepare the filling: In a large bowl, beat the softened cream cheese and 1 1/2 cups sugar with an electric mixer until smooth. Beat in the vanilla extract, 1 teaspoon peppermint extract, and salt.
- Beat in the eggs one at a time, mixing just until combined after each addition. Do not overmix.
- Gently mix in the sour cream and heavy cream until smooth. Fold in the 1/2 cup crushed peppermint candies.
- Pour the filling over the cooled crust. Place the roasting pan on the oven rack. Carefully pour boiling water into the roasting pan until the water reaches halfway up the sides of the springform pan. This is the water bath.
- Bake for 60 to 75 minutes, or until the edges are set but the center still jiggles slightly.
- Turn off the oven. Prop the oven door open slightly with a wooden spoon and let the cheesecake cool inside the oven for 1 hour.
- Remove the cheesecake from the water bath and foil. Cool completely on a wire rack. Once cool, cover and chill in the refrigerator for at least 6 hours, or preferably overnight.
- Prepare the topping: Beat the 1 cup cold heavy cream, powdered sugar, and 1/2 teaspoon peppermint extract until stiff peaks form.
- Spread the whipped cream over the chilled cheesecake. Sprinkle the remaining 1/2 cup crushed peppermint candies over the top before serving.
Notes
- To prevent cracks, do not overbeat the batter once the eggs are added. Mix only until incorporated.
- Use room temperature ingredients for the cream cheese filling to ensure a smooth texture.
- If you do not have peppermint extract, you can substitute with 1/4 teaspoon of pure mint extract, but use less as it is stronger.
Nutrition
- Serving Size: 1 slice
- Calories: 450
- Sugar: 40
- Sodium: 250
- Fat: 30
- Saturated Fat: 18
- Unsaturated Fat: 12
- Trans Fat: 0.5
- Carbohydrates: 42
- Fiber: 1
- Protein: 7
- Cholesterol: 120