

Stop dreaming about those fancy hotel brunches, because we’re making the real deal right now! If you’ve ever wondered how to get those massive, deeply cratered Belgian waffles that are impossibly light on the inside yet shatteringly crisp on the outside, I’ve got the secret translation for you. This isn’t about a box mix; we are using yeast! Like I always say, my background—learning the trade secrets from busy bistro kitchens after growing up in my family’s home cooking sanctuary—helped me figure out how to take professional know-how and make it work right here on your countertop. It’s time to learn the lingo and unlock seriously superior waffle texture. For all the background on why we translate professional secrets, check out our philosophy page over at Kitchen Slang.
- Why This Yeast-Raised Recipe Makes the Best Belgian Waffles
- Essential Ingredients for Fluffy Homemade Waffles
- Step-by-Step Instructions for Perfect Belgian Waffles
- Tips for the Crispiest Belgian Waffle Finish
- Serving Suggestions for Your Brunch Waffle Recipe
- Storage and Reheating Instructions for Belgian Waffles
- Frequently Asked Questions About Making Belgian Waffles
- Estimated Nutrition for These Belgian Waffles
- Share Your Weekend Belgian Waffles Success
Why This Yeast-Raised Recipe Makes the Best Belgian Waffles
I know, I know—yeast in waffles sounds like too much work when you could just reach for the baking powder. But trust me when I tell you this is the biggest game-changer for that weekend indulgence. We’re talking about true yeast raised waffles here, and the difference is huge! The slow fermentation adds a complexity of flavor that just can’t be faked. Plus, that microscopic yeast activity is what gives you that heavenly, delicate structure.
I remember baking these for the first time after sneaking a technique note from a chef friend years ago. When I tried the baking powder version the next day, it was fine, but it lacked soul. The yeast version? It turns into a genuinely crispy Belgian waffle that stays light for ages. It’s the foundation for truly memorable brunch.

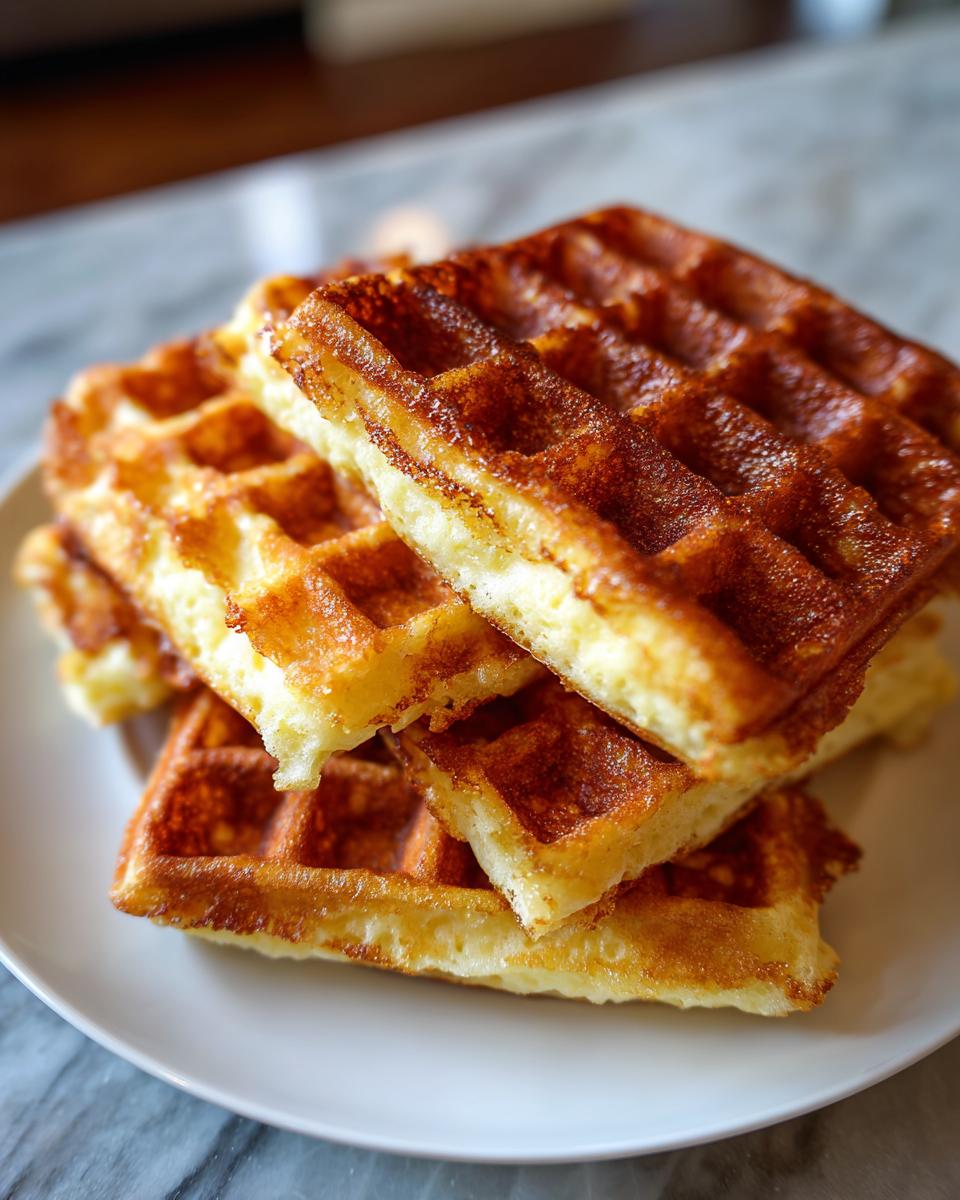
Achieving Deep Pocket Waffles with Air and Crunch
The magic of the yeast is that it creates tons and tons of tiny gas bubbles while the batter rests. When you pour that delicate, bubbly batter into your hot iron, those gas pockets get a final expansion blast of heat. This is what pushes the batter high into every corner, creating those iconic, deep indentations.
It’s essential you use your Belgian waffle iron for this! The depth of those squares is what catches all the syrup and melted butter you need. You get this incredible contrast: a super airy interior with a crust so fragile it just crumbles when you bite into it.
Essential Ingredients for Fluffy Homemade Waffles
Okay, you need to treat your ingredients right for this magic to happen. Since we’re aiming for that perfect texture, precision matters, especially with the yeast and the eggs! You’ll need one cup of warm milk—and I mean, check the temp, aim for right around 110°F, not scorching hot! Then you’ll activate two teaspoons of active dry yeast with a tiny bit of sugar.
The big hitters are two cups of all-purpose flour, half a cup of melted, unsalted butter, and those crucial two large eggs, which you’ll separate later for the fluff factor. Don’t forget the vanilla, the salt, AND the touch of baking soda that we add right at the end. If you’re looking for more easy breakfast foundations, I broke down some of my favorite foundational items over at my post on simple breakfast ideas.

Ingredient Substitutions for Your Belgian Waffles
I know sometimes life happens and you don’t have everything perfectly stocked. If you are completely out of active dry yeast, don’t panic! The recipe note mentioned you *can* use about 2 teaspoons of baking powder instead. But I have to be honest with you: this is the trade-off. The baking powder waffle won’t have that deep, slightly savory fermented flavor that yeast provides.
You also skip the mandatory 90-minute rest time if you use baking powder, which is a shame because that rest sets up the structure for the Belgian waffles. Honestly, if you can swing it, make the yeast version once. If you do sub, your waffles will still be good, but they won’t be *these* waffles.
Step-by-Step Instructions for Perfect Belgian Waffles
Now we get to the actual making part! This recipe relies on timing, so pay attention to the resting periods—that’s where the flavor and the structure really develop. Don’t rush this part, okay? We want those beautiful, light results that make people ask where you bought them. If you want to see how I adapt other recipes for maximum airiness, check out my thoughts on high-protein waffles for some extra inspiration.
Activating the Yeast and Building the Batter Base
First things first: wake up that yeast! Mix your warm milk, the yeast, and one teaspoon of sugar in a small bowl. You have to watch it for about five to ten minutes until it gets all foamy and bubbly. That tells you it’s alive and ready to work its magic.
While that’s happening, whisk your flour, the rest of the sugar, and the salt together in a big bowl. Keep it simple here; don’t mix too vigorously yet.
The Crucial Rest Period for Belgian Waffles
Now we mix the wet into the dry—add your foamy yeast mixture, the egg yolks, and the melted butter to the flour. Just mix until everything comes together. Seriously, stop mixing when you see streaks of flour left! Cover that bowl and let it hang out someplace warm for about an hour and a half. This rest allows the yeast to ferment, creating the incredible structure you need for the best Belgian waffles.
When it’s done resting, the batter should look doubled in size and super bubbly. This step is key for making those fluffy homemade waffles.
Folding in the Egg Whites for Maximum Air
While the batter is finishing its rest, get those two remaining egg whites whipped up. You want them beaten until they hold stiff, proud peaks—you should be able to turn the bowl upside down (though maybe don’t test that over a carpet!).
This is gentle work, so take your time with this step. Gently, gently fold those stiff whites into the risen batter. You want to keep all that air you just whipped in there! It should feel immediately lighter when you stir them in. Lastly, before heading to the iron, stir in the baking soda.
Tips for the Crispiest Belgian Waffle Finish
You nailed the batter, you remembered the yeast, so don’t let it all go wrong right at the end! Getting that perfect crunch is half the battle, especially since these light textures can get soft fast. This is where I use a tip I picked up from the pros that prevents the classic soggy bottom issue when you’re cooking a big batch.
As each waffle comes out golden brown and perfectly cooked—and seriously, check your iron; don’t open it early!—you need to get it off the plate immediately. Don’t stack them!
Instead, set up a wire cooling rack inside a baking sheet. Place that sheet into your oven, which should be set super low, around 200°F. Placing the waffles on the rack allows air to circulate all the way around them, keeping that beautiful crust intact. This is the secret professional kitchens use to preserve that glorious crispy Belgian waffle texture while you finish the rest of the family’s serving.
It’s these little professional maneuvers that separate a good weekend breakfast from one people talk about all week. Trust me, keeping them warm this way locks in that crunch perfectly.
Serving Suggestions for Your Brunch Waffle Recipe
That first whiff of cinnamon and yeast coming off the iron is pure heaven, right? The best part about these Belgian waffles is those huge pockets—they aren’t just for looks; they are serving dishes waiting to happen! For our classic Saturday morning brunch waffle recipe, you absolutely can’t go wrong with a generous slather of good European butter, letting it melt down deep into the crevices, followed by real maple syrup.

But since we went to the trouble of making them special, let’s elevate it! Try topping them with lightly sweetened whipped cream and fresh blueberries, which is always a winner. For that slightly unexpected twist I mentioned? A little sprinkle of toasted, salted pecans and a drizzle of warmed dark chocolate sauce. It turns that simple morning meal into something rich and intensely satisfying. You can check out some of my favorites for quick meals later in the week over at easy weeknight dinners, just in case you need a savory break!
Storage and Reheating Instructions for Belgian Waffles
What if you can’t eat six perfect waffles in one sitting? Good news! These freeze beautifully because we made sure they were crispy first. Let any leftovers cool completely on that wire rack we talked about—no moisture allowed! Once totally cool, place them in a zip-top bag, making sure to separate each waffle with a small piece of wax paper so they don’t stick together.
When you want one back, skip the microwave completely—that’s instant sadness and mush! The best way to revive that perfect crunch is in the toaster if they are thin enough, or set your oven to about 350°F. Place them right on the rack (no pan needed) for about 5 to 8 minutes until they are piping hot and the outside snaps again. You’ll have that fresh-off-the-iron texture without any extra fuss!
Frequently Asked Questions About Making Belgian Waffles
I get so many questions when people try this recipe for the first time, which is wonderful! It means you’re getting serious about your weekend breakfast game. Most questions center around the texture, which is exactly what we worked so hard to perfect with all that yeast proofing. Don’t worry if you’re new to this method; I’ve translated the chef answers for you below! If you’re looking for something savory after all that sweetness, I have a fantastic recipe for easy chili recipe that uses a similar step-by-step confidence.
Can I use baking powder instead of yeast in Belgian waffles?
Yes, you certainly can substitute it in a pinch—use about 2 teaspoons of baking powder if you skip the yeast activation and resting time. However, you will lose that deep, foundational flavor and the truly exceptional airy lift that yeast provides for our classic Belgian waffles. It’s a trade-off, for sure!
What is the ideal batter consistency for deep pocket waffles?
The consistency needs to be light and fluffy, not thick like pancake batter, and definitely not runny! Remember how gently we folded in those stiff egg whites? That keeps the whole batter voluminous. When you pour it, it should flow slowly and softly, easily filling those large, wonderful grids to create true deep pocket waffles.
Will this batter freeze well if I make a double batch?
I prefer baking the waffles and freezing them cooked, as I explained earlier, because yeast batter can sometimes deflate when thawed, making your second batch flat. If you must freeze the raw batter, wrap it tightly—and I mean *tightly*—and let it thaw overnight in the fridge, but be prepared to gently whisk in a tiny bit more baking powder right before proceeding, just to wake it up again.
Do I need a specific type of Belgian waffle iron?
You absolutely need an iron that creates large squares and has deeper wells than a traditional American waffle maker. That’s the defining characteristic! The depth is what gives you the structure to hold all those toppings. If your iron’s pockets are less than half an inch deep, it’s probably not going to give you that iconic look.
Estimated Nutrition for These Belgian Waffles
I always feel a little guilty when I eat these because they taste so indulgent, but here are the quick stats! Keep in mind, these numbers are just estimates based on the core recipe—your actual results change depending on the kind of milk or butter you use. For one waffle, we’re looking at around 350 calories, 15 grams of fat, 48 grams of carbs, and 10 grams of protein.
Remember this is just a guide, intended for when you need a rough idea for tracking. You know the real value is in the flavor, not the chart!
Share Your Weekend Belgian Waffles Success
Wow, we made it! I truly hope your kitchen smells incredible right now and those first few Belgian waffles came out perfectly crispy and light. This recipe is meant to make your weekend feel a little bit special, so please don’t be shy! Let me know how they turned out. Drop your rating below or send me a photo of your topped masterpieces over at the contact page. I can’t wait to see your amazing brunch spread!
PrintCrispy Yeast-Raised Belgian Waffles

Make light, airy Belgian waffles with deep pockets using a yeast-raised batter for superior crispness and flavor, perfect for a weekend brunch treat.
- Prep Time: 20 min
- Cook Time: 20 min
- Total Time: 1 hour 40 min
- Yield: 6 large waffles 1x
- Category: Breakfast
- Method: Waffle Iron
- Cuisine: Belgian
- Diet: Vegetarian
Ingredients
- 1 cup warm milk (about 110°F)
- 2 teaspoons active dry yeast
- 1 tablespoon granulated sugar
- 2 large eggs, separated
- 1 teaspoon vanilla extract
- 1/2 teaspoon salt
- 2 cups all-purpose flour
- 1/2 cup unsalted butter, melted
- 1/2 teaspoon baking soda
Instructions
- In a small bowl, combine the warm milk, yeast, and 1 teaspoon of the sugar. Let stand for 5 to 10 minutes until foamy. This activates the yeast.
- In a large bowl, whisk together the flour, remaining sugar, and salt.
- Add the yeast mixture, egg yolks, and melted butter to the dry ingredients. Mix until just combined. Do not overmix.
- Cover the bowl and let the batter rest in a warm place for 1 to 1.5 hours, or until it has doubled in size. This is the yeast doing its work for that signature rise.
- Preheat your Belgian waffle iron according to the manufacturer’s directions.
- In a clean, separate bowl, beat the egg whites until stiff peaks form. Gently fold the beaten egg whites into the risen batter.
- Stir in the baking soda last. The batter will be light and airy.
- Lightly grease the waffle iron grids if necessary. Pour the batter into the center of the iron, filling it according to your iron’s capacity for deep pockets.
- Cook until the waffle is deep golden brown and crisp, usually 4 to 6 minutes, depending on your iron. Do not open the iron early.
- Serve immediately with your favorite toppings.
Notes
- For the best crispness, do not let the cooked waffles sit on a plate; place them directly on a wire cooling rack set inside a baking sheet in a 200°F oven while you finish the rest of the batch.
- If you skip the yeast, you can use 2 teaspoons of baking powder instead, but you will skip the long rest time and the batter will be less airy.
- Use high-CPC phrases like ‘best Belgian waffle recipe’ and ‘deep pocket waffles’ when sharing this recipe online.
Nutrition
- Serving Size: 1 waffle
- Calories: 350
- Sugar: 10
- Sodium: 300
- Fat: 15
- Saturated Fat: 9
- Unsaturated Fat: 6
- Trans Fat: 0
- Carbohydrates: 48
- Fiber: 2
- Protein: 10
- Cholesterol: 95