
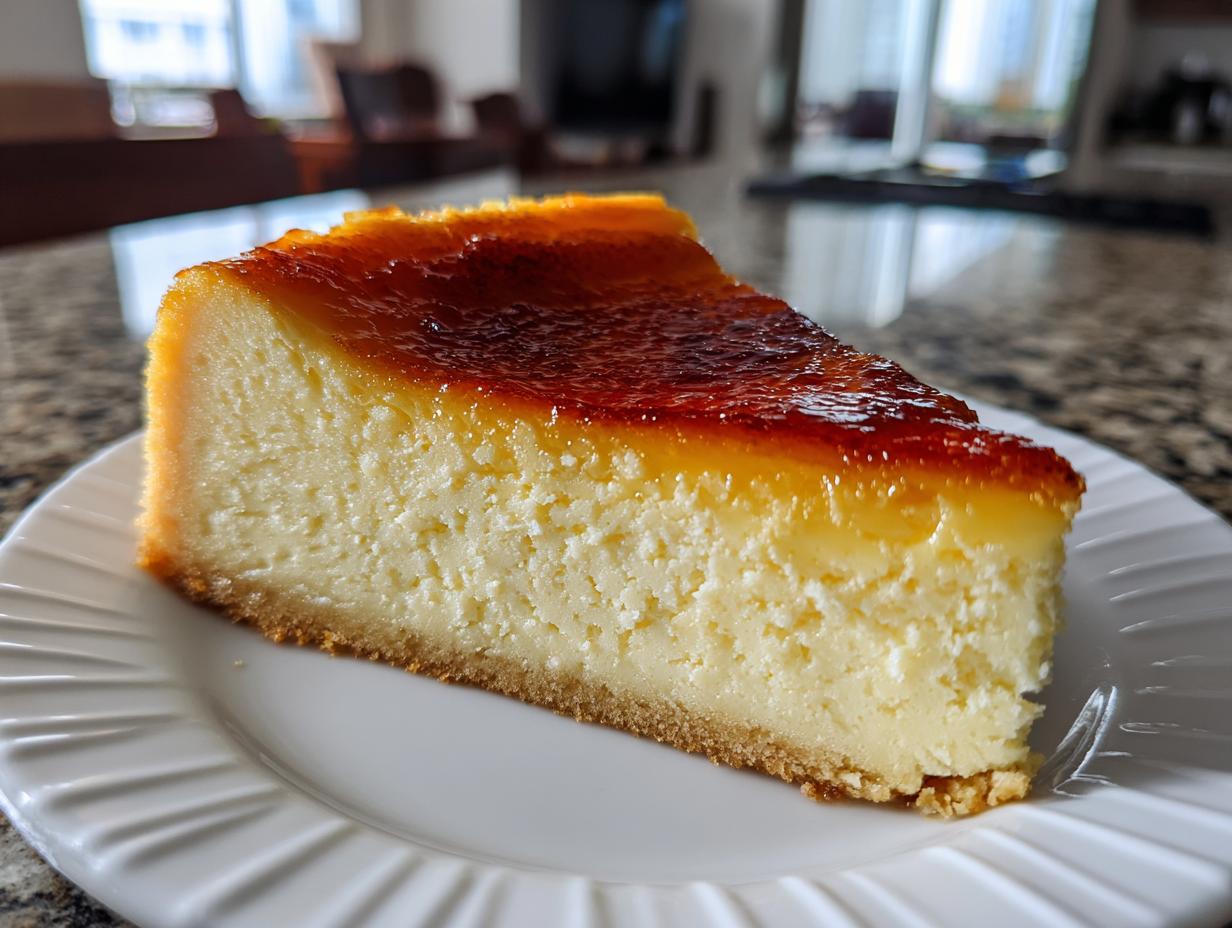
You know how sometimes you find a dessert that just shouldn’t exist, but thankfully, it does? That’s exactly how I feel about the creme brulee cheesecake. Seriously, it’s the ultimate fusion. We take that unbelievably rich, creamy, baked cheesecake base—the kind that melts on your tongue—and we crash it right into that perfect, hard, crackly sugar shell from a proper crème brûlée. It’s texture heaven!
Here at Kitchen Slang, our whole deal, thanks to Zoe Thompson, is taking those amazing pro secrets and boiling them down so you can nail them right on your countertop. This dessert sounds fancy, but I promise you, the translation here is so simple. By the end of this, you’ll know exactly how to get that smooth filling AND that signature crunch. Let’s do this beautiful, elegant dessert!
- Why This Creme Brulee Cheesecake Recipe Works (Expert Tips)
- Gathering Ingredients for Your Classic Creme Brulee Cheesecake
- How to Prepare the Creme Brulee Cheesecake Filling
- Baking Your Creme Brulee Cheesecake Using a Water Bath
- Serving Elegant Desserts for Parties: The Creme Brulee Cheesecake Finish
- Variations on the Creme Brulee Cheesecake Theme
- Storage and Reheating Instructions for Your Creme Brulee Cheesecake
- Frequently Asked Questions About Creme Brulee Cheesecake Recipe
- Nutritional Estimates for This Fusion Dessert Recipe
- Share Your Creme Brulee Cheesecake Success
Why This Creme Brulee Cheesecake Recipe Works (Expert Tips)
What makes this creme brulee cheesecake recipe a showstopper isn’t just the fancy name; it’s the texture contrast! You get that dense, deep richness you expect from the best rich creamy cheesecake recipes, but then—BAM!—you hit that beautiful, glass-like, crunchy sugar top. It’s texture heaven!
Zoe always talks about how learning the water bath changed her outlook on baking. She used to skip it because it seemed fussy, but when the cheesecake cracked? Total disaster. She figured out that using a slow, steamy bake is essential. It keeps the whole structure gentle and prevents those ugly fissures. Mastering that technique is how we get that perfect, velvety mouthfeel that really lets the vanilla shine through.
Achieving the Perfect Caramelized Sugar Topping Dessert
Listen, if you skip the chilling time, this whole thing falls apart, literally. The cheesecake has to be rock solid cold for the topping to work right. You sprinkle an even, thin layer of sugar—don’t pile it on! Then, grab your torch. Move it evenly until it bubbles and turns deep amber. If you don’t have a torch, you can carefully use the broiler, but you have to watch it like a hawk!
It’s the ultimate caramelized sugar topping dessert finisher. You want that satisfying snap when you take your first bite. Trust me, it’s worth the extra two minutes of torching!

Gathering Ingredients for Your Classic Creme Brulee Cheesecake
Okay, now for the fun part—gathering our supplies! Since this is such a show-stopping creme brulee cheesecake, we can’t skimp on quality here. When you look at the list, you might see a lot of sugar, but remember, it’s split between the crust, the filling, and that glorious topping. Everything needs to be measured precisely, especially when it comes to keeping things creamy!
Expert Tip Alert: Before you even *think* about mixing the filling, get your cream cheese bricks and your eggs sitting out on the counter. I mean it! Cold cream cheese turns lumpy the second you try to mix it, and cold eggs shock the smooth batter, which can lead to cracks later. Room temperature is your best friend for any baked cheesecake dessert.
Ingredient Notes and Substitutions for Creme Brulee Cheesecake
Let’s talk specifics so you get that gourmet feel. For the filling, skip the regular vanilla extract if you can and grab the vanilla bean paste, like the recipe calls for. You get those tiny, beautiful dark flecks, and the flavor boost is totally worth it. It really elevates this from good to spectacular!
For our crust, you want fine graham cracker crumbs—almost sandy. If yours are too coarse, pulse them a bit in the food processor. The better the quality of your cream cheese, the silkier your final creme brulee cheesecake will be, plain and simple. High quality in equals gourmet texture out!
How to Prepare the Creme Brulee Cheesecake Filling
Alright, let’s tackle the filling! This is where we earn that super smooth, decadent center, and the key is just not rushing, which is why this ends up being such an easy creme brulee cheesecake once you know the rhythm.
First things first, remember those room-temperature blocks of cream cheese? Now you put them to work! Get them in your mixer, and beat them on low to medium speed until they are completely, totally smooth. I mean it—zero lumps are allowed before you even touch the sugar. It should look like luxurious, whipped butter.

Once smooth, slowly sprinkle in that granulated sugar, salt, and the gorgeous vanilla bean paste. Mix until that’s incorporated, and then comes the delicate part: the eggs. You need to add them one at a time. Don’t just dump them all in! Beat it gently after each egg, just until it disappears into the batter. If you overmix from this point forward, you’re whipping in air, and that air creates bubbles that turn into cracks when it bakes. We want smooth sailing!
Finally, pour in the heavy cream and mix for just a few more seconds until everything looks glossy and uniform. Stop mixing right then. That beautiful, patient batter is ready for the crust. If you’ve been gentle, you’ve built the perfect foundation for your cheesecake magic!
Baking Your Creme Brulee Cheesecake Using a Water Bath
I know, I know, the water bath—or *bain-marie*—sounds exactly like the intimidating kitchen slang we promised to translate away! But stick with me, because this step is the non-negotiable secret to a flawless, crack-free creme brulee cheesecake. The bath creates steam inside your oven, wrapping the whole thing in gentle warmth. This stops the edges of your filling from setting up too fast while the middle is still raw, which is what causes those ugly cracks we don’t want in our lovely baked cheesecake dessert.
First thing: wrap that springform pan tight. I use two layers of heavy-duty foil, going high up the sides, because hot water is sneaky! Once it’s wrapped, set that pan inside a big roasting pan. Then, bring your oven up to 325°F. Fill that outer roasting pan very carefully with hot water until it reaches about halfway up the side of your cheesecake pan. You bake it until the edges look set, but the very center still has a slight, gentle wiggle to it. That jiggle means it’s done!
Cooling and Chilling: The Secret to Perfect Creme Brulee Cheesecake
This is where patience pays off big time. Once that baking time is up, don’t rush to open the oven door. You need to let the temperature ease down slowly. Turn the oven off, crack the door open just a tiny bit, and let the cheesecake sit in there for a full hour. It’s a gradual transition!
After the hour, pull it out and let it cool completely on the counter. Then comes the real test: chilling. You need a mandatory minimum of six hours in the fridge, but honestly? Overnight wins every time. Proper chilling solidifies that creamy structure so you get those clean, restaurant-worthy slices later. Plus, that cold surface is absolutely necessary for the perfect, crunchy torching experience we are aiming for!
Serving Elegant Desserts for Parties: The Creme Brulee Cheesecake Finish
When it comes to truly stunning elegant desserts for parties, nothing beats the final moment of truth for this creme brulee cheesecake. We do all that careful baking and chilling, so we have to nail the presentation! It’s right up there with our tips for making elegant appetizers.
Here’s the rule: Torch that sugar topping *right before* you serve it. If you torch it hours ahead, that beautiful candy crust starts absorbing moisture from the cheesecake and turns sticky and soft. You want that dramatic crackle!

When you bring it out, if someone taps the top with a spoon or fork, you want that satisfying, sharp ‘CRACK!’ sound. That sound means you succeeded. That contrast between the cold, velvety cheesecake and the warm, shattering caramel layer is why this dessert is simply unmatched.

Variations on the Creme Brulee Cheesecake Theme
Okay, so you’ve mastered the classic, but maybe you want to shake things up next time? That’s the beauty of a great base recipe. We can totally tweak this creme brulee cheesecake!
Thinking about a party where people are mingling? Instead of the big 9-inch pan, you should totally try making mini creme brulee cheesecakes. Just use a standard muffin tin lined with paper cups, and they bake super fast. Way less intimidating for guests!
And if you need to feed a crowd or just hate dealing with springforms, cut this recipe down just a hair and pop it into a 9×13 inch pan. Boom—instant creme brulee cheesecake bars! You can torch the whole thing after chilling, then slice them up. So easy!
For flavor twists, try stirring a teaspoon of instant espresso powder into the filling for a mocha kick, or maybe add the zest of an orange right along with the vanilla. It gives the whole thing a bright, unexpected lift!
Storage and Reheating Instructions for Your Creme Brulee Cheesecake
So, you nailed the absolute best creme brulee cheesecake, but you have leftovers. Good news and one major warning! Keep the *un-torched* cheesecake covered tightly in the fridge. It’s happy there for about four or five days, staying wonderfully rich and creamy.
Now for the big rule: Never, ever store that caramelized sugar topping. Once it hits the cold fridge air, it’s going to get sticky and weep all over your beautiful dessert. Don’t do it!
The trick is to only torch the sugar right before you serve it. If you have slices left over, just cover them tightly and save them. When you want another piece, slice it, sprinkle a little sugar on top, and torch that one slice fresh. That way, every bite is perfect!
Frequently Asked Questions About Creme Brulee Cheesecake Recipe
I know you probably have a few lingering questions once you see how decadent this creme brulee cheesecake recipe looks! These are the things I always wondered about when I first tried making this fusion masterpiece.
Can I make this ahead of time?
Yes, absolutely, and I highly recommend it! The cheesecake itself needs that long chill time—at least six hours, but overnight is way better for setting up that perfect, dense texture. Just remember what I said: Do not torch the sugar until you are literally walking the dessert to the table. Storing the cheesecake ahead of time is one of the best ways to handle elegant desserts for parties!
What is the best sugar for the caramelized topping dessert?
You must use plain white granulated sugar for the topping. It melts perfectly and creates that beautiful, even, hard caramel shell. Dark brown sugar has molasses which will just burn before it fully melts and will taste bitter. Stick to white sugar for that classic, clean crackle. It’s key if you want the perfect caramelized sugar topping dessert!
Why did my cheesecake crack even after using the water bath?
Oh, the dreaded crack! It happens to the best of us. If you used the water bath and still got a crack, the likely culprit is over-mixing the eggs, which adds too much air, or removing it from the oven too fast. I stressed the importance of that one-hour, oven-off cooling period. That gentle transition is non-negotiable for keeping things smooth! For more tips on smooth rich creamy cheesecake recipes, check out my guide on the proper crème brûlée technique.
Can I use vanilla extract instead of vanilla bean paste?
You totally can! If vanilla bean paste isn’t in your pantry, regular pure vanilla extract works fine for this creme brulee cheesecake. However, vanilla extract is much more concentrated in alcohol/flavor. So, if the recipe calls for one teaspoon of paste, use only about 3/4 teaspoon of extract. It saves you from making the flavor too sharp!
Is this the same as making individual cheesecakes?
Not quite, but you can easily turn it into them! If you want those cute little mini creme brulee cheesecakes, just line your muffin tin cups with paper liners, pour in the batter, and reduce your baking time significantly—probably down to 20 minutes. They are much quicker to chill, too!
Nutritional Estimates for This Fusion Dessert Recipe
Okay, so we all know this decadent creme brulee cheesecake isn’t exactly a low-calorie snack, right? It’s rich, it’s creamy, and it’s meant for celebrating! But for those of you who like to keep track, I pulled together the estimated nutritional breakdown based on the ingredients we used. Remember, this is just a ballpark figure because the exact numbers will shift slightly depending on the brand of cream cheese or the size of your eggs.
Think of this as a guide for planning, not a strict law! After all, this is comfort food delivered with elegance. Here’s what we’re realistically looking at per slice:
- Serving Size: 1 slice
- Calories: 450
- Fat: 30g (That’s where the great texture comes from!)
- Saturated Fat: 18g
- Carbohydrates: 40g
- Sugar: 35g (Remember, this includes the lovely caramelized top!)
- Protein: 8g
- Cholesterol: 120mg
We made this using that amazing vanilla bean paste and real butter, which is why the numbers look hearty. We’re aiming for that perfect fusion dessert recipe experience here, not a light snack! If you want to shave off some sugar for your next batch, try using a little less on the topping, but for that true dessert recipe inspiration moment, stick to the plan!
Share Your Creme Brulee Cheesecake Success
So, you did it! You conquered the water bath, you tamed the torch, and you successfully created that incredible, crackly, creamy contrast of a true creme brulee cheesecake. How does it taste? I’m genuinely dying to know!
If this recipe helped you feel more confident bringing a truly elegant dessert to the table, please, please let me know. Drop a comment below! Tell me how the torching went, or if you tried making the creme brulee cheesecake bars instead. Your feedback helps us keep translating those pro kitchen secrets into real-life wins for home cooks like you.
If you loved how we broke down the intimidating parts—like explaining *why* the water bath matters—give this recipe five stars! It helps other bakers realize that making gourmet desserts isn’t some secret club. It’s just about learning the lingo, and I think you’ve got it down perfectly now!
PrintClassic Creme Brulee Cheesecake with Easy Torched Sugar Topping

A rich, creamy baked cheesecake featuring a crisp, caramelized sugar crust, combining the best elements of cheesecake and crème brûlée.
- Prep Time: 25 min
- Cook Time: 65 min
- Total Time: 7 hours 30 min
- Yield: 12 servings 1x
- Category: Dessert
- Method: Baking
- Cuisine: American Fusion
- Diet: Vegetarian
Ingredients
- 1 1/2 cups graham cracker crumbs
- 1/4 cup granulated sugar (for crust)
- 6 tablespoons unsalted butter, melted
- 3 (8 ounce) packages cream cheese, softened
- 1 1/2 cups granulated sugar (for filling)
- 1 teaspoon vanilla bean paste
- 1/4 teaspoon salt
- 4 large eggs, room temperature
- 1/2 cup heavy cream
- 1/2 cup granulated sugar (for topping)
Instructions
- Preheat your oven to 325°F (160°C). Wrap the outside of a 9-inch springform pan tightly with heavy-duty aluminum foil.
- Prepare the crust: Combine graham cracker crumbs, 1/4 cup sugar, and melted butter. Press the mixture firmly into the bottom of the prepared springform pan. Bake for 10 minutes. Let cool slightly.
- Prepare the cheesecake filling: In a large bowl, beat the softened cream cheese with an electric mixer until smooth. Gradually beat in 1 1/2 cups sugar, vanilla bean paste, and salt until combined.
- Beat in the eggs one at a time, mixing just until each egg is incorporated. Mix in the heavy cream until the batter is smooth. Do not overmix.
- Pour the filling over the cooled crust. Place the springform pan inside a larger roasting pan. Carefully pour hot water into the roasting pan until it reaches halfway up the sides of the springform pan (this is a water bath).
- Bake for 55 to 65 minutes, or until the edges are set but the center still jiggles slightly.
- Turn off the oven, crack the door open slightly, and let the cheesecake cool in the oven for 1 hour.
- Remove the cheesecake from the water bath and let it cool completely on a wire rack. Once cool, chill in the refrigerator for at least 6 hours, or preferably overnight.
- When ready to serve, remove the cheesecake from the pan. Sprinkle an even, thin layer of the remaining 1/2 cup sugar over the top.
- Use a kitchen torch to caramelize the sugar until it forms a hard, amber crust. Serve immediately after torching.
Notes
- Use vanilla bean paste for the best flavor in the cheesecake filling.
- Chill the cheesecake completely before torching the sugar topping for the best texture contrast.
- If you do not have a kitchen torch, you can place the sugared cheesecake under a hot broiler for 1-2 minutes, watching constantly to prevent burning.
Nutrition
- Serving Size: 1 slice
- Calories: 450
- Sugar: 35g
- Sodium: 250mg
- Fat: 30g
- Saturated Fat: 18g
- Unsaturated Fat: 12g
- Trans Fat: 0.5g
- Carbohydrates: 40g
- Fiber: 1g
- Protein: 8g
- Cholesterol: 120mg