
If you are looking to elevate your holiday baking spread this year without spending hours cutting out shapes, then listen up! We are diving headfirst into making the most stunning, buttery pinwheel cookies you’ve ever seen. Seriously, these things look like they came straight from a fancy bakery case, but the beauty is they are totally foolproof slice and bake cookies. That’s the secret right there! Here at Kitchen Slang, my whole mission is translating those sleek professional techniques—like getting that perfect, impossibly tight roll for those vibrant spirals—into something you can confidently conquer right on your own countertop. If you want to see how other shapes hold up, check out my notes on getting sugar cookies to hold their shape, but for now, put away the cookie cutters; we’re rolling dough logs today!
- Why These Are the Best Pinwheel Cookies for Your Holiday Cookie Exchange
- Gathering Ingredients for Beautiful Pinwheel Cookies
- Step-by-Step Instructions for Perfect Pinwheel Cookies
- Expert Tips for Stunning Festive Baking Designs
- Storage and Make Ahead Holiday Treats with Pinwheel Cookies
- Variations on Classic Pinwheel Cookies Recipe
- Serving Suggestions for Your Buttery Spiral Cookies
- Frequently Asked Questions About Pinwheel Cookies
- Estimated Nutritional Data for Pinwheel Cookies
Why These Are the Best Pinwheel Cookies for Your Holiday Cookie Exchange
When the holiday baking rush hits, you need recipes that deliver impact without the stress. That’s why these are my absolute favorite cookie exchange recipes. They always look impressive, and because they are true make ahead holiday treats, you can bake two dozen logs now and still have fresh cookies ready next week!

- They are sturdy and travel well, which is crucial for any holiday tray.
- The visual payoff of the swirl is huge for very little effort.
- This structure is a tested and true family cookie recipe backbone—it never fails!
Mastering the Slice and Bake Cookies Technique
The secret weapon here is the slice-and-bake method. You aren’t fussing with rolling out dough, cutting shapes, and re-rolling scraps. You make the log, you chill it until it’s rock hard, and then you slice off perfect, beautiful rounds. Seriously, chilling the dough until it feels like cold wood is non-negotiable if you want those razor-sharp spirals instead of a colorful blob!
Gathering Ingredients for Beautiful Pinwheel Cookies
Okay, getting ready to bake means getting our ingredients lined up just right. Because these are beautiful, buttery spiral cookies, the quality really shines through. You absolutely must use real, unsalted butter, and make sure it’s properly softened—not melted, just soft enough to give when you press it gently. That’s where the texture starts! Also, when it comes to color, trust me on this: skip the liquid food coloring. You want gel food coloring for that intense pigment that won’t thin out your floury dough. We want vibrant color saturation so those swirls really pop when baked! If you need another masterclass in dealing with buttery doughs, peep my notes over on the whipped shortbread cookies recipe.
Here is what you need to pull together a batch of these stunning cookies:
- 1 cup (227g) unsalted butter, softened
- 1 cup (200g) granulated sugar
- 1 large egg
- 1 teaspoon vanilla extract
- 3 cups (360g) all-purpose flour
- 1 teaspoon baking powder
- 1/2 teaspoon salt
- Red food coloring (gel preferred)
- Green food coloring (gel preferred)
- Optional: 1/4 cup extra sugar mixed with red and green nonpareils for rolling
Step-by-Step Instructions for Perfect Pinwheel Cookies
This is where the magic happens! For these swirl cookies recipe to work perfectly, we need to treat the dough mixture with respect so we keep all that lovely air we whip into it. Don’t worry, it’s totally manageable. I want you rolling beautiful spirals that look way more complicated than they actually are. If you want an easy guide for this entire process, I break down my favorite easy pinwheel cookies tips in depth!
Mixing the Dough Base and Coloring
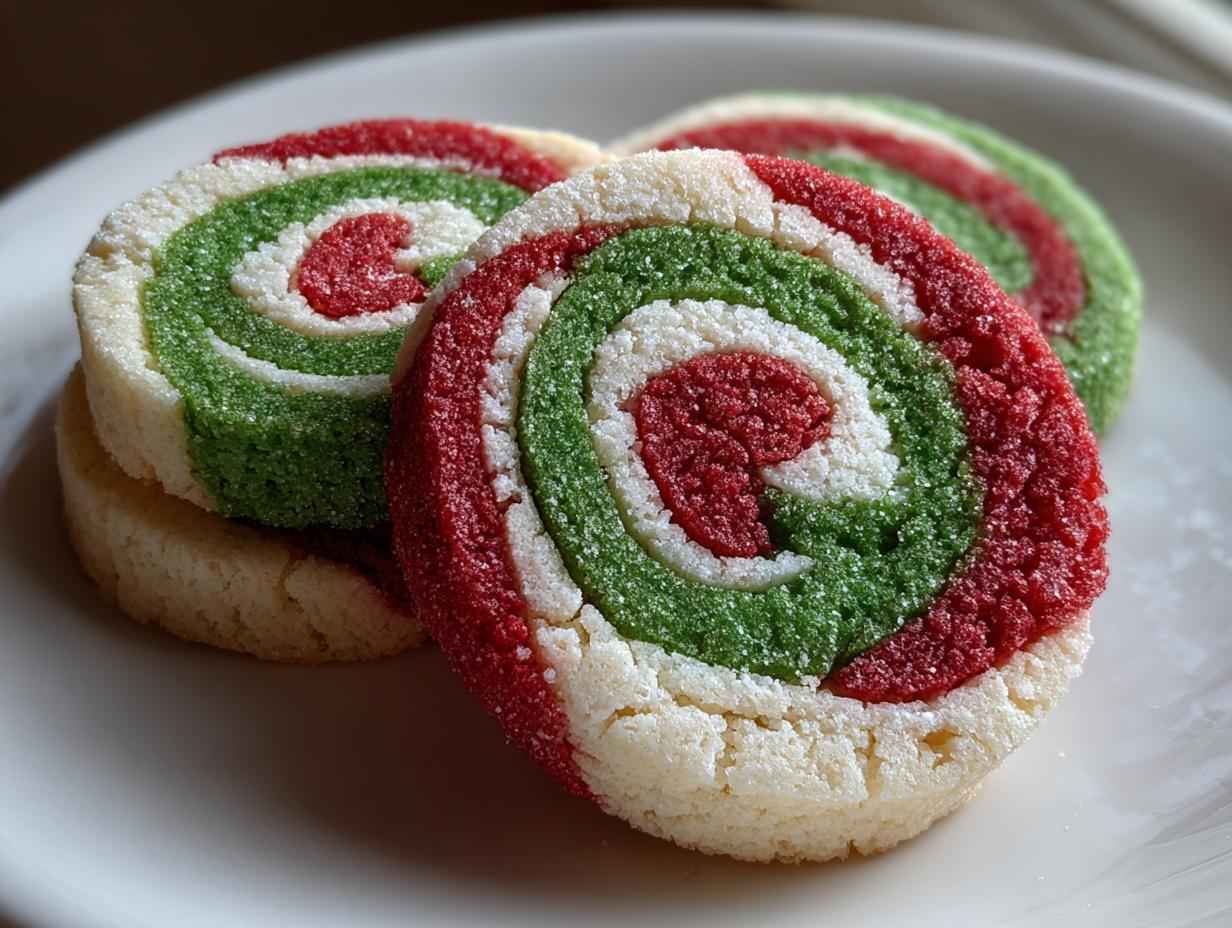
Start by creaming your butter and sugar together. You aren’t just mixing them—you’re whipping them with your mixer until they look pale yellow and super fluffy. That’s the texture we need for a tender cookie! Beat in the egg and vanilla next. Then, gradually add your flour mixture just until the dough comes together. Don’t overmix it once the flour is in! Next, grab three separate bowls. Put one third of the dough in each. Leave the first bowl plain (that’s our white base), mix red gel coloring into the second bowl, and green gel coloring into the third until they are completely uniform colors.
Rolling and Chilling Your Pinwheel Cookies Dough Log
Now for the presentation! Lay out some plastic wrap. Place the white dough down first in a rough rectangle. Then, carefully place the colored red dough right next to it, followed by the green. Gently squish the three masses together. You need to roll this combined color block really tightly into a log—I mean, squeeze that roll tight using the plastic wrap to help shape it into a perfect cylinder about two inches across. This tight roll is what guarantees those gorgeous spirals later. Once it’s wrapped, seal those ends and pop it straight into the fridge. At least two hours, friends. If you’re tempted to rush this, I promise it will spread like crazy. Cold dough is happy dough!

Baking Your Swirl Cookies Recipe
When the dough is cold and firm, preheat that oven to 375°F (190°C) and get a baking sheet lined with parchment. Unwrap your log and, using a sharp knife, slice those rounds about 1/4 inch thick. Space them out on the tray nicely; they’ll spread just a tiny bit. Bake them for 8 to 10 minutes. This is critical for those buttery spiral cookies: you watch the edges; they should look set, but poke the center lightly—it should still give just a little. They finish baking on that hot tray, so pulling them out slightly underdone keeps them soft!
Expert Tips for Stunning Festive Baking Designs
You’ve got your dough chilled—I hope you managed to keep it firm, because I once tried to slice mine after only 45 minutes because I was running late for a party, and the resulting log looked less like a beautiful spiral and more like a colorful mudslide. Lesson learned! To make sure your colorful sugar cookies really stand out as prime festive baking designs, we have to talk about color saturation.
If you want those vibrant red and green bands to truly pop against the white, you can’t skimp on the technique we mentioned during ingredient prep.
Achieving Intense Color in Your Pinwheel Cookies
This is a pro tip straight from the line cooks I worked with: always, always reach for the gel food coloring. Liquid coloring feels cheap and watery, and you have to add so much of it that you start messing up the recipe balance by adding extra liquid. Gel colors are super concentrated, so a tiny toothpick dip gives you that punchy, professional red or green without changing the consistency of your shortbread dough at all. It keeps everything perfectly buttery—no sad, smeared results for us!
Bonus tip: If you aren’t using the sprinkles, try pressing the dough log lightly into granulated sugar before you slice it. That thin layer melts just enough when baking to give you a lovely slight crunch on the edge, almost like a tiny border before you dip them in coffee later!

If you’re looking for other ways to use that vibrant color in your baking, check out how I color-code my coffee cake muffins!
Storage and Make Ahead Holiday Treats with Pinwheel Cookies
The best part about these vibrant swirls is that they are designed to be serious make ahead holiday treats. If you are baking for a huge party or just want to spread out the stress, you can absolutely put these away for later!
Once the cookies have cooled completely—and I mean totally cool, no residual warmth—you can store the finished pinwheel cookies in an airtight container at room temperature for up to five days. They actually seem to hold their buttery texture really well! But here’s the real hack: you can freeze the raw dough logs. Wrap those perfect, colored logs super tight in plastic wrap, then toss them in a freezer bag. They’re good to go for a solid three months!
When you want fresh cookies, pull the log out, let it sit on the counter for maybe 10 minutes just so it doesn’t shatter when you slice it, and pop those rounds onto the baking sheet. You’ll just need to add an extra couple of minutes to your baking time since they’re starting frozen. Easy peasy! Head over to my post on make ahead holiday treats for even more time-saving secrets!
Variations on Classic Pinwheel Cookies Recipe
Don’t feel boxed in by just red and green! While those colors are perfect for the holidays, this simple dough structure is begging for creativity. Once you master that tight roll, you can swap out flavors to make a completely new cookie. We can easily customize this recipe for any party or theme. If you’re making these year-round, I always suggest trying new color combos; maybe pale yellow and bright blue for a spring look?
You’ve seen the classic date filled cookies, but since we are using a base dough here, flavor swaps work beautifully to create new recipes. For instance, if chocolate is more your speed, you can leave one dough third white, make another black cocoa brown, and keep the last one colored. Instant Neapolitan spirals!
Creating Peppermint Swirl Cookies
If you want to pivot this recipe directly into that amazing peppermint swirl cookies vibe—which is fantastic, by the way—you just need a couple of quick switches in the base recipe. For the red dough portion, skip the vanilla extract entirely and instead, mix in about a teaspoon of high-quality peppermint extract. Don’t use too much, or it gets soapy! Then, instead of rolling the whole log in sprinkles, gently fold or lightly knead some finely crushed candy canes right into that red dough only.
The contrast of the cool peppermint with the rich butter is just heavenly. When you bake them, the little bits of candy cane melt slightly, giving you crunchy, sweet pockets of minty joy. It truly elevates this beyond your standard sugar cookie. If you enjoy that minty kick, you absolutely must check out my recipe for peppermint cheesecake; it uses that same wonderful, sharp flavor profile!
Serving Suggestions for Your Buttery Spiral Cookies
Now that you’ve got these gorgeous, perfect spirals, how do you show them off? These are truly some of the best cookie recipes for trays because the colors do all the hard work for you! When presenting these buttery spiral cookies, I try to arrange them so the colors alternate—a little red/green next to a chocolate/vanilla if you made that swap. They look great on plain white platters, letting the swirl be the star.

They pair perfectly with a simple cup of coffee or, if it’s winter, a rich mug of hot chocolate. You don’t need extra frosting or filling because the texture is spot-on straight from the oven. Just slice, bake, and admire your handiwork!
Frequently Asked Questions About Pinwheel Cookies
You’ve put in the work, you’ve chilled that dough, and now you need some last-minute assurances, right? That’s totally fair! Even mastering a reliable basic like these slice and bake cookies can bring up a few questions when things don’t turn out exactly like the picture. I’ve answered the troubleshooting questions I get asked the most when people try this swirl cookies recipe for the first time. If you used a different technique, I also have some other solid tips over in my post about easy dumpling sauce—sometimes technique is universal!
Why Are My Pinwheel Cookies Spreading Too Much?
This is almost always one of two things, and trust me, I’ve learned this the hard way! First, your butter was too soft when you creamed it. If you use melted or greasy butter, you lose all the structure needed to keep those colors packed tight instead of melting out into a puddle. Second, and this is the big one, you didn’t chill the dough long enough! If that log isn’t rock hard—like, it resists a firm poke—it will definitely spread before the fats have a chance to set in the oven. Give it those two hours minimum!
How to Get Crisp Edges on My Slice and Bake Cookies?
A slightly crisp edge contrasting with a soft center is perfection for these buttery spiral cookies. If your edges are coming out too hard or crumbly, it means you baked them too long, or you developed too much gluten in the flour. Remember what I said about avoiding over-mixing once the flour goes in? Stop mixing the second the dough just comes together. Also, try pulling them out when the edges just barely look set, even if the center looks a tiny bit soft. They firm up beautifully while cooling on the pan!
Estimated Nutritional Data for Pinwheel Cookies
Now, I always tell people here at Kitchen Slang that the nutrition label on any home-baked treat is always just a helpful guess, not gospel truth! We aren’t weighing out teaspoons of sugar with lab precision here, are we? These numbers are based on the recipe above—using standard measurements—but remember that how much butter *you* cream, or what brand of flour you use, can slightly change things.
It’s important that you know what you’re working with when you’re loading up that holiday cookie tray. These pinwheel cookies are buttery classics, so they have a bit of substance to them! It’s good to have a general benchmark for when you are planning out your day.
Here is what the estimate looks like for one glorious cookie:
- Serving Size: 1 cookie
- Calories: 145
- Fat: 7g (That’s where the flavor is, folks!)
- Carbohydrates: 19g
- Protein: 2g
Just consider these guiding numbers, okay? If you’re making flavor swaps, like using dark chocolate instead of coloring, you’ll need to run those numbers through your own calculator. If you are ever curious about dialing up the protein in your breakfasts, I have some great science-backed tips over in my post on high-protein overnight oats. But honestly, when these swap cookies recipe comes out of the oven, I’m usually not reaching for a calculator; I’m reaching for a glass of milk!
PrintClassic Christmas Pinwheel Cookies (Slice-and-Bake Swirls)

Make beautiful, buttery pinwheel cookies with striking red and green swirls using this easy slice-and-bake method. These cookies are perfect for holiday cookie exchanges and festive trays.
- Prep Time: 30 min
- Cook Time: 10 min
- Total Time: 2 hours 40 min
- Yield: About 3 dozen cookies 1x
- Category: Dessert
- Method: Baking
- Cuisine: American
- Diet: Vegetarian
Ingredients
- 1 cup (227g) unsalted butter, softened
- 1 cup (200g) granulated sugar
- 1 large egg
- 1 teaspoon vanilla extract
- 3 cups (360g) all-purpose flour
- 1 teaspoon baking powder
- 1/2 teaspoon salt
- Red food coloring (gel preferred)
- Green food coloring (gel preferred)
- Optional: 1/4 cup extra sugar mixed with red and green nonpareils for rolling
Instructions
- In a large bowl, cream together the softened butter and granulated sugar until light and fluffy. Beat in the egg and vanilla extract until combined.
- In a separate bowl, whisk together the flour, baking powder, and salt. Gradually add the dry ingredients to the wet ingredients, mixing until just combined into a soft dough.
- Divide the dough evenly into three separate bowls. Leave one bowl plain (this will be white). Add red food coloring to the second bowl and green food coloring to the third bowl. Mix each until the color is uniform.
- On plastic wrap, assemble the dough layers: place the white dough first, then the red dough next to it, and the green dough next to the red dough, forming a rough rectangle. Gently press the three colors together.
- Roll the combined dough block into a tight log, about 2 inches in diameter, using the plastic wrap to help shape it. Twist the ends of the plastic wrap to seal the log tightly.
- Chill the dough log in the refrigerator for at least 2 hours, or until firm enough to slice cleanly.
- Preheat your oven to 375°F (190°C). Line baking sheets with parchment paper.
- If using sprinkles, spread the colored nonpareils on a small plate. Unwrap the chilled dough and roll the log lightly in the sprinkles, if desired.
- Slice the dough log into rounds about 1/4 inch thick. Place the slices onto the prepared baking sheets, leaving about 2 inches between each cookie.
- Bake for 8 to 10 minutes, or until the edges are set but the centers are still slightly soft. Do not overbake.
- Let the cookies cool on the baking sheet for 5 minutes before transferring them to a wire rack to cool completely.
Notes
- For the cleanest swirls, chill the dough until it is very firm before slicing.
- If you want more defined colors, you can roll each colored dough portion into a flat rectangle before layering them together.
- These slice-and-bake cookies freeze well. Wrap the dough logs tightly and freeze for up to 3 months. Slice and bake directly from frozen, adding 1-2 minutes to the bake time.
Nutrition
- Serving Size: 1 cookie
- Calories: 145
- Sugar: 10g
- Sodium: 95mg
- Fat: 7g
- Saturated Fat: 4g
- Unsaturated Fat: 3g
- Trans Fat: 0g
- Carbohydrates: 19g
- Fiber: 0g
- Protein: 2g
- Cholesterol: 25mg